Contents
Monitoring & Configuration Tool Introduction.
1.1 Monitoring Different Entities
1.2 Monitoring Main Menu Options
2.1 Project Configuration Options
3.1 Grid Filtering for Services and Data
4.2 Docker hosted Servers and Projects
5. Application Server Instances
6.5 Generating Data Using Personas
7.2 DataGen for a Single Service
7.3 Data Generation - Seed Lists
Monitoring & Configuration Tool Introduction
The Monitoring and Configuration tool offers an ability to monitor projects as they are running, view the details for each service in a project, modify service data manually and change certain run time values in the active system depending on the project. The tool also provides the ability to create complex data sets which can be modelled on common behavioural patterns for a given system and then use these to populate instances with data - these sets are known as “persona profiles”.
This document will provide an overview of the various features of the Monitoring and Configuration Tool.
1. Monitoring Main Menu
The main view in the monitoring and configuration tool is the monitoring main menu where users can add, modify and view top level entities as well as services which have been added directly to the main menu for quick access. This section describes the various features of the Main menu.
1.1 Monitoring Different Entities
Portus EVS has a hierarchy of entities that can be monitored using the GUI:
·
Individual
Portus EVS projects
This is a Portus EVS project where stats may be returned and the run time
configuration may be modified via the GUI.
·
Application
Servers where Portus EVS projects are running
The GUI can list each of the Portus EVS projects running within an application
server and allow users to access and modify each EVS project within the
application server. This is commonly used with the Apache Tomcat Server, for
example.
·
Docker
instances running multiple Application Servers containing Portus EVS projects
The GUI will list all of the running containers on the Docker instance. It will
then facilitate the selection of any application server instance to allow drill
down to the Portus EVS projects running within the application servers and
access running Portus Servers.
·
Portus
Integrate Servers
This allows users to view details of each Portus service available within a
Portus Integrate server. Users can use this feature to add and modify the data
for the individual fields of each available service.
·
Individual
Services
Users
can add services directly to the main menu in order to quickly access
frequently used services without the need to drill down through the menu levels
in order to locate and access them.
1.2 Monitoring Main Menu Options
The monitoring menu provides a number of options at the top of the page which allow users to interact with the interface.
![]()
The function for each of these buttons are as follows.
![]()
The list of entities, personas etc. that have been added to a monitoring menu are stored on a Portus Configuration Server. The ‘Configure host/port’ option allows users to set and switch between Portus Servers which contain Monitoring and Configuration details.
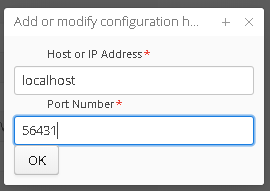
To add or change the configuration server, simply set the host and port for the Portus Configuration Server you wish to use:

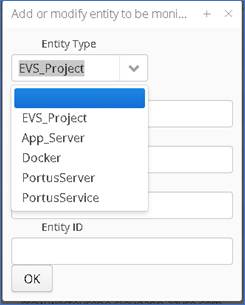
To add an entity, users can select the ‘Add’ option from the main menu, select an entity type from the dropdown menu and then fill in the connection details for that entity type:
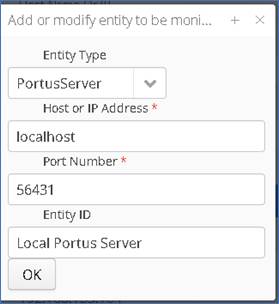
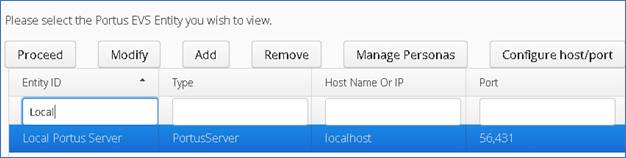
Once completed, the new Entity will be available to access or modifyfrom the main menu:
![]()
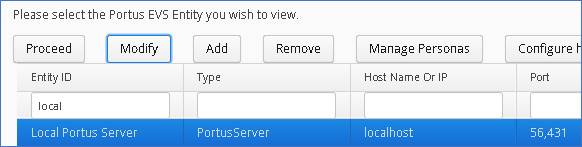
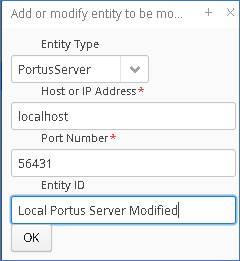
Selecting Modify while an entity is selected will allow users to modify the basic connection details for that entity. In the example below we will modify a local Portus Server Entity:
In the Modification pop up window, we change the name to Local Portus Server Modified:
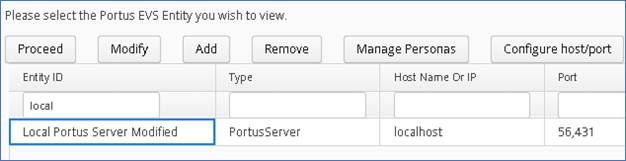
After selecting ‘OK’ to update the record, the changes are reflected in the entity record in the menu:
![]()
The ‘Proceed’ button allows users to proceed to the next screen for a selected entity. For example, selecting ‘Proceed’ while a Portus Server entity is selected will bring users to the Portus Service view, and selecting ‘Proceed’ while an EVS project is selected, will bring users to the project configuration window.
![]()
To remove an entity, highlight a record and select ‘Remove’.
![]()
Persona Profiles are managed and maintained via the Manage Persona window. This allows users to create, view and modify persona profiles. Personas are covered in detail further on in the document.
![]()
Seed Lists allow users to create their own set of data to be used in data generation. Seed List creation and use are covered further on in the document.
1.3 Monitoring Main Menu View
Below is an example of the Monitoring main menu with some different entities already added - each being a different entity type, hosted in a range of different locations. Each entry shows the basic connection details such as entity type, host and port.
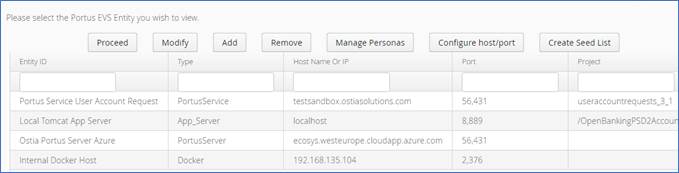
For each type of entity, users can drill down to view the details of a service or modify configuration in a project as desired.
2. Portus EVS Projects
Users can select an EVS project that has been added to the menu and select ‘Proceed’ from the menu options in order to access the project configuration and properties page.
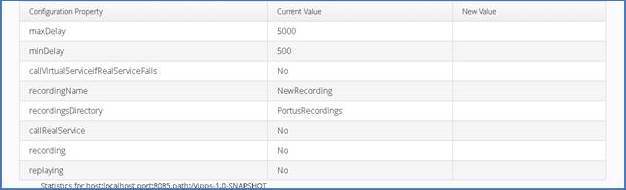
Below is an example of a configuration page for an EVS standalone project which provides a number of configuration options along with basic statistics for the selected project.
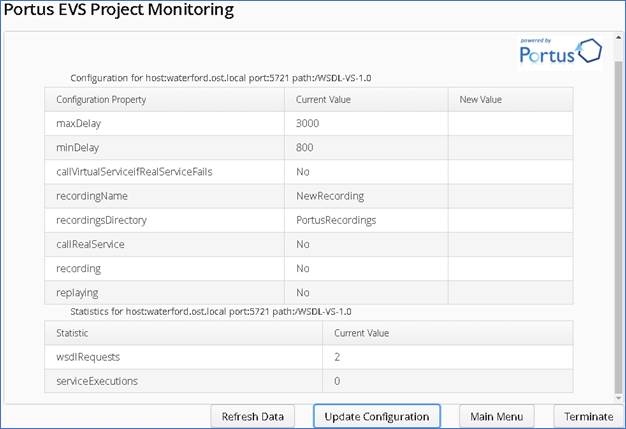
2.1 Project Configuration Options
|
Configuration Property |
Description |
Value |
|
Max Delay |
Maximum delay time for a service response. |
Milliseconds |
|
Min Delay |
Minimum delay time for a service response. |
Milliseconds |
|
callVirtualServiceIfRealServiceFails |
Send requests to the virtual service if the real service is unavailable |
Boolean – yes/no |
|
recordingName |
Specify a name for a new recording or existing recording if using playback. |
String |
|
recordingDirectory |
Specify the name where a new recording is to be stored, or the location of an existing recording if using playback. |
String |
|
callRealService |
Set project to call real service instead of virtual service. |
Boolean – yes/no |
|
Recording |
Record actions taken against service |
Boolean – yes/no |
|
Replaying |
Replay existing recording to receive recorded responses from service calls |
Boolean – yes/no |
|
Statistics – wsdlRequests |
Shows the number of requests made against service during current session |
Numeric – value represents number of calls made against a running service. |
|
Statistics – service Executions |
Shows the number of actions executed against a service |
Numeric – value represents number of executions made against a running service |
3. Portus Server and Services
Users can select a Portus Server that has been added to the menu and select ‘Proceed’ from the menu options in order to access a list of services available on the server.

A list of all available services will be presented in the next window:

3.1 Grid Filtering for Services and Data
The Monitoring and Configuration tool provides the ability to refine the records displayed for services and data based on a text search.
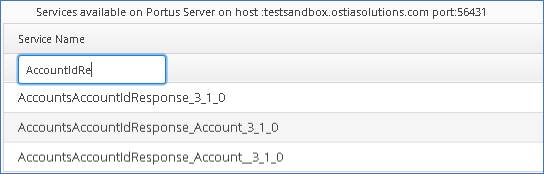
3.2 Service Filtering
Services allow for filtering-based service name, driver name and resource type, all or any combination of these filters can be used at the same time to return results that meet the criteria.

In the example below We see a list of available services on a Portus server using a service filter to only list services beginning with ‘AccountIdRe’. This can be a very useful option as Portus servers can often have an extensive list of services, often providing hundreds of different services to different independent applications all from a central hosted Portus server. This allows users to find exactly what they are looking for with just the basic service details.
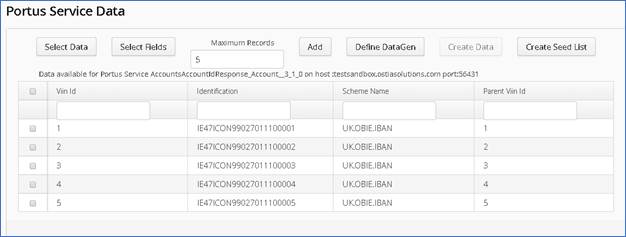
Users can select a service they wish to view or modify to access the service details. The image below shows data records for a selected service:
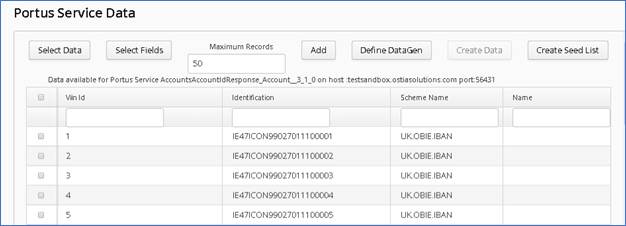
3.3 Data Filtering
As with service filtering, data filtering provides a text-based filtering option. In this case, a text-based filter will be provided for each field present in a service, and so the options available will vary depending on the service selected.

Service data can be somewhat overwhelming depending on the scope of the project, and so the monitoring tool also provides the ability to filter by number of records and fields displayed.
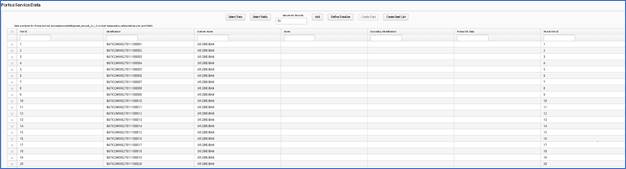
In the example below there are hundreds of records, and several fields which return null values. Although the number of records shown defaults to 50, it is still a lot to take in, and often this is not required for the task at hand:
There are a number of additional filtering options here which allow users to manage how data is presented.
To control the number of records shown, users can enter a desired number in the ‘Maximum Records’ field at the top of this page:

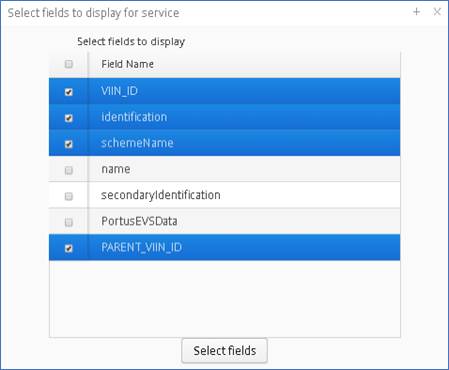
Users can choose which fields to display by using the ‘Select Fields’ option and checking / unchecking the desired fields for the record set:
After adding some filtering to show only five records, and removing a number of fields containing null values, the view now provides a much more manageable layout for handling the data:
Users can also use advanced data filtering via the ‘Select Data’ option:
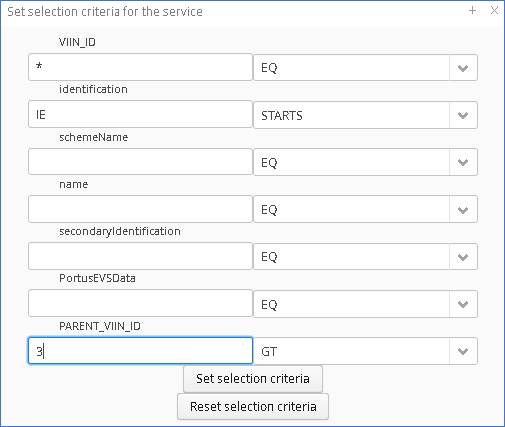
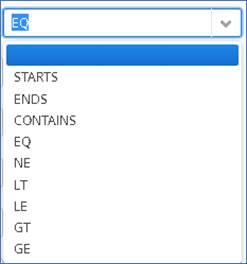
This option provides a number of comparison operators and filters allowing for much greater granularity in search filtering.
|
Starts |
Starts with value of |
|
ENDS |
Ends with value of |
|
CONTAINS |
Contains value of |
|
EQ |
Equal |
|
NE |
Not equal |
|
LT |
Less than |
|
LE |
Less than or equal |
|
GT |
Greater than |
|
GE |
Greater than or equal |
4. Docker
Containerized Portus Servers and EVS projects can be a quick and easy way to stand up a project. As this method has become increasingly popular, the Monitoring and Configuration tool now has the option to add Entire docker instances and/or docker hosted Portus Servers and Projects directly.
4.1 Docker Instances
A Docker Instance can be added to the monitoring menu in order to access all containerized Portus Servers or projects on that instance. Users will have the ability to view all running containers, but can only drill down to configuration, service and data views for Portus related entities.
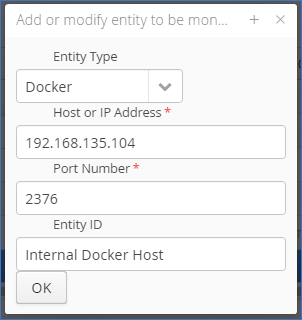
In order to achieve this, users can add the IP address or hostname of the server containing the docker instance along with the remote port value on which the Docker instance is running.
In the example below we have a server with the IP address of 192.168.135.104 running Docker on port 2376.
First, users add the connection details:
The instance then becomes available from the main menu:
![]()
Users can now drill down to view a list of all running containers for that instance:
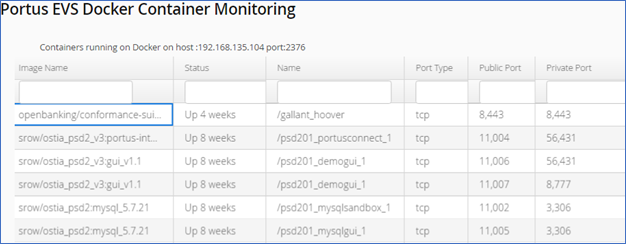
From this level, users can select a project to view the project configuration page, or a server to view the Portus services for that server.
4.2 Docker hosted Servers and Projects
Users can also add a docker hosted Portus Server or project directly to the monitoring menu using the docker host and exposed port for the hosted entity. This behaves as though the server or project were simply hosted in a remote location. Below is an entry for a Portus Server running inside a docker container with the exposed port of 11004 where the docker host IP is 192.168.135.104:
![]()
5. Application Server Instances
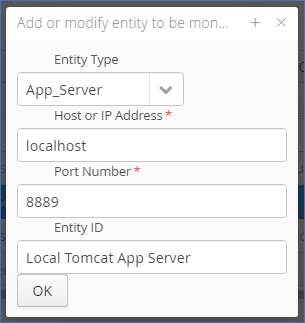
Application servers can host several Portus EVS projects at a time. Users can add an application server to the monitoring menu to view all of the projects running on that server and access the project configuration via the monitoring tool.
First, users add the connection details:
The instance then becomes available from the main menu:
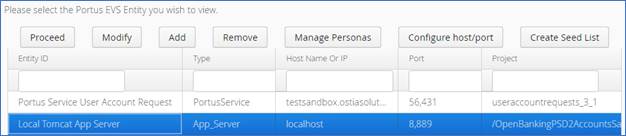
Users can now drill down to view a list of all running projects for that application server – in this case, a single EVS project:

Users can then drill down another level to access the configuration for that project:
6. Persona Profiles
Personas define a fictional profile of a typical or ideal user/customer with the aim of providing an accurate simulation of user behavioural, historical and transactional data for a given system and/or scenario. Take, for example, a bank, where a single user might have several accounts for household management, savings, credit card etc. Depending on a user’s age, marital status and income, the pattern of use may be vastly different. Persona profiles allow users to model a dataset on expected behaviour for various profiles in order to better reflect transactional data in a given system.
Personas can be accessed under the ‘Manage Personas’ Category, accessed from the main menu:

Here users can add new personas to reflect different scenarios:
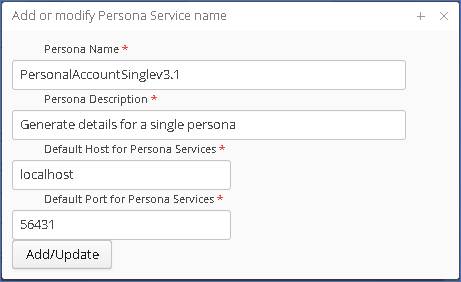
In the Manage Personas view, users can click ‘Add’ to begin creating a new profile. In the add persona window users can enter the basic details for the persona – name, description, host and port. The host and port here will be the default values for the Portus server where data is to be pushed to, but these can also be changed at the push stage.
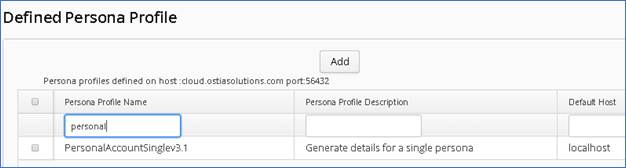
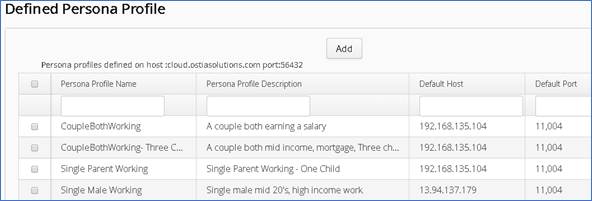
Once the basic Persona has been created, it will be available from the persona profile menu
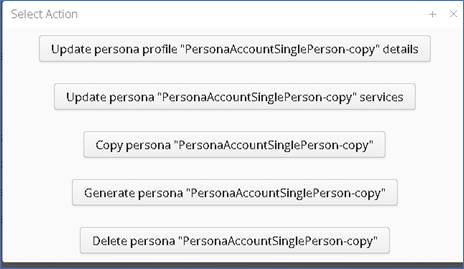
Selecting a personal profile from the menu provides a number of different actions:
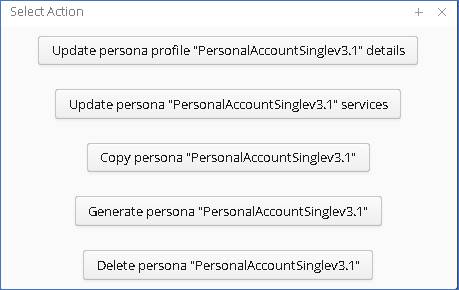
· Update Persona Profile
o Modify the basic persona details as shown in the Add window
· Update Persona services
o Add or modify the services which are used for this persona – this is covered further on in more detail
· Copy persona
o Duplicate the existing service – this will create a copy of the service with ‘- copy’ appended to the end of the persona name.
· Generate persona
o Use the selected persona profile to generate date to a chosen Portus Server – this is covered in more detail further on.
· Delete persona
o Delete the persona profile entirely.
6.1 Persona Services
Persona profiles are comprised of a number of services which are created by the user to model the persona.
To create a new persona service, users can select the persona to modify and select ‘Update Persona “persona name” Services’ from the popup menu:
![]()
This brings up the service definition window:
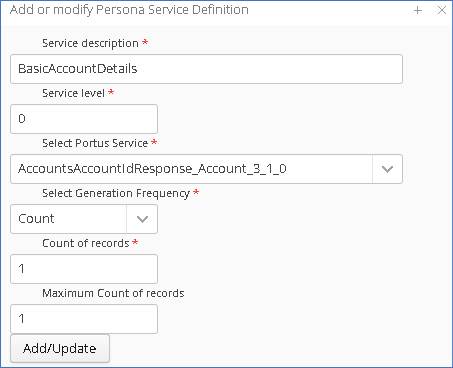
The service definition window contains a number of fields which users must set based on the project requirements and the services available.
|
Field Name |
Description |
|
Service Description |
The purpose of the service in terms of what data it will provide |
|
Service Level |
The level of this service in the data generation hierarchy relative to other services |
|
Service Name |
The service to which the data will be generated – a dropdown of available services is provided. |
|
Generation Frequency |
How often a data record will be generated during the creation phase – a dropdown of intervals is provided (hourly, daily, weekly etc.) |
|
Count of Records |
Determines how many of this type of record are generated |
|
Maximum Count of records |
If a variable number of records are to be generated, this determines the maximum number of records to be generated |
Note: if the value for Maximum Count of records is greater than or equal to the value for Count of Records then the number of records generated will be equal to the maximum value., otherwise the number of records generated will be a random amount equalling a value between count and max count.
6.2 Service level hierarchy
The service level sets the relationship between persona services and determines what data will be available to use via functions in the fields for that service. A service level of zero will only see zero tier services, whereas a service level of three will be able to see all available related services from zero to two.
6.3 Persona Service Options
Once the details for each service have been filled in, the service will appear in the ‘Defined Persona Service’ menu. Below is an example of a persona with several services defined:
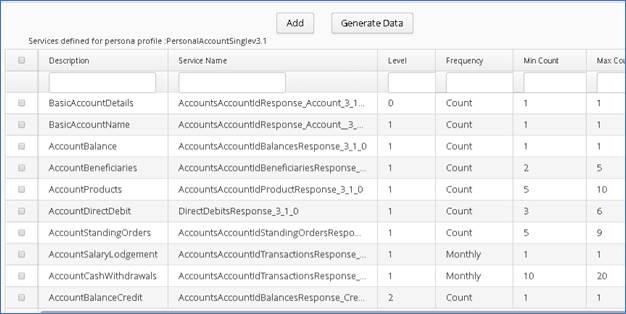
Selecting a persona service brings up a number of options:

From here users can:
· Update persona service
o Modify the basic persona service details as shown in the ‘Add’ window.
· Duplicate persona services
o Duplicate the existing service – this will create a copy of the service with ‘- copy’ appended to the end of the service name.
· Update fields for service
o Update the individual fields for the service.
· Delete service
o Delete the persona service from the profile.
6.4 Persona Service Fields
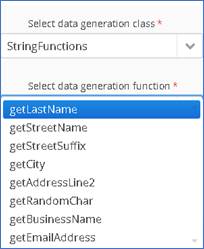
Within a defined service, users can set the data generation functions for each field via the ‘Update fields for service “<service name>” Option
![]()
For each field in a service, there is an option to select a data gen class and function. There are several classes/categories to select from with each class having several related functions that can be chosen. These are covered in detail in the DataGen section of this document.
Below is an example of some data generation rules for a single persona service:
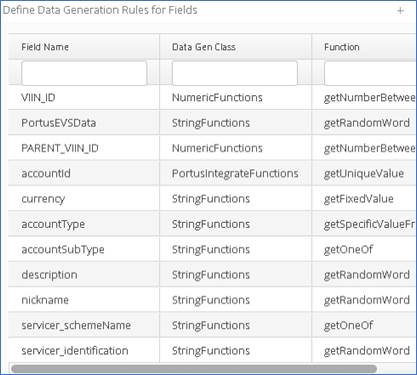
In this view, selecting a field will bring up the data generation configuration window for that field:
6.5 Generating Data Using Personas
Once a persona has been fully defined, users can populate their project or sandbox service with persona data by selecting a defined persona and choosing the Generate Option from the popup menu:
![]()
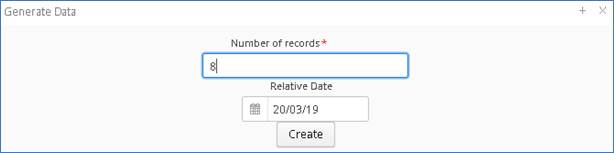
From the Generation window users can set the details for the creation of the data:
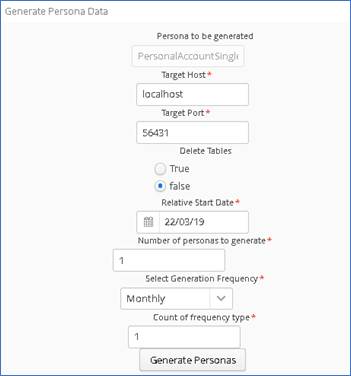
Here users can:
· Set the target host and port for the Portus Server containing the services to populate with data
· Choose to keep or delete existing records in the target service
· Set a relative data for date-based records
· Choose the number of persona records to create
· Set count and frequency for records
6.6 Duplicating Personas
Existing personas can be modified or even duplicated to allow for minor modification between similar profiles.
The persona data is held on a Portus server which can be hosted in any desired location. Users can host personas on a cloud instance for public or private use, a local server for development or even a docker image for distribution.
7. Data Generation
The Monitoring and Configuration tool provides a large number of data generation functions which allow users to populate fields with randomly generated data based on common requirements such as random strings or numbers with specified length parameters or common random words based on common requirements such as business or street names:
7.1 Data Generation functions
The following tables list and describe each data generation function and sub function available. The bolded title for each table represents a main function name with each sub function described within that table
|
Date |
|
|
Subfunction |
Description |
|
getRandomDayOfRelativeWeekWithFormat |
Returns a date based on a random day of the relative week using Java Simple Date Format provided. |
|
getDateMinMaxFromToday |
Returns a random date relative to today’s date within a set number of days specified by the min/max parameters provided. |
|
getDateBetween |
Return a random date value between two set dates specified in the parameters. |
|
getDateMinMaxFrom |
Returns a random date within a number of days specified relative to the base date provided. |
|
getRandomDayOfRelativeMonthWithFormat |
Returns the date based on a random day of the relative month using the Java Simple Date Format provided. |
|
getRandomDayOfRelativeWeek |
Returns the date based on the random day of the relative week. |
|
getDayOfRelativeWeekWithFormat |
Returns the date based on the day specified for the relative week using Java Simple Date Format provided. |
|
getDayOfRelativeWeek |
Returns a date for a specific day of the week relative to today’s date. |
|
getRandomDayOfRelativeMonth |
Returns random date of relative month based on today’s date. |
|
getDayOfRelativeMonth |
Returns date based on day provided relative to today’s date. |
|
getDayOfRelativeMonthWithFormat |
Returns date based on day provided relative to today’s date using Java Simple Date Format. |
|
Decimal |
|
|
Subfunction |
Description |
|
getNumberBetween |
Returns a random number between the min and max numbers specified. |
|
getNumberUpTo |
Returns a random number up to, but not exceeding the value specified. |
|
getFixedValue |
Returns the fixed value specified. |
|
Numeric |
|
|
Subfunction |
Description |
|
getNumberBetween |
Returns a random number between the min and max numbers specified. |
|
getNumberUpTo |
Returns a random number up to, but not exceeding the value specified. |
|
getFixedValue |
Returns the fixed value specified. |
|
PortusIntegrate |
|
|
Subfunction |
Description |
|
getValue |
Returns the value from the service and field specified in the parameters. |
|
getUniqueValue |
Returns a unique value from the service and field specified in the parameters. |
|
Record |
|
|
Subfunction |
Description |
|
getValueFromCurrentRecord |
Returns the value from a specified field for the current record. |
|
getValueFromPreviousRecord |
Returns the value from s specified field for the previous record. |
|
String |
|
|
Subfunction |
Description |
|
getBoolean |
Returns a random true or false Boolean value. |
|
getAddress |
Returns a random value for address line 1. |
|
getName |
Returns a random space separated first and last name. |
|
getUniqueId |
Returns a unique alpha numeric id string value. |
|
getNullValue |
Returns a null value. |
|
getSpecificValueFromList |
Returns a specified value from a user provided list of comma separated values. |
|
getRandomWordMinMax |
Returns a random word with length restricted by min and max character parameters. |
|
getEmailAddress |
Returns a random email address. |
|
getRandomWord |
Returns a random word. |
|
getOneOf |
Returns a random value from a list of user provided comma separated values. |
|
getFixedValue |
Returns a fixed user provided value. |
|
getFirstName |
Returns random first name. |
|
getStreetSuffix |
Returns random street suffix. |
|
getLastName |
Returns random last name. |
|
getRandomChar |
Returns a random character value. |
|
getCity |
Returns a random city name. |
|
getStreetName |
Returns a random street name. |
|
getAddressLine2 |
Returns a random value for address line 2. |
|
getBusinessName |
Returns a random business name. |
|
getRandomTextMax |
Returns random character string with maximum length restricted by max value provided. |
|
getRandomWordMax |
Returns a random word with length restricted by max parameter provided. |
|
getRandomTextMinMax |
Returns a random word with length restricted by min and max parameters provided. |
|
getRandomWordWithLength |
Returns a random word up to a specific length, or exact length if ‘exact match’ is selected. |
|
getRandomCharsMax |
Returns a random set of characters up to the specified max length. |
|
getRandomCharsMinMax |
Returns a random set of characters with length restricted by min and max parameters. |
7.2 DataGen for a Single Service
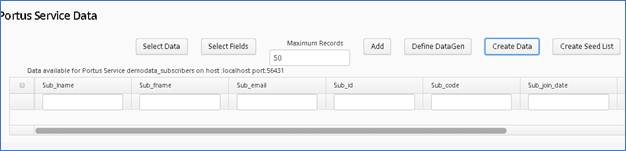
In the data view for a Portus service, users have the option to define data generation rules for that service, allowing users to create a data set based on the service fields and data requirements. Users can then populate the service with a specified number of records using this template.
From within a service view, users can select the ‘Define DataGen’ option to set up their template for data generation:

Below we see an example of a basic data generation setup for a subscriber service:
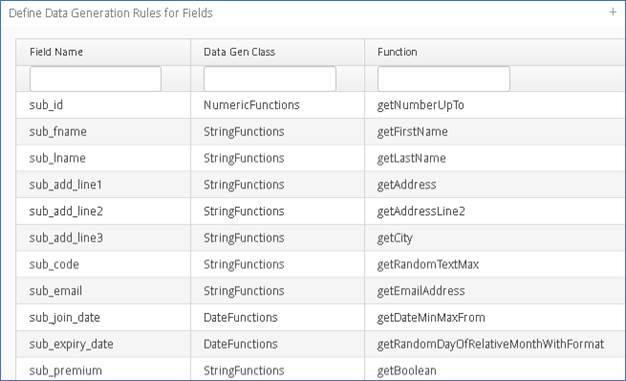
Users can modify each field to utilize the required DataGen functions as needed. See ‘Data GenerationFunctions’ for details of available functions.
Once a template has been created, users can then choose to populate the service with a specified number of records using the ‘Create Data’ option from the service data view menu:
While date records default to a relative date of when the generation occurs, users can optionally change the relative date for all date-based functions in the Generate data window:
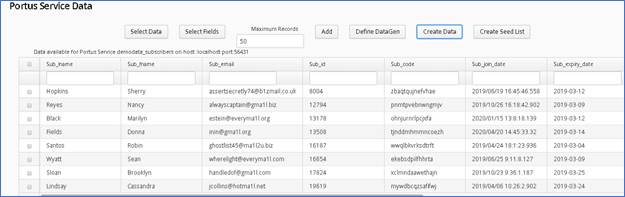
Once the data has been created, the new records can be seen in the Service Data view:
7.3 Data Generation - Seed Lists
If users find that a required basic data generation list is not available, users can create their own lists of seed data and upload this to their hosted Portus server using standard excel spreadsheets. The column headers in row 1 will represent field names, with following rows representing data for that field:

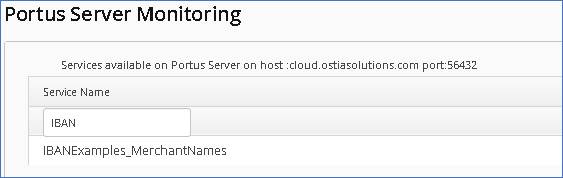
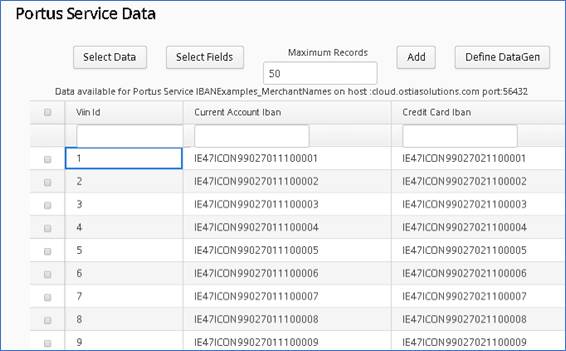
After successfully uploading a list to the Portus Server, the seed list will then be available as a Portus service which can be used to generate data. The images below show the service and data as seen in the monitoring tool:
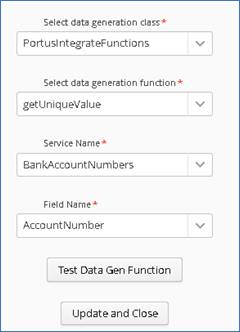
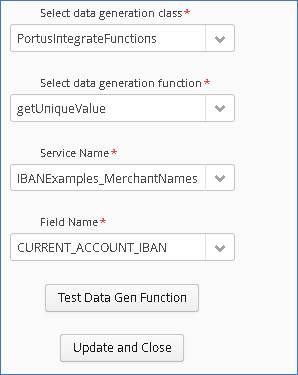
When defining DataGen rules, users can then define rules based on the new seed list by selecting PortusIntegrateFunctions as the data generation class, a sub function of getValue or getUniqueValue, selecting the service name which represents the seed list – in this example ‘IBANExamples_MesrchantNames’ and finally selecting the relevant field from which to take the values:
When data is generated into a record, the field using the new seed list will be populated with seed list data from this service
