Portus Version 2018-08-24
 

The Portus View

The Portus View lists, and allows operation on

Operations at the Server level

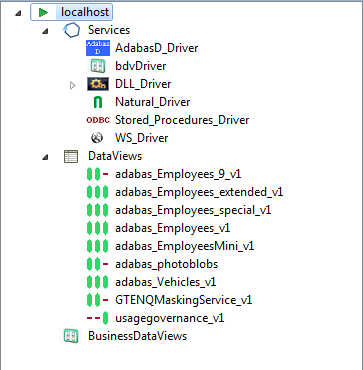
This level can be expanded to display all the Drivers defined on this Portus Server.

There are 2 ways to perform actions on a defined server.

  • Right-click a server entry and bring up the context menu.

    The context menu looks like this for a server which you are not connected to

    1. Connect to Server: Before administrative task can be carried out on a server from the Control Centre a connection needs to be established to it.
    2. Add new Portus connection: Define a new Portus server to the Control Centre
    3. Remove Connection definition: Deletes the selected entry from the Servers View.
    4. Hide this Server Hides the selected entry from the Servers View. Can be unhidden if required

    The context menu changes to the following for a server which you are connected to

    1. Refresh Configuration: When a Portus Server configuration is modified "on-the-fly", for example by modifying, adding or deleting resources, these changes are volatile, they are not preserved over a server restart. Additionally, a server configuration may have been modified by someone else. In either case, your local representation of the Portus server configuration may no longer be accurate, issue a Refresh to synchronize it by selecting the "Refresh Configuration" option on the context menu. A message will be written to the Action Log as well as the status line after the refresh operation is completed.
    2. Disconnect from Server: When many servers are defined, "inactive" servers will still be contacted when you start the Control Centre. This may take quite a while until the TCP/IP timeout is reached, so the connection to knowingly "inactive" servers can be "suspended", which will cause them to be ignored until the connection is reestablished. For disconnected servers the "Disconnect" context menu item will change to "Connect to Server".
    3. Set Credentials for Server: Set the login credentials (HTTP and SOAP User Id and password) for secured Portus servers.

      Important:

      To use HTTP credentials you must have a <Location /configurationService> directive enabled.

    4. Add driver to Server:
    5. Add new Portus connection: Define a new Portus server to the Control Centre
    6. Remove Server definition: Deletes the selected entry from the Servers View.
    7. Hide this Server Hides the selected entry from the Servers View. Can be unhidden if required.
  • Left-click the server, and use the Properties view.

    Here you can

    1. View server status, modify parameters
    2. Set tracing and message level parameters
    3. Change global settings
    4. Add or modify driver(s) used to access resources
    5. Modify Governance Settings
    6. Modify Statistical Settings
    7. Modify Messaging Settings

The Server entry can be expanded to show the sub-levels - Services, DataViews and BusinessDataViews.

Server status display / parameter modification

In this section you can modify the friendly-name, host and port that the Portus server is running on. You may also view some detailed information about the server.

To modify the Portus server entry:

  1. In the Portus Server view, left-click the server you wish to modify.
  2. Select the General tab in the Properties view
  3. Modify parameters as required, click Save.
Note: you can also view the Portus Status, and license information here too. This information is not modifable.

Modify tracing and message level options

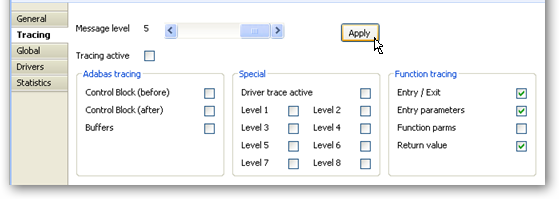
The message level set for a Portus Server determines the amount and detail of information written to the server log.

Important:

Trace options are debugging instruments which should not be modified unless instructed to do so by support personnel, continuous tracing will adversely effect the performance of the Portus Server.

To change either the message level or trace options:

  1. Select the "Tracing" tab from the Properties view
  2. Modify the message level or tracing option(s), as appropriate, click "Apply" to send the changes to the Portus Server.

Modify global settings

Global settings for the entire Portus Server can be changed here.

Important:

We recommend you contact your Portus support team before modifying these parameters.

Security Settings

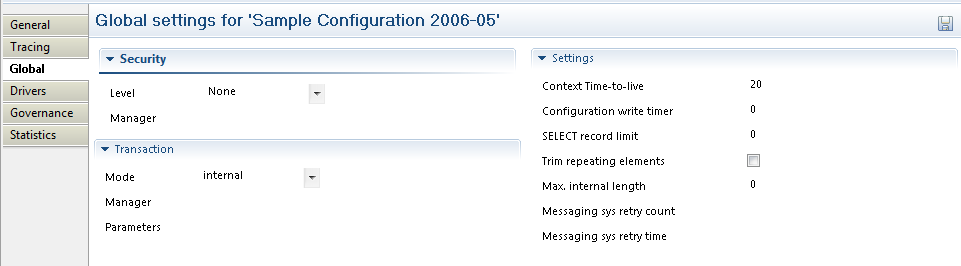
There are 4 security levels that Portus can run at

  1. None: No Portus security.
  2. Userid: All requests must have a user ID.
  3. Password: All requests must have a user ID and password.
  4. SSLCert: All requests must have a SSL Certficate.

Under normal circumstances the user will be authenticated by sending the credentials to the underlying resource ( for example the ODBC database). It is also possible to provide a 3rd party DLL which can authenticate the credentials. This DLL name should be added in the Manager text box.

Transactional Options

You can set the Transaction Manager that Portus uses to handle data integrity.

Server Settings

You can set specific options for the server

  1. Context Time-to-live: specifies the time (in seconds) after which orphaned contexts (for example due to timeouts or broken connections) will be considered "dead" and cleaned up.
  2. Configuration write timer: The in-core copy of the Portus configuration will be automatically saved to file after the specified interval (in seconds) elapsed. A value of 0 means the current configuration will never be saved back to the configuration file.
  3. Select record limit: Limit the amount of records returned from a "select" or "select next" call.
  4. Trim repeating elements. This option only applies to Natural-based web services. Repeating array elements will be trimmed based on the first empty field found. For example, if the service returns . . . <myArray>ONE</myArray><myArray>TWO</myArray><myArray/><myArray/><myArray/> . . ., when this option is turned on the output will be trimmed to . . .<myArray>ONE</myArray><myArray>TWO</myArray> . . ..
  5. Max internal length: An upper limit on the size of a field in the XRD.
  6. Messaging sys retry count: If using Portus to connect to a messaging system such as EntireX or MQ, it may be that a failure occurs attempting to connect due to a database not being started. A retry count can be set to allow the database to be started and the connection to succeed.
  7. Messaging sys retry time: This sets the time to wait until another attempt is made to connect to whatever system has initially caused the messaging system to throw an error on connection.

Add / modify drivers

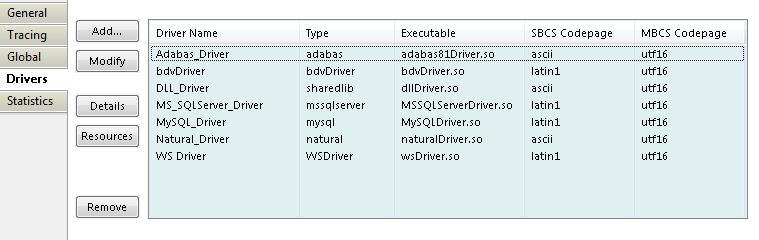
This section describes how you add/remove/modify the drivers that Portus uses to talk to the underlying resource whether that be Adabas, Natural, MySQL, PostgreSQL, etc

To open the Drivers view, left-click the server you wish to modify. In the Properties view, select the Drivers tab.

From here you can add, remove and modify drivers, or view detailed information about a particular driver.

  • You may left-click a driver entry and select Details to display more information about this driver.
  • To modify an existing driver, left-click the driver,and select Modify
  • To add a new driver, click the Add... button.

The Driver Definition Wizard presents a list of licensed drivers, select one to all and press the Configure button.

Preset values are presented , modify as appropriate.

Press the Save button to define the driver.

If the new driver does not appear, check the error log.

If the driver requires any options, you will be prompted to enter these after you click Save once, specify them as appropriate, click Save again to actually define the driver.

When "Show (post-setup) Driver Information" is selected, additional information may be displayed after the driver add operation has completed:

The following table illustrates information about all the drivers Portus supports on Linux and Windows systems

Suggested Driver Name Library Name Suggested SBCS Suggested MBCS Notes / Other Options More Info
Adabas_Driver adabasDriver.so ascii utf16 ListMaxRecords is optional  
Natural_Driver naturalDriver.so ascii utf16  
AdabasD_Driver AdabasdDriver.so latin1 utf16    
DB2_Driver DB2Driver.so latin1 utf16    
DLL_Driver dllDriver.so ascii utf16    
Echo_Driver echoDriver.so ascii utf16    
Generic_ODBC_ Driver odbcDriver.so latin1 utf16    
Sybase_Driver SybaseDriver.so latin1 utf16    
MS_SQLServer_Driver MSSQLServerDriver.so latin1 utf16    
MySQL_Driver MySQLDriver.so latin1 utf16    
Oracle_Driver OracleDriver.so latin1 utf16    
PostgreSQL_Driver PostgreSQLDriver.so latin1 utf16    
Stored_Procedures_Driver storedProcsDriver.so latin1 utf16    

And the following outlines the driver information for Portus running on mainframe (z/OS or z/VSE) systems

Suggested Name Library Name Suggested SBCS Suggested MBCS Notes / Other Options / Default values More Info
Adabas_Driver ADADRVR CP1141 utf16 ListMaxRecords is optional  
Natural_Driver NATDRVR CP1141 utf16

Natural Batch Pgm : NATBATCH

Init Params : ETID=OFF

Pre-Init Sessions : 2

Max. Sessions: 8

Natural Library Name : SYSSOA

Natural Steplibs: SYSSOAEX,SYSEXT

Natural Security: No

Note: Natural libraries are required in the Portus server STEPLIB, the Natural Batch Nucleus used MUST NOT be LE-enabled (specify LE370=NO).

CICS_Driver CICSDRVR CP1141 utf16

CICS APPLID: specify target CICS system application id

CICS EXCI library is required in the Portus steplib.

 
VSAM_Driver VSAMDRVR CP1141 utf16    
LE_Driver LEDRVR CP1141 utf16

Runtime Options: TRAP(OFF,NOSPIE),RPTOPTS(ON),RPTSTG(ON)

envMax: 50

preEnvInit: 5

 
DLL_Driver DLLDRVR CP1141 utf16    
DB2_Driver DB2DRVR CP1141 utf16    

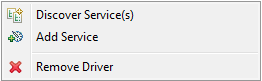
To remove an existing driver, select the driver, and click Remove

Operations at the Driver level

The following context functions are available at the driver level

  1. Discover Service(s) - This starts the Discovery Wizard which can be used to create web services.
  2. Add Service
  3. Remove Driver, which is only possible when no service exists for the driver

Add a Service

Normally Services are created using the Discovery Wizard, but it is also possible to define these manually.

Right-click the driver you wish to use to create the server with, and select Add Service

  1. Enter the name of the Service. This will have an impact on the URL used to access the WSDL, and the endpoint the service uses.
  2. The Control Centre will automatically create an "empty" DataView or BusinessDataView for you, based on the type of the driver, and will open the editor on the newly created view.
  3. A tutorial on creating a DataView from scratch is available here
  4. Once the file is saved, the (Business)DataView will be automatically exported back to the server and a XSD be generated., if the respective option is enabled
  5. Select the new service, and edit the Service Properties to suit your back-end resource.

Operations at the Service level

Further information on service related functions and topics can be found in the Service Configuration section

Operations at the DataView / BusinessDataView levels

By right-clicking on one of the items in the list, you can

  1. Import them from the server into your local workspace. Select Import ...
  2. Delete them from the server.
    Note:
    • This operation cannot be undone.
    • Deleting a (Business)DataView referenced by a service will render the referencing service unusable.

Ostia
www.ostiasolutions.com
Copyright @ 2006-2018 Ostia Software Solutions Limited.