|
|

|
|
Extended Virtual Services (EVS) Documentation Set
August 2017 |

© Ostia Software Solutions Limited 2017
Contents
1 Portus EVS Concepts and Facilities
1.1 Portus EVS Service Virtualization
1.1.2 The requirement for service virtualization.
1.1.3 Addressing the requirements
1.1.4 Solving the problem with virtual services
1.1.5 Portus EVS Server environment
1.1.6 The Portus EVS Framework environment
1.2 Portus EVS message and data generation
1.2.1 Addressing the requirements
1.2.3 Selecting the data generation function
2.1 The capabilities of a Portus EVS virtual service
2.2 The Virtual Service Project
2.3 The Portus EVS Project Created by Sandbox Generation
2.3.2 The Standard Generated Implementation
2.3.3 Generating a Comprehensive Unit test
2.4.1 Project Layout Overview:
2.4.2 Project Payloads (Except WSDL Projects)
2.4.3 payload.properties – location and use
2.4.4 Overview of payload.properties structure:
2.4.5 payloads.properties Example
2.4.6 Overview of the properties for the project:
2.4.7 <project name>. properties – location and use
2.4.8 <project name>.properties – MQ/JMS Functions.
2.4.9 <project name>.properties – MQ Example
2.4.10 <project name>.properties – REST Functions
2.4.11 <project name>.properties - REST Example
2.4.12 <project name>.properties – Sockets Functions
2.4.13 <project name>.properties – Sockets Example.
2.4.14 <project name>.properties - WSDL Example
2.4.15 Further details about files and directories within the project:
2.4.16 <project name>_mapping.xml
2.4.17 <service name>_1_0_mapping.xml
2.4.18 Java Code – src/main/java/
2.4.19 Java Code – src/test/java/
2.4.21 Portus EVS Data Service Helper Classes
2.4.22 Debugging – logback.xml
2.4.24 Building a Project using the GUI – Part 1
2.4.25 Building a Project using the GUI – Part 2
2.4.26 Building a Project using the GUI – Part 3
2.4.27 Building a Project using command line mojo
2.9 Portus EVS Monitoring and Run Time Configuration
2.9.1 Entities that can be Monitored
2.9.3 Adding Entities to the Main Menu
2.9.4 Displaying a Docker Instance
2.9.5 Displaying an Application Server Instance
2.9.6 Displaying a Portus EVS Project Instance
2.9.7 Updating a Portus EVS Project Run Time Configuration
2.10 Portus EVS Data Model Creation
2.10.3 Separation of Sandbox and Data
2.10.4 Data Types Used in the Model
2.10.5 Installation Requirements
2.10.6 EVS Data Model Installation, Components and Configuration
2.10.7 The Process to Create a Data Model
2.11 Portus EVS Project Management
2.11.2 The Portus EVS Project Management GUI
2.11.3 Providing Transport Information
2.11.6 Build or Update the Project
2.12 Common virtual service paths
2.13 Data generation capability
2.14 Hierarchy of virtual service creation
2.15 Portus EVS record and playback
3.1 Portus EVS installation types required
3.2.7 The results of the installation
3.3 Clone Environment installation
3.3.5 The results of the installation
6 Transport and protocol support
6.1.2 Recordings for HTTP services
6.1.4 Virtual service implementation call
6.2 Portus EVS WebSphere MQ transport
6.2.2 Recordings for MQ services
6.2.4 Virtual service implementation call
6.3 Portus EVS sockets transport
6.3.1 Sockets service semantic
6.3.2 Recordings for sockets services
6.3.3 Sockets service properties
6.3.4 Sockets helper functions
6.4.3 Recordings for REST services
6.4.4 Recording keys for REST services
6.4.6 Virtual Service implementation call
6.5.1 Different JMS implementations
6.5.3 JMS PTP service semantic
6.5.4 Recordings for JMS services
6.5.6 Virtual Service implementation call
7.1.1 Provided to the virtual service
7.1.2 Service configuration properties
7.2.1 Interpreting the payload
7.2.2 Provided to the virtual service
7.2.3 Service configuration properties
7.3.7 Interpreting the record data
7.3.8 Dealing with Binary Data
7.3.9 Provided to the virtual service
7.3.10 Service configuration properties
7.4.1 Interpreting the byte data
7.4.2 Provided to the virtual service
7.4.3 Service configuration properties
7.5.1 Provided to the virtual service
7.5.2 Service configuration properties
8 Additional Portus Utility Information
8.1.1 The Key Requirements for Using a Service
8.1.2 Creating a PortusServiceAPI Service
8.2 Portus IOS8583 Binary Coded Decimal API
8.3 Portus Integrate Extended API
8.3.1 The Key Requirements for Using a Service
8.3.2 Creating a PortusServiceAPISoapSoap Service
8.3.4 Providing Key Data to The Delete or List functions
8.3.5 Providing Data to The Add or Update functions
8.3.6 Providing Key Data to The Select or SelectCount functions
8.3.7 Data Returned from Select, SelectNext or List
8.4 The Portus Payload Management API
8.4.2 The Class generated for an XML or JSON Payload
8.4.3 Creating a PayloadUtils Instance
8.4.4 Using the PayloadUtils Instance
8.5 The Portus Context Management API
8.5.3 Instantiating the PortusContext Class
8.6.2 Writing to or reading from a queue
8.6.3 Initializing a Connection to a Queue Manager
8.7 TDOD – Test Data on Demand
9 Portus EVS problem determination
9.1 The virtual service wizards
9.2 Generating the virtual service project
9.3 Running the virtual service
10 Portus EVS tutorials – Manage Project GUI
10.1 Tutorial to create a MQ RAW virtual service
10.1.2 Create the virtual service
10.1.3 Importing and running the virtual service project
10.1.6 Modifying the virtual service
10.2 Tutorial to create a MQ XML virtual service
10.2.2 Create the virtual service
10.2.3 Importing and running the virtual service project
10.2.6 Modifying the virtual service
10.3 Tutorial to create a MQ JSON virtual service
10.3.2 Create the virtual service
10.3.3 Importing and running the virtual service project
10.3.6 Modifying the virtual service
10.4 Tutorial to create a MQ COBOL virtual service
10.4.2 Create the virtual service
10.4.3 Importing and running the virtual service project
10.4.6 Modifying the virtual service
10.5 Tutorial to create a MQ XML-COBOL virtual service
10.5.2 Create the virtual service
10.5.3 Importing and running the virtual service project
10.5.6 Modifying the virtual service
10.6 Tutorial to create a REST XML virtual service
10.6.2 Create the virtual service
10.6.3 Importing and running the virtual service project
10.6.6 Modifying the virtual service
10.6.7 Running the improved service
10.6.8 Calling the Modified Service
10.7 Tutorial to create a REST JSON virtual service.
10.7.2 Create the virtual service
10.7.3 Importing and running the virtual service project
10.7.6 Modifying the virtual service
10.7.7 Running the improved service
10.7.8 Calling the Modified Service
10.8 Tutorial to create a JMS RAW virtual service
10.8.2 Create the virtual service
10.8.3 Importing and running the virtual service project
10.8.6 Modifying the virtual service
10.9 Tutorial to create a JMS JSON virtual service
10.9.2 Create the virtual service
10.9.3 Importing and running the virtual service project
10.9.6 Modifying the virtual service
10.10 Tutorial to create a virtual service using a WSDL
10.10.2 Create the virtual service
10.10.3 Modifying the virtual service
10.11 Tutorial to create a SOCKETS virtual service
10.11.2 Create the virtual service
10.11.3 Importing and running the virtual service project
10.11.4 Invoking the virtual service
10.11.5 Modifying the virtual service
10.12 Tutorial to create XML records with XML Data Generation
11 Portus EVS Tutorials – Depreciated Apps
11.1 Tutorial to create a MQ COBOL virtual service
11.1.2 Create the virtual service
11.1.3 Importing and running the virtual service project
11.1.6 Modifying the virtual service
11.2 Tutorial to create a sockets virtual service
11.2.2 Create the virtual service
11.2.3 Importing and running the virtual service project
11.2.5 Invoking the virtual service
11.2.6 Modifying the virtual service
11.3 Tutorial to create a virtual service using a WSDL
11.3.2 Create the virtual service
11.3.3 Modifying the virtual service
11.4 Tutorial to create a REST JSON virtual service.
11.4.2 Create the virtual service
11.4.3 Importing and running the virtual service project
11.4.6 Modifying the virtual service
11.4.7 Running the improved service
11.4.8 Using the service with a Client
11.5 Tutorial to create a JMS JSON virtual service
11.5.2 Create the virtual service
11.5.3 Importing and running the virtual service project
11.5.6 Modifying the virtual service
11.6 Tutorial to create a JMS Raw virtual service
11.6.2 Create the virtual service
11.6.3 Importing and running the virtual service project
11.6.6 Modifying the virtual service
11.7 Tutorial to create a MQ JSON virtual service
11.7.2 Create the virtual service
11.7.3 Importing and running the virtual service project
11.7.6 Modifying the virtual service
11.8 Tutorial to create a MQ Raw virtual service
11.8.2 Create the virtual service
11.8.3 Importing and running the virtual service project
11.8.6 Modifying the virtual service
11.9 Tutorial to create a MQ XML virtual service
11.9.2 Create the virtual service
11.9.3 Importing and running the virtual service project
11.9.6 Modifying the virtual service
11.10 Tutorial to create a MQ XML COBOL virtual service
11.10.2 Create the virtual service
11.10.3 Importing and running the virtual service project
11.10.4 Modifying the virtual service
11.11 Tutorial to create a REST XML virtual service
12 Appendix 1 – Open source code
13 Appendix 2 – 3rd party code
1 Portus EVS Concepts and Facilities
1.1 Portus EVS Service Virtualization
1.1.1 Summary
Application Development and Testing in today’s interconnected world requires integration and interdependency between the applications and current and/or legacy systems.
To date Service Virtualization has been the preserve of the testing community, using mocked or record/replay technology to provide limited integration testing of applications, prior to implementation in production. The challenge with the current mocked or record/replay technology is that it is static (the recordings represent a series of simplex interactions, that when a change occurs need re-recording).
These static recordings do not simulate the complex end to end integration between applications, nor do they represent the dynamic nature of today’s integrated applications. To use these static recordings to represent a complex interconnection or automated process, across multiple systems requires hard coding and or complex configuration between the recordings, thereby creating another largely static environment, which is difficult to change. This static testing is the basis of the Service Virtualization technology provided by the current leaders in this field. Their customer’s find these static Service Virtualization technologies expensive to develop and maintain.
It is also means they are unable to ‘shift left’ to meet the expectation of agile development and their customers are also not able to meet the demands of the business for fast delivery of new applications/product to market.
Developers need a dynamic Service Virtualization environment, allowing them to use Dev/Ops agile development and continuous integration techniques to improve and integrate their applications.
Ostia Portus EVS technology delivers the dynamic Service Virtualization technology demanded by our customer’s Development and Testing teams. EVS technology builds on established record/replay technology. It extends this capability/function and is able to simulate the request/response interaction, providing a fully customizable approach to creating virtual services. Ostia Portus EVS technology:
· Uses metadata definitions and structures to create services, as a series of components, to simulate the real services, within a Java development environment.
· Uses the simulated service components and Java to integrate and build contextual services to represent the interdependency between services in an end to end environment, where the dynamic response from one service can easily be used within the request in subsequent services. This is critical in representing a complex interconnection or automated process.
The application under test thinks it’s talking to the real end to end system but is talking to simulated service(s) using the Portus EVS framework technology running on commodity hardware and software, which can be cloned as often as necessary, so test systems of this nature can be made available on demand.
The implementation of the contextual service (made up from ‘inter related’ EVS service components) is fully modifiable so that organizations can extensively customize the virtual service implementation to fully represent their end to end application or environment, where multiple different systems are involved.
The user can create a library of EVS service components (for example a Bank’s Payment/Settlement Service, Mobile Banking environment or and external services such as ‘nets’ or SWIFT), simulating each service, or a series of interrelated services. Through the EVS interface, Developers can use the EVS service components, to develop and interactively test/prove their developments to resolve issues within Development, so that final testing is more focused on validation. Testing is completed with the Developers proving their applications as they code, using the simulated end to end services.
Thereby reducing the problems with errors in Test and more importantly in Production, improving the coverage and complexity of testing, and improving overall code quality assurance. The EVS framework allows users to test edge cases like downstream failure that can be difficult to provide in a live environment, and the library of EVS service components will improve regression testing.
1.1.2 The requirement for service virtualization
Most existing and new applications being developed require links to back office services for testing. With the advent of continuous integration and agile development, the availability of such services 24/7 is now becoming a requirement, however, this is rarely possible due to the contention for access to these test systems. Often teams are limited to 3, 2 or even 1 day slots every month to test while it can also take a significant number of days to deliver the test environment. If they cannot complete their testing during that time, they must wait which causes incredible delays in releasing new or modified applications.
In other cases, test systems or applications simply are not available in the environment where testing may take place. This can occur for a number of reasons:
· Lack of access to test systems and data due to data governance restrictions (e.g. offshore development).
· No connectivity to the testing environments which can occur for offshore projects or even for on shore outsourced projects.
· Limited availability of testable systems with accurate, but anonymised data
· In agile development environments, the dependant applications required to complete testing may not exist when required or are unstable as they are being developed by another agile team.
1.1.3 Addressing the requirements
Developers and test teams need a system that can provide the precise response they need immediately, demonstrating some service side behaviour. To create an simulation of the services, a form of request/response semantic, between the application under development and other new applications and or to back office legacy applications. Some examples of the transports and protocols involved are:
· WebSphere MQ services.
· Web services.
· REST services.
· JMS services.
· Simple sockets - TCP/IP services.
· APPC services.
· And there are others.
While these transports provide the means to deliver and receive payload, the payload also may be in different formats such as:
· XML.
· JSON.
· SOAP.
· Flat records.
· EDIFACT.
· SWIFT.
· with the flexibility to add new formats.
1.1.4 Solving the problem with virtual services
Portus EVS solves the problem by simulating the request/response interaction so that the system under test thinks it’s talking to the real test system but is talking to Portus EVS running on commodity hardware and software. As this is a simulated environment it can be cloned as often as necessary, test systems of this nature can be made available on demand.
The traditional way to achieve this has been to record traffic between a system under test and the real test system. This can then be played back to the system under test which believes it is talking to the real test system. This is very useful for regression testing, however, what about the following:
· What if a request has been received that hasn’t been recorded?
· What if the real service is not available to make the recording?
· Running in the Cloud, very few organizations are likely to allow connectivity to their core test systems for recording.
· What if specific and particularly custom logic is required?
· What about data? Data governance regulation is pushing organizations more and more towards testing with synthetic data i.e. valid while not representing data for any person or organization.
· What if the service simply does not exist yet?
· What if the service is continually adapting?
Portus EVS addresses all of these requirements by supporting both the traditional record and replay implementation, through the use of the Portus EVS server implementation, while answering all of the above questions by extending the Portus EVS Server environment with the Portus EVS framework to offer unparalleled flexibility in the creation of virtual services.
1.1.5 Portus EVS Server environment
This focusses on a simple, configuration only approach to allowing the creation of virtual services. It offers the following capabilities:
· An ability to create proxy MQ and Web services that sit between the system under test and the real test system.
· Payloads are configured based on COBOL structures, WSDL definitions or XSD definitions for XML.
· This facilitates the recording of requests and responses as they flow to and from the real test service.
· These recordings may then be replayed to a system under test without the need for the real system to be available.
· This offers further capabilities as follows:
o An ability to create requests and responses based on the recorded ones thus increasing the coverage without having to record each and every request/response pair.
o An ability to mask data which can be used for testing against real services in flight or for the recording of masked datasets for use safely outside of the organization or even outside of the country.
o An ability to modify responses on the fly with external customizable routines written in PHP.
o An ability to use Portus EVS data generation capability for masking or synthetic data generation.
o Integration with common 3rd party Test Data Management toolsets.
· Finally, this technology also offers a capability to access legacy or hard to reach data sources with view to accessing and masking that data on the fly for safe use during testing.
The skills required to use this are:
· An understanding of the service transports, protocols and payloads being virtualized.
· Reasonable IT knowledge to use the GUI (training available).
The documentation for Portus EVS Server environment can be found here.
1.1.6 The Portus EVS Framework environment
This framework builds on the Portus EVS Server environment by offering a more customizable approach to creating virtual services. Its primary capabilities are as follows:
· Ability to create services using metadata definitions and structure without a requirement to access the real service.
· Service implementation is fully modifiable so that organizations can extensively customize the virtual service implementation to better represent their application or environment.
· Provides support for the virtualization of services not suitable for the recording.
· Enables contextual services to be created such that the effects of calling one service are seen in calls to subsequent services. This is critical for the simulation of a full application thus bringing the testing capability to a new level.
· Can also facilitate end to end testing where multiple different systems are involved.
· Leverages the power of the newer toolsets and technologies developers are using today.
· Fits in perfectly with any Java development methodology currently in use within an organization.
· Ideal for Cloud deployment of test environments as:
o No connectivity is required to the real service.
o All data used can be synthetic or masked thus avoiding the risk of data leaks.
· Easily enables the creation of services that don’t currently exist.
· Can be used for support to simulate user problems.
· Can be used for training as training simply requires a simulate environment.
The skills required to use this are:
· An understanding of the service transports, protocols and payloads being virtualized.
· Reasonable IT knowledge to use the GUI.
· Java programming knowledge.
· Maven knowledge.
For more information, please see Portus EVS Framework.
1.2 Portus EVS message and data generation
The Portus EVS platform contains a rich set of functionality to create synthetic data of different sorts. These can also be extended based on customer requirements or can be customized such that the customer creates their own data generation routines for specific purposes. The requirement to generate messages and data has always been around, however, with new stricter data governance regulation, there is an increasing need to be able to create schema compliant messages and data that is valid but represents no person or organization for test purposes. This includes (but is not limited) to the following:
· Creation of messages to test batch systems which are driven based on messages.
· Creation of database tables with test data for performance and scalability testing.
· Creation of rich sets of messages to test the edge conditions within applications.
· Creation of language specific messages and data to test the internationalization capability of an application.
· And there are many others.
Once available in the Portus EVS platform, the generated messages and data can be used as part of the service virtualization framework or to generate synthetic data or messages.
1.2.1 Addressing the requirements
The Portus EVS framework is building on the methodology described in the following picture:
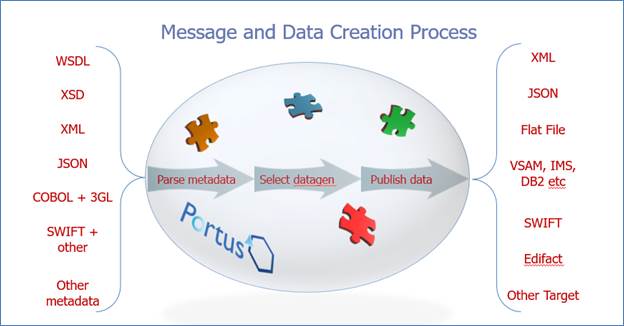
The process is as follows:
1. Portus reads metadata which describes the schema or data model to be used to create the messages or data.
2. The user configures data generation routines to be used to create data for each field or node in the metadata.
· The user decides how many sets of the data to publish and the data is then published to the target.
1.2.2 Processing the metadata
The goal is to support any set of inputs that could describe a schema, message or structured set of data can be read by the Portus tool. The following are currently in scope but others may be added in the future:
· XML Schemas (i.e. XSD files).
· COBOL Structures.
· XML Messages.
· JSON Messages.
· ODBC Database schemas.
· SWIFT Messages.
· EDIFACT Messages.
· CSV Messages.
· etc.
Portus will read the metadata and present each field in the metadata to the user defaulted to a fixed value based on the type of the field or node. Portus will also maintain relationship information that is found within the metadata such as referential integrity between database tables or relationships between XML nodes in an XML document.
1.2.3 Selecting the data generation function
For each field in the metadata, the user can then select which data generation routine is to be used to create data for the field when a message or set of data is being generated. This data generation routine will be called for each entity that is to be created based on the metadata.
Once configured, this configuration will be saved by the tool so that it can be reused or modified in the future.
1.2.4 Generating the data
The user then selects how many messages or sets of data that they wish to generate. For example:
· For XML, it is the number of XML messages of the type defined by the schema to generate.
· For JSON, it is the number of JSON messages of the type defined by the sample JSON message to generate.
· For a relational schema, it would be the number of sets of records for that schema to be generated.
· For SWIFT, it will be the number of SWIFT messages to generate.
· etc.
There are a number of targets to which this data can be written:
· Messages or flat records may be written to the file system.
· Data may be written to a relational database such as Oracle, DB2 etc.
· Data may be written to non-relational databases such as VSAM or ADABAS.
· Data may be written to a Portus Web Service wrapping some business logic written in Natural or COBOL.
· Data may be written to an MQ Queue to test that application.
1.2.5 Updating the metadata
Often the metadata for which data is being generated may have to change which is often the case as systems are being developed or improved. The following will be possible to a given base set of metadata:
· Fields may be added to the metadata.
· Fields may be removed from the metadata.
· Fields may be modified in the metadata.
· The data generation routine may be changed for a field in the metadata.
Depending on the target for the data, the following will occur:
· For messages (e.g. XML, JSON, SWIFT, EDIFACT etc.), a new set of messages will always be created.
· For ODBC compliant databases:
o Fields that are added to the metadata will have new data generated into those fields in the database.
o Fields that are modified in the metadata will have the updated value generated into those fields.
o Fields that are deleted in the metadata will be ignored but will remain on the target database unless created again from scratch.
· For non-ODBC compliant databases, the dataset must be created from scratch.
2 Portus EVS Framework
The framework is focussed on performing repeatable things well and quickly so that that the customer can focus on their actual requirement. Hence the focus is to create a virtual service that simulates how the actual service functions without the extensive complications that the real service must deal with. The framework also offers a level of control and customization that facilitates full integration with continuous integration and testing environments.
The framework consists of the following:
· A number of wizards to guide you through the creation of each type of virtual service.
· A run time environment that does the heavy lifting around transports, protocols and payload support.
· A run time environment that offers additional helper functions particularly in the area of data generation capability.
· A run time environment that is configurable on the fly and thus capable of changing based on environment conditions or dynamically based on the requirements of the test being run.
· An initial implementation of the virtual service in Java that can be adapted and customised based on the user requirements.
The creation of virtual services and their specific requirements and configuration is described in detail in various tutorials here. The following is a description of the standard elements of all virtual services created by the Portus EVS Framework.
2.1 The capabilities of a Portus EVS virtual service
There are a number of ways in which a Portus EVS virtual service may be used:
· In the simplest case and in the basic service that is created initially, the service will accept a request and return a default response depending on the metadata available.
· The virtual service may also be configured to call the real service and thus return the real response to the caller. In this mode, if the call to the real service fails, the user may configure whether the service should proceed and return a virtual response either from replay or by calling the virtual service implementation.
· Recording may be activated which will record the response returned by a service call based on keys provided by the user. These keys will indicate what values in the request should be used to identify the request uniquely. These keys are then used to create a file name to which the payload and potentially transport or protocol specific data to a recordings directory. Note that when recording is active, the response from the real, virtual or a replayed service request will be saved. When a recording already exists for a specific key, it will be overwritten.
· The service may run in replay mode. Replay mode uses the keys from the request to understand the unique filename used to record the response and determine if a response already exists. If it does, the recorded response is returned to the caller.
· In the case of a response from the virtual service implementation or from a recording, it’s possible to set a minimum and maximum delay in milliseconds. Portus will wait for a random amount of time between these values before responding to the caller thus more accurately mimicking the real service. This may also be used for non-functional testing by forcing the service to respond in a time that is out of the SLA to test how clients will react.
There are other potential uses for these services:
· The services may be used as a cache for a service. If a given service is likely to return the same result for a given request over a period of time, this response could be recorded so that from that moment on, the replay mechanism will be used to respond to the service request. The recording could then potentially be deleted after a specific period of time such that the real service is called and thus the response updated after an appropriate interval.
· If real time modification of payloads is required (e.g. for data masking) it would be possible to call a virtual service helper to allow the modification of the response form the real service.
2.2 The Virtual Service Project
When a virtual service is created, Portus creates a complete Apache Maven (build automation tool) project. That Maven project may then be imported into the Integrated Development Environment (IDE) of your choice and may then be managed, modified and deployed from there. This offers significant advantages:
· As a Maven project, it will be familiar to Java developers who use Maven extensively for development.
· It can benefit from all of the editing, helper and other functions offered by the IDE.
· It can be committed to a source control system and thus managed in exactly the same way as any other Java project.
· It can be run using the debugging capability in your IDE.
· It can use existing Java functionality available within your organization.
· Any dependencies between virtual service projects may be managed in this way also.
As the final package is an Application Server WAR file, it must then be deployed to a clone environment for usage when it has been tested locally. It can also potentially be deployed to application servers in various PaaS environments such as IBM’s Bluemix environment.
2.3 The Portus EVS Project Created by Sandbox Generation
When a Portus EVS project is created using the Portus tools, a standard structure is created with some limited additions for different types of projects.
2.3.1 The Base Project
The base project is a standard Java project, when generated and imported into Eclipse, it will look like the following:
The pom.xml file in the base directory is the standard pom file required for maven projects. Each of the directories and its contents are described in the next sections.
Note the term “<groupid>” in the following must be replaced with the Maven group id you use in your maven projects.
2.3.1.1 /src/main/java
This section will contain the packages and code created by EVS generation and can potentially be added to as the project develops:
- Package “<groupid>.generated.sv.impl” contains the java code for the project.
o VirtualServiceImpl.java (ServiceImp.java in newer projects) will be generated the first time and is the logic that will be called by the framework to create the rules for the sandbox. It is intended that this will be modified as required by the user and thus when it already exists, it will not be overwritten.
o VirtualServiceImplGenerated.java (ServiceImplGenerated.java in newer projects) will always be generated if VirtualServiceImpl.java (ServiceImp.java in newer projects) exists. This will enable you to make changes to the project as it develops and generate the base code to reflect those changes. This ‘base code’ can then be added to your real implementation and modified as appropriate.
- Package “<groupid>. servlet” contains servlet code required by the project.
o VirtualServiceServlet.java is required to get control to the appropriate point in the EVS framework and must not be modified.
It is expected that as a project develops, further code and packages will be added to this directory.
For sockets projects, the following package will also exist:
- Package “<groupid>.impl” contains helper code for the sockets project.
o VirtualServiceHelper.java is provided as part of the sockets sandbox support. If the payloads that will be received over sockets are variable, this must be modified by the developer to correctly identify to the EVS framework what length it should expect for the incoming message. Please refer to the “Portus EVS sockets transport” documentation for more information.
2.3.1.2 /src/main/resources
This section will contain resources used by the sandbox implementation:
- Directory “payloads”
o This directory will contain all of the payload meta data required for the project.
- File “payloads.properties” contains the control statements for the processing of the payloads in the payloads directory. This should only be modified if requested by Ostia support.
- File “logback.xml” contains the logging statements for the project and can be modified to assist with debugging a project.
- File “<project name>.properties”, where “<project name>” is the name of the project, contains the EVS framework properties for this project. This should only be modified if requested by Ostia support.
2.3.1.3 /src/main/webapp
This section will contain resources used by the sandbox implementation as part of the web application generation:
- File “index.html” will contain a HTML page which will be presented if the service is accessed without parameters.
- Directory “WEB-INF” will contain the web.xml file that is used to control behaviour when deployed in the application server or during testing under jetty. This must not be modified unless instructed to do so by Ostia support.
- For web services projects only, this will contain the WSDL and any imported XSDs required for the service based on the definition when the service was created.
2.3.1.4 /src/test/java
This section will contain java packages and code for testing:
- Package “<groupid>.test” contains test java code for the project.
o UnitTest.java will always be generated into the project. This is a simple test case that ensures that the service will start correctly. It does not test any of the functionality.
o TestVirtualServiceImplementation.java will only exist if the project is built with the property generateUnittest=true. Please refer to the section on comprehensive unit test generation for more details.
It is expected that as a project develops, further code and packages will be added to this directory.
2.3.2 The Standard Generated Implementation
The VirtualServiceImpl.java (ServiceImp.java in newer projects) will contain the initial skeleton code for the sandbox you wish to create. For each function required, the following will be generated:
- A Pojo (plain old java object) based on the input data format will be passed to the function.
- The code will print out each element received as part of the input message. This will provide a helpful sample of how to access the incoming elements.
- The code will then create a response Pojo based on the response data format. This will be filled out with random generated data.
- This is returned to the framework.
Note that for MQ, JMS and Sockets protocols, there will only be one function. For REST and SOAP protocols, one or more functions will be created depending on how many REST or SOAP methods the service must support.
2.3.3 Generating a Comprehensive Unit test
The framework will also optionally generate a comprehensive unit test called TestVirtualServiceImpl.ava (TestServiceImpl.java in newer projects). This is triggered by specifying the following property on the maven build:
-DgenerateUnittest=true
Note that if this is specified and the TestVirtualServiceImpl.ava (TestServiceImpl.java in newer projects) file already exists, it will _not_ be overwritten as it is likely to contain user changes.
The resulting generated code will contain code to start a version of the virtual service using jetty for test purposes, run a number of unit tests and subsequently bring the jetty service down.
In addition, this will contain the initial skeleton code to drive each function in the virtual service. For each function in the service, the following will be generated:
- A Pojo (plain old java object) based on the request data format for the function will be created.
- This will be sent to the virtual service using the appropriate protocol.
- The response will be received from the virtual service using the appropriate protocol.
- The response Pojo will be checked to ensure that each field in the response has a value (as will be filled out by the standard virtual service implementation) and if not, an assert will be triggered.
Note that for MQ, JMS and Sockets protocols, there will only be one function. For REST and SOAP protocols, one or more functions will be created depending on how many REST or SOAP methods the service must support.
The purpose for generating this comprehensive test is two folded:
1. It is intended that this can be extended to create real test cases to drive and test the real service and understand what is valid or invalid behaviour.
a. This can be used for real testing of the actual service.
b. It can also be run regularly to check for changed behaviour in the actual service which should trigger an update to the virtual service implementation. Of course, this should be flagged in advance between teams but this represents a non-human ‘sanity check’.
2. This can then be use to drive the virtual service to ensure that the virtual service is performing correctly.
a. This will ensure that when the service is built, the build will only succeed if the virtual service is performing correctly.
The default behaviour is not to generate this unit test as with any existing projects, the defaults are likely to cause the test to fail as changes will have been made in existing projects. You may force the generation of this for existing projects by specifying the option on the build.
The intention is that for newly generated projects (with the exception of Web Services project) from the GUI, this will be generated by default when the initial project is built.
Web Services projects are slightly more complex as there is already a facility to create a standard XML response for each function using configured values. In order to force the generation of the standard Virtual Service Implementation described above for a web services project, add the following option on the maven build for the project:
-DgenerateXMLResponses=false
This will also force the TestVirtualServiceImpl.ava (TestServiceImpl.java in newer projects) to be created. If you simply wish to generate the TestVirtualServiceImpl.ava (TestServiceImpl.java in newer projects), use the standard approach:
-DgenerateUnittest=true
2.4 Project Components
The EVS framework allows developers to create sandboxes quickly and easily in a few simple steps. This produces a standardised virtual service sandbox which simulates the real service based on the metadata and payloads provided. The result is a Java Maven project which can be imported into any Java IDE and expanded with additional logic as required.
EVS uses standard Java and Maven tools, and so anyone with knowledge in these areas will be confrontable working with the tool and resulting projects. In this chapter, we will cover EVS Sandbox project structure and components.
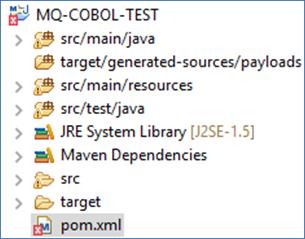
Throughout this chapter we will be using MQ-COBOL-TEST sandbox as our project example. The structure of an EVS project will be the same or similar no matter what transport or payloads are used. Differences will be highlighted when relevant.
2.4.1 Project Layout Overview:
• src/main/java contains java packages
• target/generated-sources/payloads
contains generated packages
• src/test/java contains unit tests
• src/main/resources contains project resources
2.4.2 Project Payloads (Except WSDL Projects)
During project creation, the Manage Project GUI copies all payloads and their dependencies to the src/main/resources/payloads/ directory prior to the project build process.
Internal QA process to copy all payloads and their dependencies there during automated QA runs.
These payloads are referenced during the build via payloads.properties for most projects, though COBOL payloads are referenced during runtime.
2.4.3 payload.properties – location and use
payload.properties is located in src/main/resources/. Its function is to Identify and categorize all payloads used in the project. This properties file contains two main properties:
payloadBuild.n - where ‘n’ is a sequential number from 0 to the number of payloads to be defined. Note if a number is skipped, higher numbers will not be processed.
payloadGenerateVersion=v - where ‘v’ is ‘0’ (Legacy) or ‘1’ (current)
E.g. for a COBOL project using Request.cpy and Response.cpy you will find entries such as:
payloadBuild.1=Request,COBOL,Request.cpy?<additional
params>
payloadBuild.0=Response,COBOL,Response.cpy?<additional params>
payloadGenerateVersion=1
This properties file should not be modified manually unless requested to do so by Ostia support.
2.4.4 Overview of payload.properties structure:
· payloadBuild.n=<payloadid>,<payloadformat>,<payloadfilename>
o <payloadid> unique name by which this payload is known.
§ For XSD format, this should be the name of the complex element in the payload file that this payload represents (where there are multiple within the XSD file)
· <payloadformat> the format of the payload:
o RAW: no format and no <payloadfilename> may be provided.
o XSD: <payloadfilename> contains an XML Schema.
o JSON: <payloadfilename> contains a sample json message
o JSONSCHEMA: <payloadfilename> contains a sample json schema
o COBOL: <payloadfilename> contains a COBOL structure definition
· <payloadfilename> is the name of the file in the payloads directory.
o For COBOL payloads, this also contains further processing instructions for COBOL such as the COBOL dialect, the size of the lines used and other options to deal with COBOL structures from different compilers.
2.4.5 payloads.properties Example
#Payload Properties
#Thu May 10 17:40:13 BST 2018
payloadBuild.6=PutRequestJSON,JSON,put_req.json
payloadBuild.5=PutResponseJSON,JSON,put_req.json
payloadBuild.4=RawData,RAW
payloadBuild.3=GetWeatherResponse,XSD,GetWeatherResponse.xsd
payloadBuild.2=GetWeatherRequest,XSD,GetWeatherRequest.xsd
payloadBuild.1=CPL002,COBOL,Request.cpy?codepage\=UTF-8&dialect\=FMT_INTEL&columns\=USE_LONG_LINE&org\=IO_FIXED_LENGTH&split\=SPLIT_NONE
payloadBuild.0=CPL004,COBOL,Response.cpy?codepage\=UTF-8&dialect\=FMT_INTEL&columns\=USE_LONG_LINE&org\=IO_FIXED_LENGTH&split\=SPLIT_NONE
payloadGenerateVersion=1
2.4.6 Overview of the properties for the project:
2.4.7 <project name>. properties – location and use
<project name>.properties is located in /src/main/resources/. The function of this file is to provide EVS project specific properties for the project.
Contents:
• Transport related properties (MQ queue names, JMS details etc.)
• Generic EVS behavioural properties
• Function properties depending on the property type
This properties file should not be modified manually unless
requested to do so by Ostia support.
2.4.8 <project name>.properties – MQ/JMS Functions
• function.n where ‘n’ is a sequential number from 0 to the number of functions to be defined. Note if a number is skipped, higher numbers will not be processed.
• function.n=<functionid>,<functionimpl>,<requestpid>,<responsepid>
• <functionid> unique name by which this function is known.
• <functionimpl> the name of the method in the virtualServiceImpl.java
• <requestpid> the payload id of the request to be passed to the method
• <responsepid> the payload id of the response to be returned from the method
• Note, the payload ids of the payloads referenced above related to those defined in the payload.properties file.
2.4.9 <project name>.properties – MQ Example
#Thu May 10 17:39:59 BST 2018
mqPassword=
mqUserid=
mqServiceQManager=MQ.PORTUS
mqServicePort=1414
mqServiceInputQueue=JPO.SERVICE.INPUT
mqServerConn=OSTIA.SVRCONN
mqServiceOutputQueue=JPO.SERVICE.OUTPUT
mqServiceHost=lxserver.ost.local
mqCopyMsgidToCorrelationId=No
Function.0=CobolFuncID,CobolFuncImpl,CPL002,CPL004
Function.1=XMLFuncID,XMLFuncImpl,XmlRequest,XmlResponse
mqQManager=MQ.PORTUS
mqServicePassword=
mqServiceUserid=
mqInputQueue=JPO.PROXY.INPUT
mqPort=1414
mqHost=lxserver.ost.local
mqOutputQueue=JPO.PROXY.OUTPUT
mqServiceServerConn=OSTIA.SVRCONN
2.4.10 <project name>.properties – REST Functions
• RestFunction.n where ‘n’ is a sequential number from 0 to the number of functions to be defined. Note if a number is skipped, higher numbers will not be processed.
• RestFunction.n=<REST method>,<path>,<impl>,<requestpid>,<responsepid>
– <REST Method> Method (ie GET, PUT, POST etc.) this represents
– <path> JAVA Pattern to match the URL for this request
– <impl> the name of the method in the virtualServiceImpl.java
– <requestpid> the payload id of the request to be passed to the method for POST, PUT and PATCH
– <responsepid> the payload id of the response to be returned from the method for all types except HEAD
2.4.11 <project name>.properties - REST Example
#Fri Apr 20 17:24:35 BST 2018
serviceHost=localhost
RestFunction.9=POST,^/payments/retail/domestic$,paymentsretaildomesticPOST,PaymentsretaildomesticPOSTRequest,PaymentsretaildomesticPOSTResponse201
RestFunction.8=PATCH,^/customers/individual$,customersindividualPATCH,CustomersindividualPATCHRequest,CustomersindividualPATCHResponse200
RestFunction.7=POST,^/transfers/retail/domestic$,transfersretaildomesticPOST,TransfersretaildomesticPOSTRequest,TransfersretaildomesticPOSTResponse201
RestFunction.6=PATCH,^/cards/[^/]+/[^/]+/[^/]+/actions/block$,cards_cardId__cardSequence__primaryCard_actionsblockPATCH,Cards_cardId__cardSequence__primaryCard_actionsblockPATCHRequest,Cards_cardId__cardSequence__primaryCard_actionsblockPATCHResponse200
RestFunction.5=GET,^/accounts/[^/]+/transactions$,accounts_accountNumber_transactionsGET,Accounts_accountNumber_transactionsGETResponse200
RestFunction.4=GET,^/accounts/[^/]+/balances$,accounts_accountNumber_balancesGET,Accounts_accountNumber_balancesGETResponse200
RestFunction.3=GET,^/accounts/balances$,accountsbalancesGET,AccountsbalancesGETResponse200
RestFunction.2=PATCH,^/cards/[^/]+/[^/]+/[^/]+/actions/unblock$,cards_cardId__cardSequence__primaryCard_actionsunblockPATCH,Cards_cardId__cardSequence__primaryCard_actionsunblockPATCHRequest,Cards_cardId__cardSequence__primaryCard_actionsunblockPATCHResponse200
RestFunction.1=GET,^/customers/individual$,customersindividualGET,CustomersindividualGETResponse200
RestFunction.0=POST,^/customers/individual$,customersindividualPOST,CustomersindividualPOSTRequest,CustomersindividualPOSTResponse201
restSwagger=openlayerswagger.json
servicePort=8080
2.4.12 <project name>.properties – Sockets Functions
• requestPayload is the payload id of the data to be passed to the implementation method
• responsePayload is the payload id of the data to be returned from the implementation method.
• proxyPort is the port upon which the implementation will wait to accept requests or to receive an incoming message depending on the configuration.
• requestLength is the default expected request length
• responseLength is the default expected response length from the real service when called.
• socketsInitiateSocket determines how the connection is initiated
– Connect will cause the implementation to connect to a socket and wait on a receive.
– Accept will cause the implementation to issue an accept and wait on connects before issuing a receive.
• socketsReceiveTimeout the time a receive will wait for incoming data. If this is specified as ‘0’ it will never time out.
2.4.13 <project name>.properties – Sockets Example
#Wed Jul 26 19:49:04 BST 2017
responsePayload=NETS_OUT_HDR
servicePort=2221
requestPayload=NETS_IN_HDR
serviceHost=localhost
proxyPort=52000
requestLength=632
responseLength=902
socketsInitiateSocket=Connect
socketsReceiveTimeout=0
2.4.14 <project name>.properties - WSDL Example
In the wsdl properties below wsdl = the name of the WSDL which was used to build the project
Example
#Tue Nov 07 18:06:39 GMT 2017
wsdl=CardApplicationService.svc.wsdl
2.4.15 Further details about files and directories within the project:
2.4.16 <project name>_mapping.xml
• Located in src/main/resources/
• Provides a mapping between fields in the implementation and services and fields in the data model
• Contains an entry for every class and field referenced
• If it already exists, a new xml will be saved as <project name>_mappingGenerated.xml
• Should not be modified manually unless requested to do so by Ostia support.
2.4.17 <service name>_1_0_mapping.xml
• Located in src/main/resources/
• One created for each service created as part of the data model
• Provides a mapping for each of the Portus Integrate services created during the build process
• Will be overwritten each time a build is completed
• Should not be modified manually unless requested to do so by Ostia support.
2.4.18 Java Code – src/main/java/
• Package <groupid>.generated.sv.impl
– <groupid> is the groupid used on the build
– Contains VirtualServiceImpl.java (ServiceImp.java in newer projects) which it is intended will be modified.
– VirtualServiceImplGenerated.java (ServiceImplGenerated.java in newer projects) will be generated when VirtualServiceImpl.java (ServiceImp.java in newer projects) already exists as a reference.
• Package <groupid>.servlet
– Contains VirtualServiceServlet.java to represent the transport in use
– Will also contain PatchServletClass.java for REST projects
– Should never be modified manually.
• Add helper packages
– Will not be modified by Portus EVS
– Will facilitate easier upgrading when the transports or meta data changes
2.4.19 Java Code – src/test/java/
• Package <groupid>.test
– <groupid> is the groupid used on the build
– Will contain UnitTest.java
• Generated as part of the archtype generate
• Simple unit test to ensure the project has been built correctly and will start up
• May contain TestVirtualServiceImpl.ava (TestServiceImpl.java in newer projects) which is generated when –DgenerateUnitTest=true is specified on the build.
• TestVirtualServiceImpl.ava (TestServiceImpl.java in newer projects) is a comprehensive unit test to drive each method generated as part of VirtualServiceImpl.java (ServiceImp.java in newer projects) testing the appropriate request and response payloads.
– It is intended it will be modified and/or used as a base for other tests and will not be overwritten once it already exists, instead TestVirtualServiceImplGenerated.java will be generated whenTestVirtualServiceImpl.ava ( TestServiceImpl.java in newer projects) already exists.
• Add helper packages
– Will not be modified by Portus EVS
– Will facilitate easier upgrading as new versions are created
2.4.20 Generated Java Sources
• Located in target/generated/payloads/
• One or more created for each class created as a result of the JSON or XSD mapping
• Used to map JSON/XML to POJOs and back again as part of the framework process
• Will be overwritten each time a build is completed
• Should never be modified manually.
2.4.21 Portus EVS Data Service Helper Classes
• Located in target/generated/payloads/portusCrudCode
• One generated for each service defined in the data model
• Provide capability to add, delete, update, list or get for each service mapping from or to the appropriate Java classes
• Will be overwritten each time a build is completed
• Should never be modified manually.
2.4.22 Debugging – logback.xml
• Located in src/main/resources
• Trace Portus EVS framework code with the following entry:
<logger name=“com.ostiasolutions" level=“DEBUG" additivity="false">
<appender-ref ref="STDOUT" />
</logger>
• Trace user code with the following entry:
<logger name=“<groupdid>" level=“DEBUG" additivity="false">
<appender-ref ref="STDOUT" />
</logger>
– Where ‘<groupid>’ is the group id used to create the project
2.4.23 Logback.xml - Example
<?xml version="1.0" encoding="UTF-8"?>
<!DOCTYPE xml>
<configuration>
<!-- Send debug messages to System.out -->
<appender name="STDOUT" class="ch.qos.logback.core.ConsoleAppender">
<!-- By default, encoders are assigned the type ch.qos.logback.classic.encoder.PatternLayoutEncoder -->
<encoder>
<pattern>%d{HH:mm:ss.SSS} [%thread] %-5level %logger{5} - %msg%n</pattern>
</encoder>
</appender>
<logger name=“com.ostiasolutions" level=“INFO" additivity="false">
<appender-ref ref="STDOUT" />
</logger>
<logger name="org.mycompany" level="DEBUG" additivity="false">
<appender-ref ref="STDOUT" />
</logger>
<logger name="org.sonatype" level="WARN" additivity="false">
<appender-ref ref="STDOUT" />
</logger>
<!-- By default, the level of the root level is set to DEBUG -->
<root level="INFO">
<appender-ref ref="STDOUT" />
</root>
</configuration>
2.4.24 Building a Project using the GUI – Part 1
• Collect project name and location
• Collect transport properties (e.g. MQ Queues, JMS Queues etc.)
• Collect payloads
– IDs and payload types (e.g. XSD, JSON etc.)
– Load contents (including all dependencies) into GUI
• Collect functions (For SWAGGER/WSDL this is automatic)
– Map functions to implementation names
– Identify request and response payloads (where appropriate) for each function
• Proceed to project creation
2.4.25 Building a Project using the GUI – Part 2
• Create the project using archetype generate
• Write payloads to /src/main/resources/payloads/ in the new project
• Write payloads.properties to /src/main/resources/ in the new project
• Write <project name>.properties to /src/main/resources/ in the new project
• Invoke the mojo for the appropriate transport
2.4.26 Building a Project using the GUI – Part 3
• Process the payloads
– Create classes using JAXB for XSDs
– Create classes using JSON2POJO for JSON files or JSONSCHEMAS
– No pre processing is required for COBOL structures
• Compile all the created JAVA Classes
– This is required so that the compiled classes are available
• Create VirtualServiceImpl.java (ServiceImp.java in newer projects) in src/main/java/ based on the methods defined and the request and response payloads.
• Optionally create TestVirtualServiceImpl.ava ( TestServiceImpl.java in newer projects) in src/test/java/ based on the methods defined and the request and response payloads.
• Optionally process the data model
– Create the data services and tables based on the payloads.
– Write one record to each service as a base
– Create a CRUD helper java class for each service
2.4.27 Building a Project using command line mojo
• Create the project using archetype generate
• Process the payloads
– If payloadsparms is specified, the payloads are defined with an absolute or relative file location. This causes the payloads to be written to to /src/main/resources/payloads/ in the new project and the payloads properties to be created.
– If individual request or response payloads are provided, these are then mapped to the new payload format and the files written to /src/main/resources/payloads/
– Write the payloads.properties to src/main/resources/
• Process the functions
– If functionparms is specified, the function.n properties are built in the project properties.
– Otherwise, standard request/response project properties are built
– Write the <project name>. properties to src/main/resources/
• The process can now be built in exactly the same way as the third part of the GUI process.
2.5 Project EVS configuration
With all virtual service projects created by Portus, there is fixed configuration that must live for the lifetime of that project and which cannot be changed which includes things like virtual service implementation class names and a unique name per virtual service. These configuration elements are included in the web.xml for the project as ‘init-parm’ values and these must never change.
Note that a key init-parm for Portus is the one named ‘webapp-name’ as shown below:
<init-param>
<param-name>webapp-name</param-name>
<param-value>uniquevirtualservicename</param-value>
</init-param>
This is the name used by Portus when writing configuration information or other data specific to that particular virtual service.
2.6 Service configuration
Each virtual service project created by Portus will also include configuration for the actual service itself which will depend on the transport used and the payloads being supported for that service. For each project a ‘<webapp-name>.properties’ file is created as part of the build and written to the ‘/src/main/resources’ directory in the project so that it is deployed in the package in the classpath.
When the project is first initialized in an application server container, this set of properties will be written to a new directory outside of the project with the same filename. This directory is relative to the default path active when the project is running as follows:
“../conf/portus/”
These service configuration parameters are expected to be modified potentially as the virtual service is developed and thus the configuration parameters must be modified in the “../conf/portus/” directory. The intention here is that when a project is rebuilt or redeployed, it will continue to use these service configuration parameters outside of the project.
If you wish to reset to the parameters generated into the project, simply delete the copy in the “../conf/portus/” directory and restart the application and it will rewrite the project properties to this directory.
The contents of the properties file are different depending on the transport and the payload in use and are thus described in the relevant section of this documentation where the transports and payloads are described.
2.7 Run time configuration
The ‘Run Time’ configuration is the configuration for the project which may change while the project is executing. For example, there may be a requirement to call the real service during certain times but to call the virtual service in other cases. For each project, the run time configuration default will be written to the “../conf/portus/” directory as <webapp-name>.xml.
Note that it is currently hardened to this directly only when the application is terminated gracefully.
The following table describes the run time parameters, their meaning and their potential values:
|
Configuration Parameter |
Values |
Description |
|
callRealService |
Yes/No |
Determines whether the real service will be called or not.
Default: No |
|
callVirtualServiceifRealServiceFails |
Yes/No |
Determines if the processing will continue to look for a recording (subject to configuration) or call the virtual service if the call to the real service fails. Note that ‘failure’ is a relative term as a call to the real service could return some data so from a Portus perspective that is not a failure. A failure is only considered to be when a response is not returned from the real service.
Default: No |
|
maxDelay |
Number |
This is the maximum number of milliseconds that Portus will wait before responding with a recorded response or a response from the virtual service. This must always be equal to or higher than minDelay.
Default: 2000 |
|
minDelay |
Number |
This is the minimum number of milliseconds that Portus will wait before responding with a recorded response or a response from the virtual service. This must always be equal to or lower than maxDelay.
Default: 500 |
|
recording |
Yes/No |
This dictates if recording is active or not. Note that when recording is active, any response whether from the real service, a previous recording, or from the virtual service will be recorded.
Default: No |
|
recordingName |
String |
This is the low level name of the directory into which recording files for this project will be written.
Default: newRecording |
|
recordingsDirectory |
String |
This is the high level name of the directory, concatenated with recordingName, into which recording files for this project will be written. This is intended to enable recordings from different projects to be written together without clashing due to the potential presence of a different recordingName for each virtual service.
Default: recordingsDirectory |
|
replaying |
Yes/No |
This determines whether Portus will look for a previous recording for a given request. This comes into effect if the real service is not called or, the real service is called, fails and the configuration has callVirtualServiceifRealServiceFails=Yes.
Default: No |
The run time values may be changed using the monitoring and configuration wizard accessible from the main Power User menu.
As it is exposed for each service as a simple get/set web service, the user can potentially call this web service to change run time parameters as required for automation purposes. Great case must be taken here to ensure that such changes do not result in unforeseen consequences.
2.8 Monitoring Application
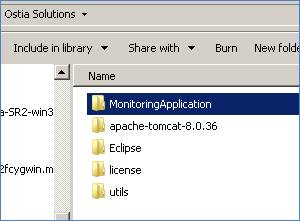
In order to monitor projects running on an application server, the monitoring application must be running on that server before connecting via the monitoring wizard. The monitoring application is provided with your installation in the in the Monitoring Application folder located in your installation directory:
To add this to your application server, simply add the monitoring-1.0.war file to the webapps (or equivalent) folder of your servlet. Ensure the application server and monitoring application are up and running before connecting via the Monitoring wizard GUI.
2.9 Portus EVS Monitoring and Run Time Configuration
The Portus EVS framework offers an ability to monitor projects as they are running and to change certain run time values in the running system. This is achieved using a Monitoring GUI available from the Portus EVS main menu screen.
2.9.1 Entities that can be Monitored
Portus EVS has a hierarchy of entities that can be monitored using the GUI:
- Individual Portus EVS projects. This is a Portus EVS project where stats may be returned and the run time configuration may be modified by the GUI.
- Application Servers where Portus EVS projects are running. The GUI can list each of the Portus EVS projects running within an application server and allow the selection of each to provide details on each EVS project within the application server.
- Dockers running multiple Application Servers with Portus EVS projects running within them. The GUI will list all of the running instances on the Docker instance. It will then facilitate the selection of any application server instance to allow drill down to the Portus EVS projects running within the application servers.
There are a number of pre-requisites which must be in place before this can be achieved:
1. For application servers, the Portus monitoring application must be running within the application server.
2. For Docker, the remote API interface must be enabled. See Official dockerd Documentation
2.9.2 Overall Concept
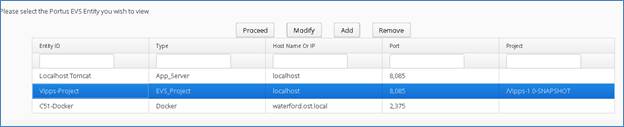
On the main menu, it’s possible to add any type of entity which can then be accessed directly from the main menu. Any entity that has been added to the main menu, may also be accessed directly using the URL available for the entity when navigated to from the main menu.
When an entity is accessed from the second level from the main menu, this _cannot_ be accessed using the URL for the entity. Consider the following example:
- A Docker instance is defined on the main menu on host <host> and port <port>.
- When selected, this will list all of the Application Server instances running on that Docker instance.
o The URL for this page can be used to directly access that page.
- You may then select an Application Server instance which will display a list of Portus EVS projects running within that Application Server Instance.
o This page may _not_ be accessed directly with the URL for this page.
o You will find a button to enable you to return to the previous Docker display on this page.
- You may further select an individual Portus EVS project from this page to show the configuration and statistics for that particular project.
o This page may _not_ be accessed directly with the URL for this page.
o You will find a button to enable you to return to the previous Application Server display on this page.
o You will also find a button to enable you to return to the previous Docker display on this page.
There are some other considerations here:
- If an Application Server is defined and accessed from the main menu:
o The URL for this page can be used to directly access that page.
o You will only see a button to allow you to return to the main menu when the Application Server is accessed in this way.
o If a Portus EVS project is selected from this page
§ You will see a button enabling you to return to the Application Server page.
- If Portus EVS project is defined and accessed from the main menu:
o The URL for this page can be used to directly access that page.
o You will only see a button to allow you to return to the main menu when the Portus EVS project is accessed in this way.
2.9.3 Adding Entities to the Main Menu
The following sections describe the process of adding projects, servers and Docker instances to monitor via the monitoring tool.
2.9.4 Displaying a Docker Instance
From the main Monitoring menu, select the ‘Add’ button:
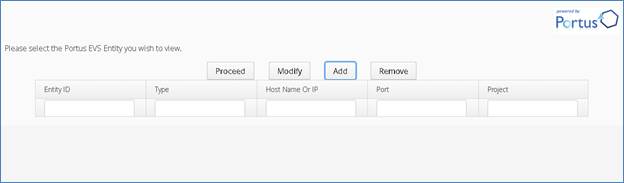
Select the type of entity you want to monitor, in this example we will select Docker:
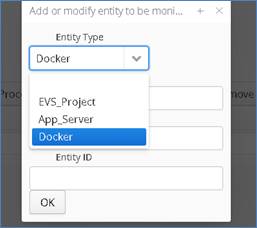
Fill in:
- Hostname – The machine where your Docker is running
- Port – The port on which your Docker remote API is listening.
- Entity ID – A unique name you give to this monitoring entry. (This will default to the host and IP address concatenated with the Portus Project where appropriate.)
Example of filled out Monitoring form:
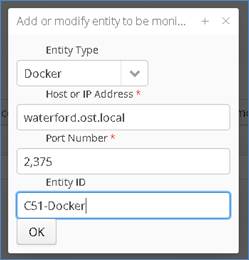
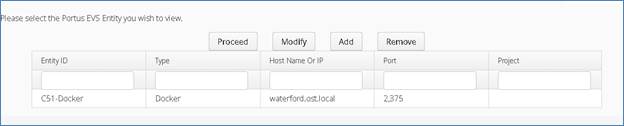
Hit ‘OK’ and the new entry will appear in the menu list:
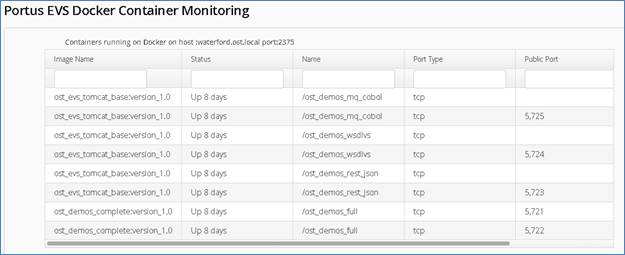
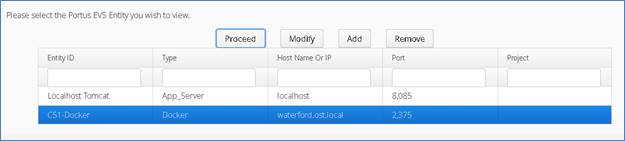
Once an entity has been added, you can select it and hit ‘Proceed’ (or double click on the item) to drill down to the entity details. In the following screenshot, we can see this Docker instance runs a number containers hosting various EVS projects. We can see the base image name from which the container was created, the running status, port type and the public port on which the container is listening:
From here, you can select an individual container to see the details, in the following shot we see the demos_mq_cobol container is hosting a single project – MQ-COBOL-VS-1.0.

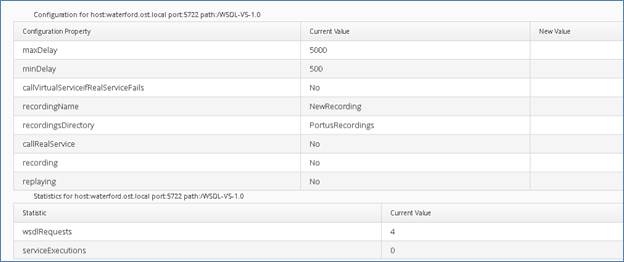
You can then select this project to view configuration details. The configuration page is covered in more detail later on in this document:
2.9.5 Displaying an Application Server Instance
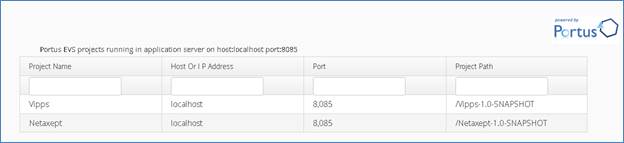
From the main menu, select the ‘Add’ button and choose ‘App_Server’ entity type from the dropdown list. Fill in the details for your app server, in this case we have a tomcat running on port 8085 of a local machine and have given it the Entity ID of Localhost Tomcat
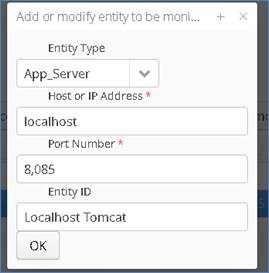
Hit ‘OK’ and the new App Server will appear in the menu list:
You can then select the app server entry and click ‘Proceed’ (or double click on the entry) to view the projects on the Server:
Select a project to view configuration options:
2.9.6 Displaying a Portus EVS Project Instance
From the main menu, click the ‘Add’ button and enter the required details:
- Select ‘EVS_Project’ as the entity type from the dropdown list
- Enter the hostname or IP for the machine where the project is running
- Enter the port number the project is listening on – in this example our project is running in a local tomcat configured to use port 8085
- Enter the EVS Project name. Depending on your application version, you may need to enter a forward slash before the project name to correctly pick it up.
- Give your project a unique Entity ID
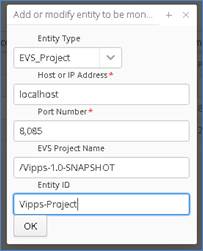
Click OK once these details have been added, and the Project will appear on the menu list:
Select one of the listed Projects and click ‘Proceed’ (or double click on the entry) to view configuration options for that project.
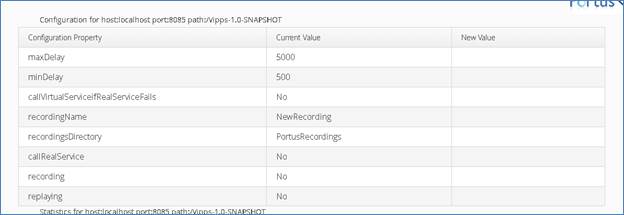
2.9.7 Updating a Portus EVS Project Run Time Configuration
From the Portus EVS project page, you may click on a configuration item and you will be offered the ability to modify the value for that configuration item. This can be done as follows:
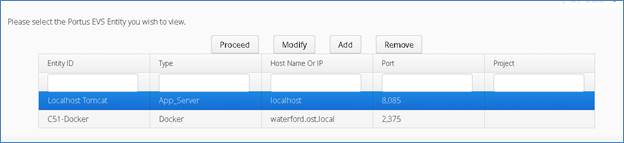
Select an Entity and click ‘Proceed’:
Select an Item from the list, in this case, a Docker container, click once to view the projects running in this container:

Select a project from the list, click once to view configuration options:

The configuration options for the selected project are displayed:
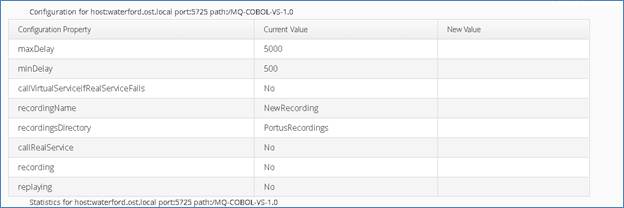
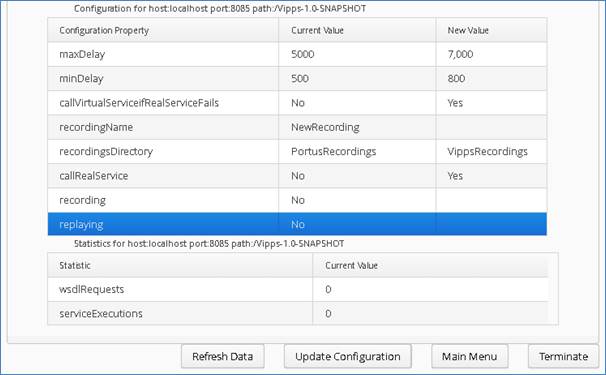
Select a configuration to modify and update the values, here we are changing the max delay to 8,000:
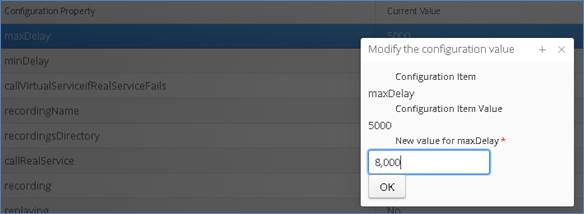
Click ‘OK’ to apply the changes, and the new value will now be reflected in the configuration options window alongside the original value:

Once modified, the new value will be shown in the right column. You may select and change multiple configuration items in the same way. If you wish to confirm the updates, hit the ‘update’ button and the configuration will be updated if changes are made. If you wish to remove the proposed configuration changes, simply hit the ‘refresh’ button and the page will revert to the existing project configuration.
At the bottom of the Configuration Options page, users can view the number of requests and executions that have been performed on a selected service:

2.10 Portus EVS Data Model Creation
The creation of sandboxes and test environments alone is really only part of the story required in a test environment. A critical part of the testing environment is access to a data model that can be easily traversed along with data that can be used for testing. Having isolated test data is never more important than today with the advent of the GDPR regulation in Europe. Portus EVS is perfectly placed to manage this requirement.
2.10.1 Background
In the vast majority of cases, the ‘data model’ as it stands in the existing systems has evolved rather than having been designed from the start. This has resulted in many anomalies in data, a lot of duplication and data structures that are sometimes difficult to understand. In the real test environments, a lot of effort is required to replicate this ‘model’ for good reason; it must correctly represent the production environment.
Portus EVS simulates back office services and therefore accepts and delivers data from this model to the applications under test, however, this does not mean it must replicate this model. Once the data being presented to the applications and the formats are correct, the front end applications don’t need to understand or know about the back office model. In fact it makes no sense to replicate this in a simulated environment.
For this reason, Portus EVS takes a much more pragmatic approach creating a data model based on the payloads in the messages sent to and received from simulated applications. This results in a much cleaner and simpler to understand data model for testing and means that test data can more easily be created from synthetic data sources thus fully complying with GDPR and internal data governance rules and regulations.
2.10.2 How does it work?
Portus EVS is uniquely positioned to create this model when building simulations and sandboxes for organizations. In all cases, Portus EVS is given the Meta data for the messages that are sent to a simulated application and the Meta data received from a simulated application. This Meta data has the following information:
- The individual fields or ‘pieces of data’ that make up the requests and responses.
- The relationships between those fields within each request response.
- The relationship between the fields in the requests and the responses.
- The relationship between request and response fields between different application calls.
This enables Portus EVS to gather related fields together from requests and responses and to use Portus Connect to create services backed by database tables to hold data related to requests and responses. As part of the initial setup, a single record with random data is added for each service. Once created, the Portus Monitoring and Configuration GUI can be used to access the data using those services and to add, update or delete that data as required using a GUI.
For larger amounts of data, Excel spreadsheets may be used to upload data directly to the tables backing up the Portus Connect services.
The standard skeletons for each simulated service is then designed to call into Portus EVS to get at the data required. When Portus Connect has been configured in the run time, the data will be retrieved from the data services created as part of the data model. When not configured, the skeleton will simply return random data as before.
2.10.3 Separation of Sandbox and Data
A key element of the implementation of the data model in Portus EVS is that there is a clear separation of the sandboxes, where the code resides and runs, and the data services. This is intentional as depending on the testing required, there is a requirement to adopt different configurations. For example:
- If the sandbox is being used for intensive development, it is likely that it is safer and better practice for the developer to have a standalone sandbox with a standalone set of data services. Thus the developer can only screw their own environment up and nothing is shared.
- In a CI environment, it is likely that a consistent set of data services with a consistent state is required to avoid CI processes and test falling over due to inconsistent data.
- In an integrated environment, the requirement for stability and related data is more acute.
Portus EVS achieves this goal by enabling the configuration of which Portus Connect server to use for a given instance of a sandbox.
2.10.4 Data Types Used in the Model
The model uses strictly the string data type with a view to ensuring that any type of testing is possible whether the data exists or not, whether it is valid data or not so that any type of negative test may be created using the data.
2.10.5 Installation Requirements
The installation requirements are as follows:
1. A licensed Portus Connect server must be installed with a MySQL Driver
2. A MySQL Database to hold the service data
3. A MySQL ODBC connection must be set up with the connection name ‘PortusData’ to the database to be used to back up the data services.
2.10.6 EVS Data Model Installation, Components and Configuration
This section will cover the components and configuration required to support EVS Data Model Creation.
2.10.6.1 Update EVS GUIs
Ensure you have the latest EVS GUIs deployed into your Tomcat webapps folder
The latest versions can be downloaded from the Ostia Artifactory repository:
Remove the timestamps from the war files and replace the existing version of these files in the Tomcat webapps folder of your EVS installation with these latest versions.
2.10.6.2 Install Portus Connect
Note: Portus Connect Server installation and updates will require a Portus Connect License.
Download Portus Connect Control Centre:
http://cloud.ostiasolutions.com/eclipse37/windows/Portus-431-Win64.zip
Extract the archive to your preferred location (separate to the EVS installation) and follow section 1.1 – 2.1 of the linked instructions to install the Portus Server and configure the required MySQL driver:
http://cloud.ostiasolutions.com/portal/Portus-Guides/guides.html
You may also follow this installation video for Portus Connect if preferred: https://youtu.be/fFX8bApXRhE
2.10.6.3 MySQL Installation
It is recommended to install the MySQL Workbench to simplify configuration and interaction with the MySQL Server, however, this is not required if you are comfortable configuring and using MySQL from the command line.
Download the MySQL Installer: https://dev.mysql.com/downloads/file/?id=474802
Select the custom installation option:
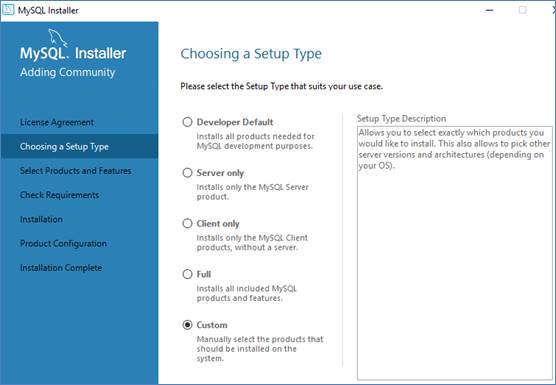
Select the following options, we require the 32bit ODBC connector for Portus-Connect:
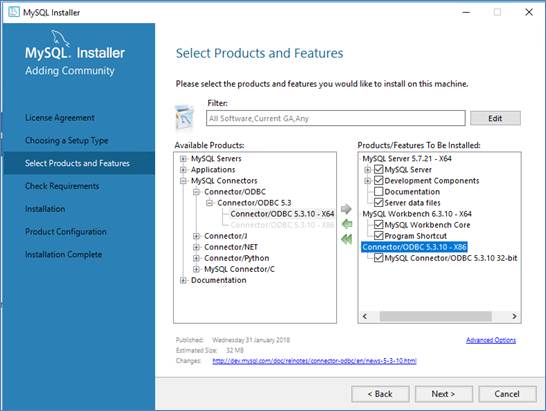
Install the selected elements as instructed by the MySQL Installer and install any required dependencies highlighted during the install:
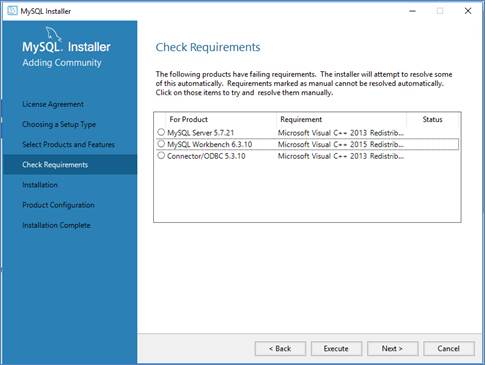
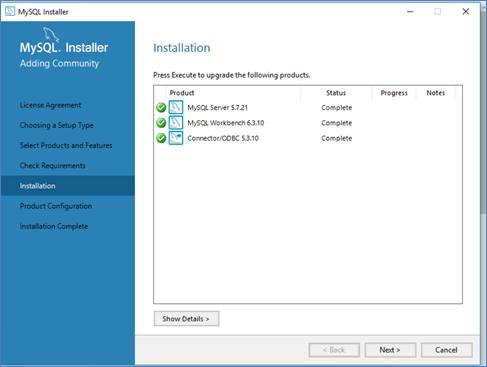
Use the default for configuration:
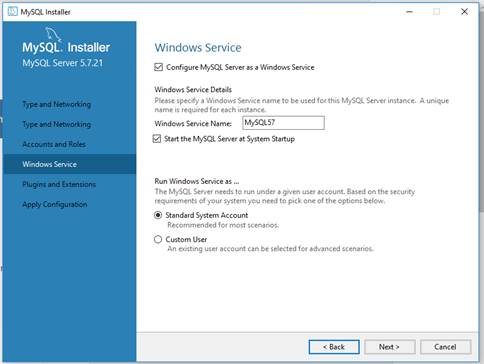
MySQL should now be installed.
2.10.6.4 Create the portusdata Schema
In MySQL, create an empty database called portusdata:
Open the MySQL workbench and select the default local instance:
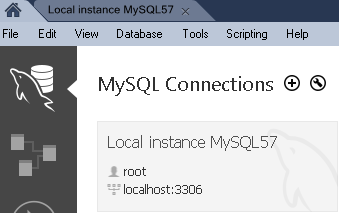
In the white space of the navigator window to the left-hand side of the screen, right click and select ‘Create Schema’ from the context menu:
Name the new schema ‘portusdata’.
2.10.6.5 ODBC Connection Configuration
Run the 32bit Data Source Admin tool:
Create a 32bit MySQL connection under the System DSN tab and name it PortusData. Fill in the connection details, selecting the portusdata schema as the default database – note that the capitalisation in PortusData is important:
Save and close the connector window on success.
2.10.7 The Process to Create a Data Model
Before using the Data Model feature, please take note of the first point below regarding the SoapUI Proxy – certain proxy settings may cause unexpected behaviour.
2.10.7.1 SoapUI Proxy
EVS uses some SoapUI functionality when creating the Data Model. If you have a SoapUI Client installed on your system, ensure that the SoapUI Proxy is turned off during Data Model creation
2.10.7.2 Create the Base Sandbox
Build the sandbox project using the Portus EVS GUI providing the appropriate transport and payload information.
2.10.7.3 Create the Base Data Model
This is done as an additional step of the GUI process to create the sandbox. Once the sandbox has been created, the configuration for the Portus Connect server must be provided. This consists of:
- The host on which the Portus Connect server is running.
- The port on which the Portus Connect service is listening.
- A setting to determine if existing services and tables found will be deleted. This can avoid overwriting existing data that has been created.
- An optional userid for the Portus Connect server if required.
- An optional password for the userid if required.
Once this has been configured. The simple click of a button will result in the data services being created.
2.10.7.4 Review and Modify Initial Data
Using the Portus Monitoring and Configuration GUI, the newly created data services may be viewed and the data for each reviewed. The GUI allows the updating, addition and deletion of data for each service to prepare for initial basic testing using the sandbox.
2.10.7.5 Start the Sandbox and Update the Configuration
The sandbox created must be started. It will by default not use the data services. Using the Portus EVS Monitoring and Configuration GUI, the configuration for the sandbox may be modified to set this up. The configuration parameters ‘dataHost’ and ‘dataPort’ must be provided to provide details of where the Portus Connect server to use is running.
2.10.7.6 Verify Operation
Once the sandbox has been started and configured, the sandbox may be called and the data returned to each request reviewed to ensure it is coming from the data services.
A second verification that is useful for simulated services is for those services that can return multiple sets of data is to find the data services related to those and to add further records. Without any further action, the next time the service is called, the extra data sets will be presented showing the new data added.
2.10.7.7 Next Steps
The next steps will involve fleshing out the sort of test cases that your developers and testers need available. This could be done by giving them access to the GUI to set up data for the service or providing an Excel spreadsheet to be filled out with the data required by the developer or tester for their particular project.
An additional step would be to further improve the sandbox by including rules to gradually ensure the sandbox correctly simulates what the real system being simulated does.
Note: In order to write the configuration to retain the details for the datahost and dataport among other configuration changes, it is required to terminate the project cleanly. For example, using jetty:stop to terminate a project running with jetty.
2.11 Portus EVS Project Management
Portus EVS is a framework that creates and maintains Maven projects which implement the functionality required in the sandboxes. These projects can be stand alone or may be sub projects of a larger project. In order to create or update the projects, a GUI is provided to initially create the project and to make changes to the project after it has been created.
2.11.1 Project Structure
Portus EVS projects are like any other Maven project and if your organization already has a standard for the structure of your project, this can and should be used to manage Portus EVS projects. It is important to have a well-defined project structure that is controlled for a number of reasons:
- It is simplest if these structures are used to commit changes to your source control system such as SVN or CVS.
- It will ensure that related sub-projects are managed and maintained in a uniform way.
- It will help with versioning of the projects.
- It will help with backup and recovery of projects.
As each Maven project is simply a directory with a fixed structure on the file system, Ostia recommend that projects are collected into related sets of sub projects. For example, if you are creating a Payments sandbox and a sandbox for your PSD2 APIs, you might consider the following structure:
./projects/payments
./projects/PSD2
As each sandbox may be made up of multiple Maven sub projects, these projects may be added to the appropriate directory above. If there is a desire to build the entire sandbox in one go, a ‘master’ pom file can be added to the higher level directory (e.g. /projects/payments/pom.xml) which can reference the sub projects and ensure they are all built together. It can also be used to ensure that the sub projects are using consistent versions of software on which they are dependent by declaring these as dependencies in the parent pom rather than in the project pom.
2.11.2 The Portus EVS Project Management GUI
When you start the GUI, you will be presented with a menu as follows:
The first thing you must do is select the directory in which you wish to work. This can be done by clicking on the ‘Select project directory’ button where you will be shown a tree structure that will enable you to select the project directory in which you wish to work as can be seen in the following screenshots:
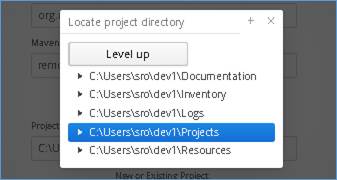
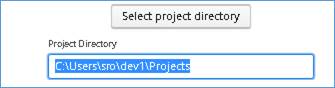
Once selected, you can elect to create a new project or select an existing project.
To select a new project, you must provide the name of the project and the nature of the transport or protocol it will use as this will determine how you will progress through the wizard.
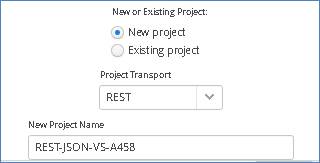
To select an existing project, check the ‘Existing project’ radio button, then hit the ‘Select existing project’ button and you will be presented with a list of Portus EVS projects in your selected directory. You can then select the one you wish to modify.
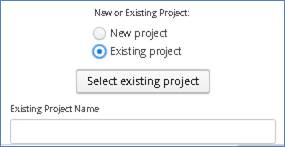
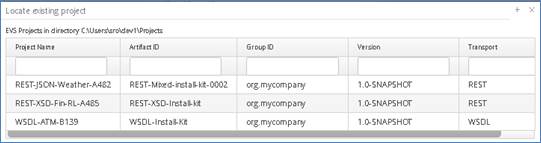
Once a new or existing project has been selected, you simply progress through the GUI using the ‘Next’ button on the bottom of your screen. As you move through the process, for existing projects the current definitions can be seen and modified. For new projects, you must provide the information required.
The wizard has a standard flow as follows:
1. You must provide the information for the transport or protocol selected. For example, for MQ, the queue manager and queue names must be provided, for REST the original host and port must be provided and so on.
2. You must provide the payloads that will be used in your project. For example, if you will receive JSON messages, you must provide JSON models for those messages, for XML messages, you must provide XSD definitions, for COBOL messages, you must provide COBOL structures and so on.
3. You must provide the methods that will be available in the project and the payloads they will receive and return. For MQ, Sockets and JMS, there is one method and thus you must provide the request and response message formats based on the defined payloads. For REST and WSDL, there will be normally more than one method.
4. You will then be presented with the ability to build or update the project which is the final step.
These are described in more detail in the following sections:
2.11.3 Providing Transport Information
This is where the transport or protocol specific information for each type of web service is provided. The information will be different depending on the format.
2.11.3.1 REST
The following screen will be presented:
- Set Host or IP where the real service is running. (While this is required, it will not be used unless the real service must be called.)
- Set the Port where the service is listening. (As above)
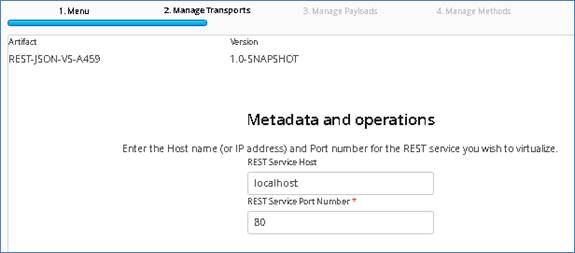
2.11.3.2 JMS
The following screen will be presented; add your JMS Queue Manager details as required:
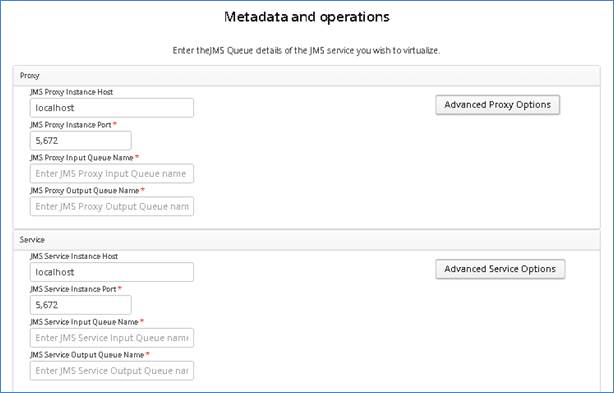
Credentials for the JMS instance can be added by selecting the ‘Advanced Options’ buttons:
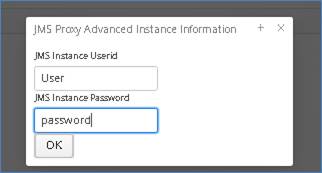
2.11.3.3 MQ
The following screen will be presented, add the details for your MQ instance as required:
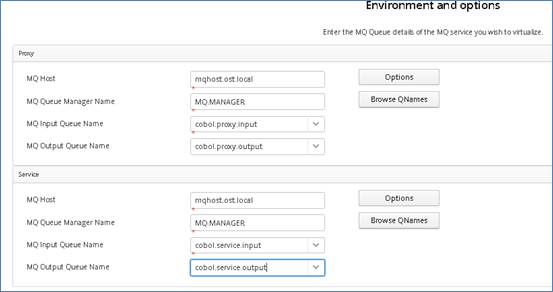
Add Port, Server Connection Details and credentials by selecting the ‘Options’ button:
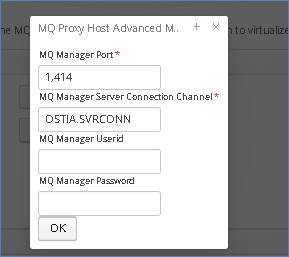
Note that if a new queue manager is being added, you can simply set the MQ Host and the port (or let it default) and hit the ‘Browse QNames’ button. If there is an MQ Manager running on that host and port, the MQ Queue Manager Name will be filled out while the list of available queue names will be made available in the drop down for both input and output queues.
2.11.3.4 Sockets
The following screen will be presented:
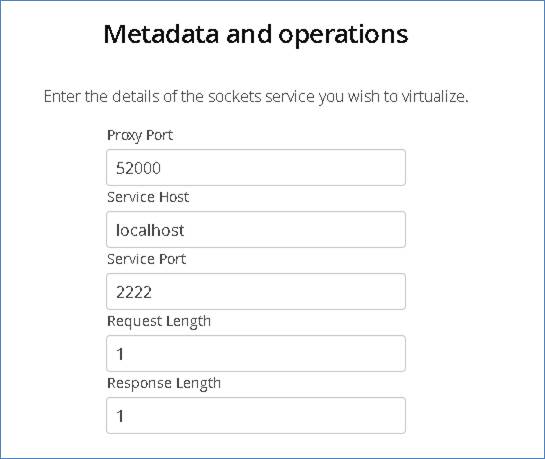
- Service Host: The host machine where the real service is listening
- Proxy Port: The port for the service to which requests will be sent
- Service Port: The port on which the real service is listening
- Request length: Length of the Request
- Response Length: Length of the Response
2.11.3.5 WSDL
The following screen will be presented:
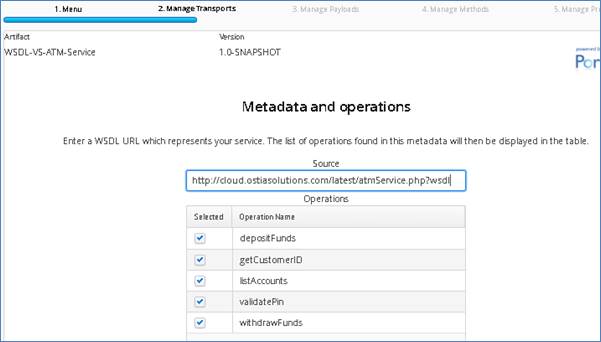
- Enter the WSDL url and move the mouse cursor out of the ‘Source’ box to view a list of available Operations for that WSDL
- Select the operations you want to include in the service
2.11.4 Payload Definition
Portus EVS understands a number of payload formats. Payloads may be used in the following ways:
1. As the input (or request) to a specific method in the virtual service.
2. As the output (or response) from a specific method in the virtual service.
3. Payloads are also used to represent a particular context within a project which retains information from method call to method call. Please refer to the documentation describing the development of a Portus EVS sandbox for further information.
The current formats supported are:
- JSON – a JSON file or JSON schema representing the message format must be provided.
- XML – an XSD representing the XML must be provided.
- COBOL – A COBOL structure must be provided for the payload format
- RAW – No meta data is required as the virtual service implementation will simply be passed the raw data which can be used for payloads which cannot be described with meta data (e.g. payloads that are a combination of COBOL and XML)
A unique name within the project must be defined for the payload. By default, this will be the file name of any Meta data provided in the dialog. For Raw data, you must provide a payload name.
Note that it is also possible to use any combination of payloads within a single project. The only restriction is that they must have a unique ID.
To add a payload, proceed as follows:
Hit the ‘Add’ button:
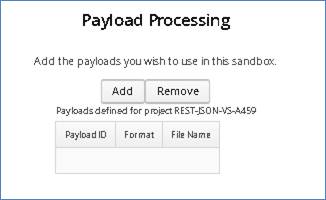
Select type:
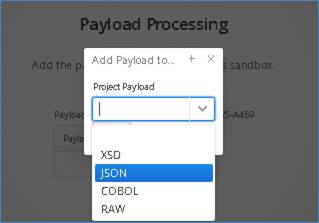
For JSON, XML or COBOL payloads, Hit the ‘Upload’ button and select payload file:
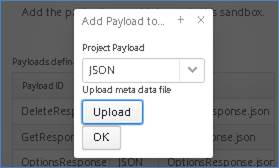
Note that for a RAW payload, you must simply give it a unique payload ID.
For COBOL Payloads, there are a number of additional configuration options. For details on these options, see Portus EVS record payload
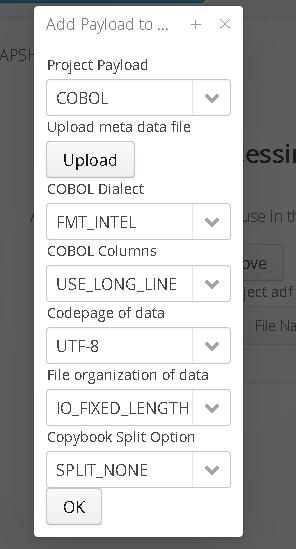
Example of completed Payload page:
JSON Example:

COBOL example:

To delete a payload, proceed as follows:
Select the Payload you want to delete by clicking on the entry and then click on the remove button
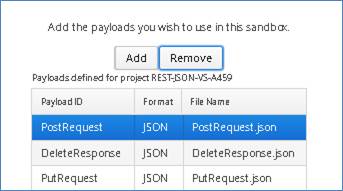
Note: if working with an existing Project, you will need to remove the reference from any methods using that payload before removing the payload.
2.11.5 Managing Methods
In general, a virtual service will expose one or more methods that can be called. This will depend on the transport or protocol defined for the virtual service:
- For MQ, JMS and Sockets, there is one method implementation. For these methods, you simply associate a payload with the request and the response.
- For REST, there will be multiple method implementations. For PUT or POST methods, you must provide a request and response payload for each. For GET, DELETE and OPTIONS you must provide a response payload only.
- For WSDL, there will also be multiple payloads, however, as the WSDL will have defined exactly what is needed for this, Portus EVS will already have created the method definitions for you.
The following sections will document the process for each type of service.
2.11.5.1 MQ, JMS and Sockets
A Dropdown will provide a list of available Request and Response payloads based on what was uploaded during the previous payload processing step. In the following example, a single request and a single response payload are required, for simplicity these have been named Request and Response:
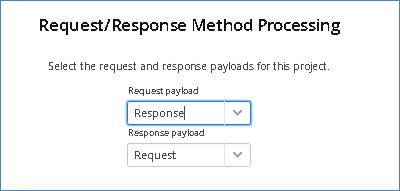
2.11.5.2 REST
For this rest project, a number of Request/Response payloads have been added during the payload processing stage. In the screenshots below, a number of methods are added using the corresponding payloads.
Hit the ‘Add’ Button:
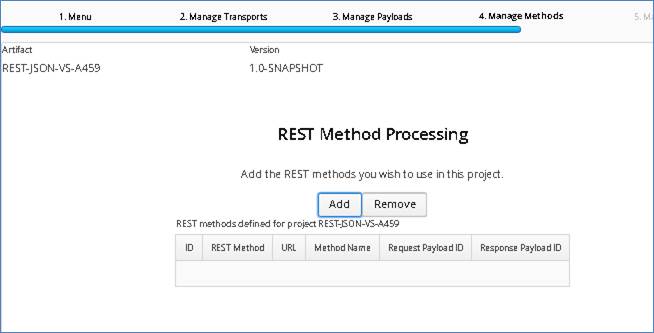
Select method and related payloads from the available dropdown options:
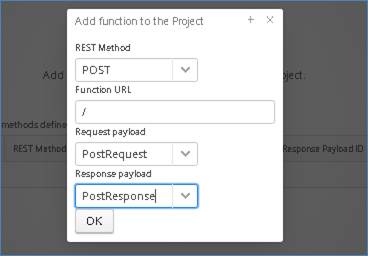
Example of completed Methods page:
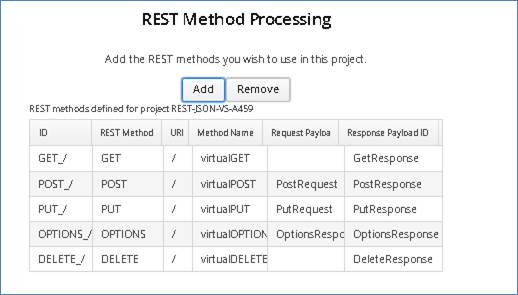
2.11.5.3 WSDL
WSDL Definitions are created for you when the WSDL URI is provided. In the method processing stage, users can define data generation parameters using inbuilt data generation functions, or add static data for the available fields.
- To the left, a list of operations and fields are presented.
- To the right, the data options are shown
To modify the data, select the field to modify from the left side, then select the ‘Change’ button to the right of the screen:
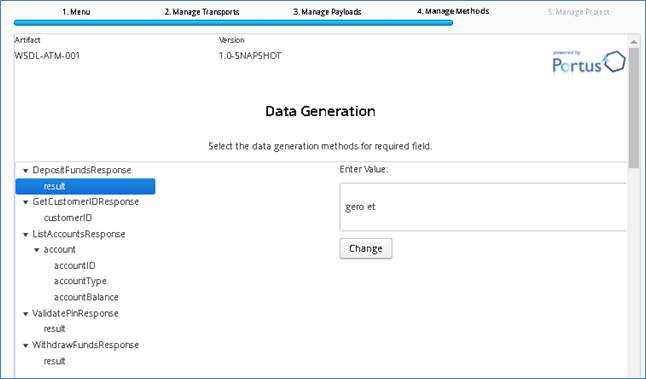
In the data window, select a function category from the left, and the function to use from the right side. Double click a function to add it to the expression window at the top of the screen as shown in the screenshot below:

Users can add static only text data, or a mix of functions and static text:
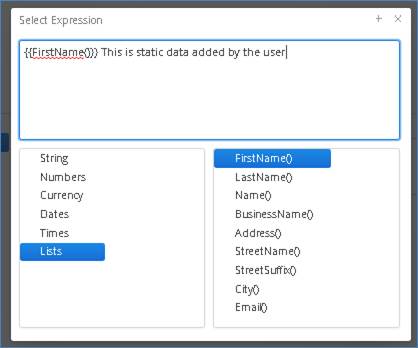
2.11.6 Build or Update the Project
This is the final step in the wizard where you will be offered the ability to build the project (when it is a new project) or update the existing project. You will be presented with a screen as follows:

For a new project, the following occurs when you hit the ‘build’ button:
1. The Portus EVS Archetype will be used to create the base project.
2. Any defined payload Meta data files will be written to the project.
3. The project properties will be written.
4. The Portus EVS Maven plugin will be run to process the payloads and create the virtual service implementation model.
This project can then be imported into the IDE of your choice and run from there.
For an existing project, the following occurs:
1. Any newly defined payload Meta data files will be written to the project. This will also result in an internal payloads.properties file being updated.
2. The project properties will be updated.
3. The Portus EVS Maven plugin will be run to process the payloads and create the virtual service implementation model. Note that this will _not_ overwrite the existing implementation as this may have changed so a new model is generated. This is to enable the actual implementation of the virtual service to be updated with any changes generated in the new implementation.
It is expected that for projects that are updated, they will already have been imported into your local IDE. In this case, following the update simply refresh the project in your IDE to pick up the latest changes.
2.12 Common virtual service paths
Each different type of virtual service will follow a common path as follows:
· Read the request data.
· If callRealService=Yes:
o Call the real service.
o If response received:
§ If recording=yes
· Create a key based on the request data and the payload properties.
· Write the recording to the configured directory with a filename representing the request.
§ Return response to caller.
o If no response received:
§ If callVirtualServiceifRealServiceFails=No, return the error
§ Otherwise, proceed
· If replay=yes
o Create a Create a key based on the request data and the payload properties.
o Determine if there is a recording file for that key in the configured directory
o If yes:
§ Build the response with the recorded data.
§ If recording=yes. Write the recording to the configured directory with a filename representing the request.
§ Return the response to the caller.
· Call the virtual service implementation.
· If this returns successfully:
o If recording=yes:
§ Create a key based on the request data and the payload properties.
§ Write the recording to the configured directory with a filename representing the request.
o Return response to caller.
· If the call to the virtual service fails, return the error as the response.
Note that this is likely to change and be enhanced based on customer requirements.
2.13 Data generation capability
The data generation capability in Portus is enabled in the virtual service implementation by simply adding the following Java import to the Java class:
import com.ostiasolutions.api.datagen.DataGenFunctions;
It is then possible to use the data generation functions available in this class to create data in your virtual service.
These functions are being extended based on user requirements and will be general updates.
It is also possible, of course, for organizations to simply use their own data generation classes written in Java.
2.14 Hierarchy of virtual service creation
Portus has a hierarchy of virtual service creation as follows:
· First the transport is identified. This could potentially be:
o WebSphere MQ.
o Web service (SOAP over HTTP).
o TCP/IP sockets.
o REST (available October 2016).
o JMS (available November 2016).
o FTP (on request).
o APPC (on request).
o Please contact Ostia with any other transport requirements.
· Second the payload is identified. This could potentially be:
o Byte: The payload on the request is simply presented as a Java byte[] array to the service and expects the same as the payload response.
o XML: The payload on the request is simply presented as XML and the response is also expected to be XML. These are parsed by Portus using their associated XSD and presented to and returned from the virtual service implementation as a Plain Old Java Object (POJO).
o SOAP: The payload on the request is SOAP and a SOAP response is expected. This is parsed by Portus using the WSDL for the SOAP Service. This is slightly different to XML as the virtual service implementation is called with a POJO describing the request in the SOAP Body and expects a POJO in return which will integrated into the SOAP Body in the response.
o Flat record structures such as those described by the COBOL language. This are processed using jrecord and a construct is passed to the virtual service implementation to enable data in the request to be accessed using its field name and for the response to be built by setting values for each desired field name.
§ Note that while COBOL is currently the only metadata supported, other metadata can be supported on request.
Each transport, protocol and payload has different characteristics which are described in the section dedicated for each transport and payload.
2.15 Portus EVS record and playback
Portus EVS offers the capability to record responses and play them back in much the same way as other frameworks. This is provided more to enable some sample datasets to be recorded rather than being used for a record and playback function which is fully supported and available within the IVS component of EVS. Ostia recommend the more flexible approach of building a true virtual implementation of the service required for best results.
2.15.1 Setting up Recording
Recordings are written to a directory called ‘<RecordingsDirectory>/<RecordingDirectory>’.
‘<RecordingsDirectory>’ is a high level directory where sets of Portus recordings may be written. This can be set from the MonitoringConfiguration GUI and will default to ‘PortusRecordings’.
‘RecordingDirectory’ is the name of a directory where a particular set of recordings will be written. This can be set from the MonitoringConfiguration GUI and will default to ‘NewRecording’. Below we see two sets of recordings with different ‘RecordingDirectory’ names, both under the high level PortusRecordings <RecordingsDirectory>.
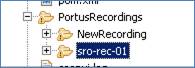
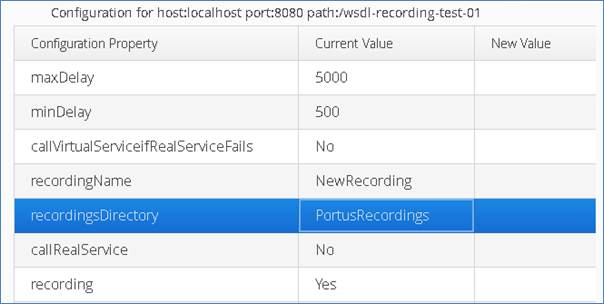
<RecordingsDirectory> could potentially be a hard file name or a relative file name. By default, it is a relative file name and will be written to the project directory when the project is being run under Eclipse. It will be written by default to the bin directory, or otherwise the specified directory when run under Tomcat e.g.: ..\PortusRecordings will create the recordings directory one level higher in the tomcat root directory.
Eclipse:
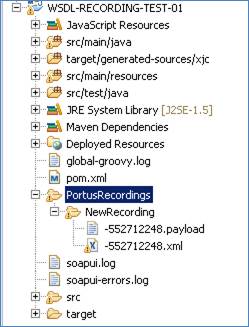
Tomcat:
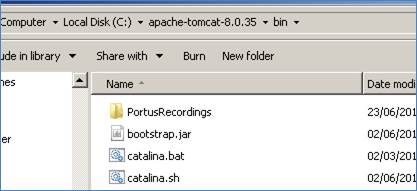
Recording will only occur when recording is set to ‘Yes’ in the run time configuration for a project which can also be set from the MonitoringConfiguration GUI.
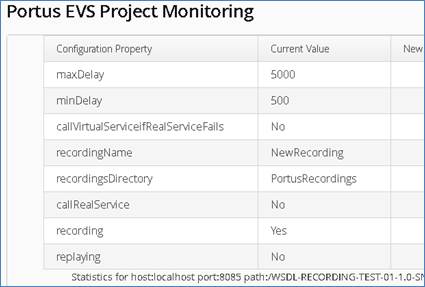
2.15.2 Recording responses
Any record response will be recorded in <filename key>.payload file in the recordings directory. This will be the record format that would be returned on the call. While this may be modified, care must be taken if there is binary data in the payload as the editor could translate characters and thus corrupt the binary fields.
3 Portus EVS installation
Portus EVS may be delivered as a Cloud or on-premise solution. When delivered in the Cloud, Portus is pre-installed on the Cloud images that are made available for use. Therefore, these instructions are only required for an on-premise installation.
This document describes the following:
· The Portus installations required.
· The supported platforms.
· The pre-requisite software that must be installed before running the Portus installation.
· Additional resources that must be available.
· The Installation.
· The results of each installation.
3.1 Portus EVS installation types required
Portus EVS has two distinct and separate installation types:
1. The ‘Power User Environment’ is where the person developing the virtual services will work. It contains all of the tools, wizards and helpers to create, modify, build and deploy virtual services. One Power User Environment is required per virtual services developer.
2. The ‘Clone Environment’ is the run time for virtual services and is the environment into which virtual services are deployed to be run and used. Clone Environments are intended to be created on demand as different users and teams require access to the virtual services created.
3.2 Power User installation
3.2.1 Supported platforms
The following are the platforms currently supported by Portus:
· All levels of Windows supported by Microsoft.
Please contact Ostia if support is desired on other platforms.
3.2.2 Pre-requisite software
The following software must be installed before proceeding with the Portus installation:
· Java SE Development Kit 1.8.
· Apache Maven 3.3.9.
· If you do not use Eclipse as your IDE, you will need to install your favourite Java IDE (e.g. NetBeans etc.) for managing virtual service projects once created.
3.2.3 Other resources
Ostia deliver Portus EVS using Maven dependencies and thus a Maven repository containing the various Portus dependencies must be accessible from the machine where the Power User will run. This can be achieved as follows:
· If access is available to http://cloud.ostiasolutions.com:8081/, this is the central Ostia repository where Portus updates are made available and is the optimum configuration to ensure seamless and quick availability of fixes or updates.
· If access is not possible due to firewall rules, often organizations set up a mirror repository in their Demilitarised Zone (DMZ) which can then periodically download updates from Ostia’s site. Power Users can then use the mirror in the DMZ.
· If this is not an option, please contact Ostia to discuss the optimum potential setup for your organization.
3.2.4 Settings.xml
In order to point maven to the Ostia Artifactory repository for EVS artifacts a settings.xml file is provided to EVS users and can be found in the ‘utils’ folder under the Ostia Solutions installation directory. This settings file must be placed in the .m2 directory alongside the repository folder:
The settings.xml file can be modified to accommodate any additional requirements the organisation may have as long as the Ostia repository locations remain in place.
3.2.5 Proxy Settings
Depending on the organisation, proxy settings may need to be adjusted in order to successfully reach the Ostia Artifactory repository via maven if a DMZ mirror is not put in place. The Ostia Artifactory repository runs on port 8081 and can also be reached via browser using the following url: http://cloud.ostiasolutions.com:8081.
3.2.6 Installation
You will require the Portus EVS Power User installer and a license key to install Portus on your system so proceed as follows:
· Download or copy the Power User installer to your machine.
· Download or copy the Power User license to your machine.
Launch the installer and follow the steps in the wizard:
When prompted, add the license file:
The installation wizard will install the necessary files from the installation kit (including a Tomcat server), start the tomcat server and deploy the applications to the server.
Once the applications are ready, the landing page will open in a new browser window. From here you can access the available tools and documentation.
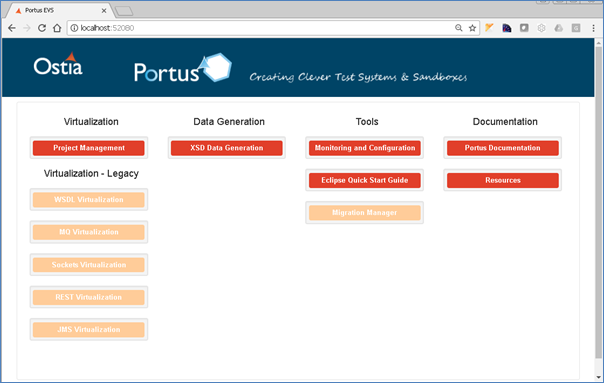
Once completed, please follow this online guide to install the Portus Server on this machine.
3.2.7 The results of the installation
At the completion of the Power User installation, the following will have been installed in the Power User Environment:
· A Tomcat instance with a landing page containing:
o The Manage Projects GUI – this is the main project management interface
o Links to each of the wizards to create virtual services. (now depreciated)
o Links to each of the wizards for data generation.
o A link to the Portus monitoring and configuration wizard.
o A link to the documentation.
o A link to a page describing how to start the Portus Control Centre.
Note: Ostia recommend that no other non-Ostia software is installed within this Tomcat instance and it is maintained exclusively for Portus use.
· The Portus Eclipse Based Control Centre.
o The Portus Server may be installed from the Portus Eclipse Control Centre.
Please proceed to the section on Clone Environment installation.
3.3 Clone Environment installation
3.3.1 Supported Platforms
The following are the platforms currently supported by Portus:
· All levels of Windows supported by Microsoft.
Please contact Ostia if support is desired on other platforms.
3.3.2 Pre-requisite software
The following software must be installed before proceeding with the Portus EVS Clone installation:
· Java run time environment version 1.8. This is available for download here.
3.3.3 Other resources
Each Clone Environment needs TCP/IP access to the Power User Environment when specific services are used.
3.3.4 Installation
You will require the Portus EVS Clone Environment Installer and a license key to install Portus on your system so proceed as follows:
· Download or copy the Portus clone installer to your machine.
· Download or copy the license to your machine.
Launch the installer and follow instructions provided by the installation wizard.
3.3.5 The results of the installation
At the completion of the Clone Environment installation, the following will have been installed in the Power User Environment:
· A Tomcat instance with the following installed:
o The Portus Tomcat monitoring application.
Note: This Tomcat is intended as the target for deployment of Portus created virtual service applications. Ostia recommend that no other software is installed within this Tomcat instance and it is maintained exclusively for use by Portus virtual services.
· The Portus Server.
3.4 Next steps
Once completed, Ostia recommend you spend some time understanding the concepts of how Portus creates virtual services before attempting to start creating virtual services, perhaps making use of the tutorials:
· Create a MQ COBOL virtual service
· Create a sockets virtual service
4 Portus EVS Updates
The majority of application updates for EVS will be delivered through maven and will be pulled down automatically during project builds. In some instances, however, the application file will need to be updated.
4.1 Manage Project GUI Update
To update the Manage Project GUI, download latest manage project .war file from the Ostia Artifactory Repository. The most recent update will be the last .war file in the list with the most recent timestamp as part of the file name as shown in the following image:
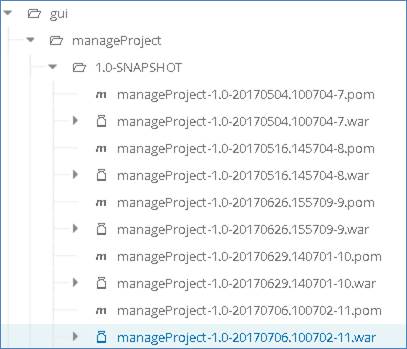
Once selected, download the war file and rename the new file to manageProject-1.0.war, this will ensure that the application GUI can still be accessed from the EVS main landing page via the link provided.
Stop the Tomcat server before proceeding.
Delete old existing manageProject -1.0.war in the Ostia Solutions Tomcat webapps folder, and the related manageProject-1.0 directory.
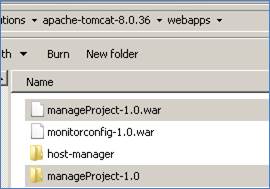
Add the new manageProject war file to the webapps folder.
Start the Tomcat server and allow some time for Tomcat to expand and load the new application.
4.2 Monitoring GUI Update
To update the Monitoring GUI, download latest monitorConfig .war file from the Ostia Artifactory Repository. The most recent update will be the last .war file in the list with the most recent timestamp as part of the file name as shown in the following image:
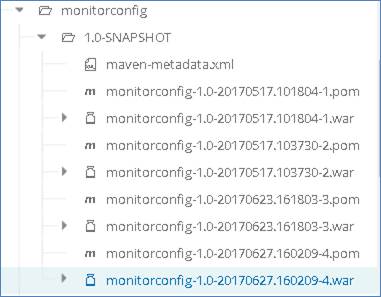
Once selected, download the war file and rename the new file to monitorconfig-1.0.war, this will ensure that the application GUI can still be accessed from the EVS main landing page via the link provided.
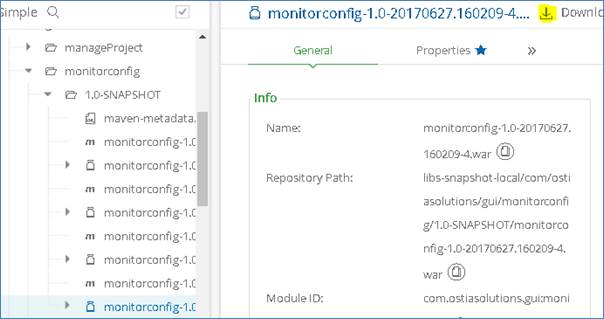
Stop the Tomcat server before proceeding.
Delete old existing monitorconfig-1.0.war in the Ostia Solutions Tomcat webapps folder, and the related monitorconfig-1.0 directory.
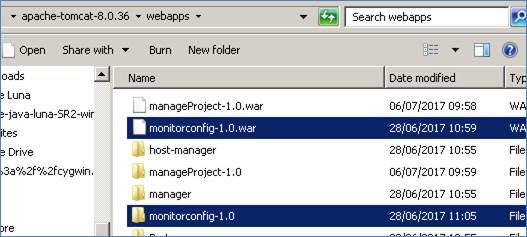
Add the new monitorconfig-1.0.war file to the webapps folder.
Start the Tomcat server and allow some time for Tomcat to expand and load the new application.
5 Portus EVS licensing
It is important from both a supplier and a customer perspective that it is clear what is licensed and who is using those licenses. For this reason, Portus EVS implements a licensing capability for the three flavours of implementation that are available, namely:
· Power User
· Single Clone User
· Gateway Clone
This describes the various features associated with this licensing with a view to ensuring that the licensing component is as unobtrusive as possible.
5.1 Hardware lock
Each license is tied to a specific server where the software is running. When requesting a license, the MAC address for the active network card on the server where the Portus component will be running must be provided to Ostia. This can be found by running the function to display the hardware key found in the following location in the Portus EVS Installation kit:
\%USERPROFILE%\Ostia Solutions\utils\HardwareID-Viewer\LICENSE4J-HardwareID-Viewer.exe
Note that many, if not all servers now have multiple Network cards so the one that will be active when Portus is used must be chosen. For example, on a note book, the MAC address is different depending on whether you are working through a docking station, connected via cable to the RJ45 socket on the server or using the wireless capability.
5.2 Moving a license
Ostia provide for a license that is capable of being moved between machines. In this case, the license will be reissued with the new MAC address for the new machine, however, Ostia must first deactivate the license on the older machine which must be done in conjunction with the user to ensure service is maintained during the move of the license.
6 Transport and protocol support
6.1 Portus EVS HTTP transport
HTTP can theoretically be sent over sockets, MQ, JMS etc. however; its most widely used implementation is over the sockets transport where it can add much more meaning to a request or response via metadata tags it can add. HTTP has proven itself to be one of the most interoperable transports over the past number of years and is the transport upon which the Internet has thrived. This describes Portus’ implementation which strictly runs over sockets - TCP/IP currently.
6.1.1 HTTP semantic
While there are a number of semantics, the request/response semantic is by far the most widely used:
· Application under test sends a HTTP request to the service listening on a well-known host and port.
· Service receives the HTTP request.
· Service processes the request and creates a response.
· Service sends a HTTP response to the application under test.
· Application under test receives the HTTP response.
Portus EVS introduces the concept of proxy HTTP services for the purposes of service virtualization. The semantic then is as follows when the real service is being called from Portus on behalf of the user:
· Application under test sends a HTTP request to Portus listening on a well-known host and port.
· Portus receives the HTTP request.
· Portus processes the request as appropriate. (I.e. manages payload etc.)
· Portus sends the HTTP request to the service listening on a well know host and port.
· Service receives the HTTP request.
· Service processes the request and creates a response.
· Service sends a HTTP response to the application under test.
· Portus receives the HTTP response.
· Portus processes the request (e.g. it may record it).
· Portus sends the HTTP response to the application under test.
· Application under test receives HTTP response.
Where the real service is not being called, the semantic is different:
· Application under test sends a HTTP request to Portus listening on a well-known host and port.
· Portus receives the HTTP request.
· Portus processes the request as appropriate.
o It may look for a recording matching the input request.
o It may call the virtual service implementation.
o It may record the response.
o It may delay the response based on configuration variables.
· Portus sends the HTTP response to the application under test.
· Application under test receives HTTP response.
As can be seen, there are potentially other uses that this can be put to, for example:
· In flight data masking of requests as they return from the real service.
· It is possible to cache responses that are only used should the real service not be available.
· It would be possible to cache responses so that the real service is never called until the recordings ‘time out’ and thus the real service may be called again. This could potentially avoid load on a service where return values only change periodically.
6.1.2 Recordings for HTTP services
When a HTTP payload is recorded by the Portus framework, there is significant HTTP metadata from the various HTTP headers that must also be recorded. This is written as an XML document to the recordings directory with the payload and will have the same filename as the payload. If the payload is to be replayed, the HTTP Headers are also reconstructed to give a 100% accurate response to the application under test.
6.1.3 HTTP service properties
When a virtual service uses HTTP as a transport, there are currently no properties defined for the current implementation as all information is derived to support SOAP from the WSDL.
|
Parameter |
Required |
Description |
|
n/a |
|
|
6.1.4 Virtual service implementation call
When the virtual service implementation is called from the Portus framework, the metadata for the request and response messages, in the form of a HttpServletRequest and HttpServletResponse respectively, is passed to the virtual service implementation along with the payload. This gives the user the opportunity to:
· Check the value of any request header passed on the request.
· Check and/or set the value of any response header to be returned on the response to the user.
This provides the utmost flexibility to the virtual service implementation.
6.2 Portus EVS WebSphere MQ transport
WebSphere MQ is a messaging based architecture supplied by IBM. Originally used to access IBM mainframe systems, it is also now used extensively on Windows and Open Systems platforms today.
6.2.1 MQ service semantic
MQ has a specific messaging based semantic with the majority of services having the following semantic:
· Application under test places a request on the service request queue “serviceReqQ”.
· Service takes the request off the service request queue “serviceReqQ”.
· Service processes the request.
· Service puts the response onto the service response queue “serviceRspQ”,
· Application under test removes the response from the service response queue “serviceRspQ”.
Portus EVS introduces the concept of proxy queues for the purposes of service virtualization. The semantic then is as follows when the real service is being called from Portus on behalf of the user:
· Application under test places a request on the proxy request queue “proxyReqQ”.
· Portus takes the request off the proxy request queue “proxyReqQ”.
· Portus processes the request as appropriate. (I.e. manages payload etc.)
· Portus places the request on the service request queue “serviceReqQ”.
· Service takes the request off the service request queue “serviceReqQ”.
· Service processes the request.
· Service puts the response onto the service response queue “serviceRspQ”,
· Portus takes the response off the service response queue “serviceRspQ”.
· Portus processes the request (e.g. it may record it).
· Portus places the response on the proxy response queue “proxyRspQ”.
· Application under test removes the response from the proxy response queue “proxyRspQ”,
Where the real service is not being called, the semantic is different:
· Application under test places a request on the proxy request queue “proxyReqQ”.
· Portus takes the request off the proxy request queue “proxyReqQ”.
· Portus processes the request as appropriate.
o It may look for a recording matching the input request.
o It may call the virtual service implementation.
o It may record the response.
o It may delay the response based on configuration variables.
· Portus places the response on the proxy response queue “proxyRspQ”.
As can be seen, there are potentially other uses that this can be put to, for example:
· In flight data masking of requests as they return from the real service.
· It is possible to cache responses that are only used should the real service not be available.
· It would be possible to cache responses so that the real service is never called until the recordings ‘time out’ and thus the real service may be called again. This could potentially avoid load on a service where return values only change periodically.
6.2.2 Recordings for MQ services
When an MQ Service payload is recorded, there is significant MQ metadata from the MQMD that must also be recorded. This is written as an XML document to the recordings directory with the payload and will have the same filename as the payload. If the payload is to be replayed, the MQ metadata is also reconstructed to give a 100% accurate response to the application under test.
6.2.3 MQ service properties
When a virtual service uses MQ as a transport, the following documents the MQ related properties which will be read from the service configuration properties file.
|
Parameter |
Required |
Description |
|
mqHost |
No |
Identifies the hostname or IP address where the MQ manager is running for proxy queues. Only required if the proxy queues are on a remote queue manager from the machine where the virtual service is running.
Default: “” |
|
mqPort |
No |
Identifies the port number on which the remote MQ manager is listening. Only required if mqHost is provided.
Default: 1,414 |
|
mqQManager |
Yes |
This is the name of the MQ Queue manager where the proxy queues are defined.
Default: none |
|
mqServerConn |
No |
Identifies the Server Connection Channel on which the remote MQ manager is listening. Only required if mqHost is provided.
Default: SYSTEM.ADMIN.SVRCONN |
|
mqUserid |
No |
The userid for the MQ Queue manager where the proxy queues are defined when a userid is required to access the queue manager.
Default: “” |
|
mqPassword |
No |
The password associated with the mqUserid for the MQ Queue manager where the proxy queues are defined when a password is required to access the queue manager.
Default: “” |
|
mqInputQueue |
Yes |
The name of the MQ Proxy Input queue for the virtual service.
Default: none |
|
mqOutputQueue |
Yes |
The name of the MQ Proxy Output queue for the virtual service.
Default: none |
|
mqServiceHost |
No |
Identifies the hostname or IP address where the MQ manager is running for the service queues. Only required if the service queues are on a remote queue manager from the machine where the virtual service is running.
Default: “” |
|
mqServicePort |
No |
Identifies the port number on which the remote MQ manager for the service is listening. Only required if mqServiceHost is provided.
Default: 1,414 |
|
mqServiceQManager |
Yes |
This is the name of the MQ Queue manager where the service queues are defined.
Default: none |
|
mqServiceServerConn |
No |
Identifies the Server Connection Channel on which the remote MQ manager is listening. Only required if mqServiceHost is provided.
Default: SYSTEM.ADMIN.SVRCONN |
|
mqServiceUserid |
No |
The userid for the MQ Queue manager where the service queues are defined when a userid is required to access the queue manager.
Default: “” |
|
mqServicePassword |
No |
The password associated with the mqUserid for the MQ Queue manager where the services queues are defined when a password is required to access the queue manager.
Default: “” |
|
mqServiceInputQueue |
Yes |
The name of the MQ Service Input queue on which the real service is waiting for requests.
Default: none |
|
mqServiceOutputQueue |
Yes |
The name of the MQ Service output queue on which the real service
will place responses. Default: none |
Note that while some mqService* definitions are required, they will not be used if the real service will not be called. This means that dummy values can be provided once there is no intention to invoke the real service. These settings can be changed later if the real service must be called in the future.
6.2.4 Virtual service implementation call
When the virtual service implementation is called from the Portus EVS framework, the metadata for the request and response message is passed to the virtual service implementation along with the payload.
In previous versions of EVS, this was simply the MQMessage received for the input request and an MQMessage structure to be used for the output message.
In the latest version of EVS, this is now a Portus EVS Class called PortusExtMQMessage. This class was introduced in support of RFH2 headers and has the following data:
- For the request input PortusExtMQMessage req:
o The MQMessage structure. This can be accessed using the getter for that field req.getMqMessage(). This can be used to check any values received in the MQMD for example.
o When a message with an RFH2 header is received,
Portus EVS processes the RFH2 into an MQRFH2 class and makes this available in
the provided PortusExtMQMessage. This can be access using the getter method for
that field req.getRfh2().
- For the output response PortusExtMQMessage resp:
o The MQMessage structure that will be used to send the response. This can be accessed using the getter for that field resp.getMqMessage().This can be used to set desired values received in the MQMD to be used for the response for example.
o The implementation can optionally build an MQRFH2 header structure and return this to the framework using the setter resp.setRfh2(). The framework will then mark in the MQMessage structure that an RFH2 header is included and return this to the
This provides the utmost flexibility to the virtual service implementation.
6.3 Portus EVS sockets transport
Sockets was used in early days to create a client/service semantic using raw sockets to connect to a service, send some data as a request and receive a response from the service at the other end. While it is unlikely that new services are being created with this transport, there are still many services out there using the transport from day to day and thus need support today.
6.3.1 Sockets service semantic
The majority of sockets services will have the following semantic:
· Application under test connects to a well know host and port where the service is listening.
· Application under test sends a request of a specific length to the service.
· Service receives the request.
· Service processes the request.
· Service sends a response using the same connection to the application under test.
· Application under test receives the response from the service.
Note in some cases, the socket is then closed and the system under test must connect again, in other cases the socket may be left open for future communication.
Portus EVS introduces the concept of proxy sockets for the purposes of service virtualization. The semantic then is as follows when the real service is being called from Portus on behalf of the user:
· Application under test connects to a well-known host and port where Portus is listening.
· Application under test sends a request of a specific length to Portus.
· Portus receives the request.
· Portus processes the request.
· Portus connects to the service host and port.
· Portus sends the request to the service.
· Service receives the request.
· Service processes the request.
· Service sends a response using the same connection to Portus.
· Portus receives the response.
· Portus processes the request (e.g. it may record it).
· Portus sends the response to the application under test over the socket on which the request was received.
· Application under test receives the response from Portus.
Where the real service is not being called, the semantic is different:
· Application under test connects to a well know host and port where Portus is listening.
· Application under test sends a request of a specific length to Portus.
· Portus receives the request.
· Portus processes the request as appropriate.
o It may look for a recording matching the input request.
o It may call the virtual service implementation.
o It may record the response.
o It may delay the response based on configuration variables.
· Portus sends the response to the application under test over the socket on which the request was received.
· Application under test receives the response from Portus.
As can be seen, there are potentially other uses that this can be put to, for example:
· In flight data masking of requests as they return from the real service.
· It is possible to cache responses that are only used should the real service not be available.
· It would be possible to cache responses so that the real service is never called until the recordings ‘time out’ and thus the real service may be called again. This could potentially avoid load on a service where return values only change periodically.
6.3.2 Recordings for sockets services
Unlike other transports, sockets is a relatively simple transport and no metadata exists about the request so the only data recorded for a sockets service is the payload.
6.3.3 Sockets service properties
When a virtual service uses sockets as a transport, the following documents the sockets related properties which will be read from the service configuration properties file.
|
Parameter |
Required |
Description |
|
proxyPort |
Yes |
This is the Port on which Portus will wait for requests for this virtual service. The application under test will use the host were Portus is running and this port to connect to the virtual service.
Default: none |
|
serviceHost |
Yes |
This is the hostname or IP address of the machine where the real service is running.
Default: none |
|
servicePort |
Yes |
This is the port number on the machine where the real service is listening.
Default: none |
|
requestLength |
Yes |
This is the expected length of a request from the application under test.
Default: none |
|
responseLength |
Yes |
This is the expected length of the response to be received from the real service when a request is sent to it.
Default: none |
Note that while the serviceHost, servicePort and responseLength definitions are required, they will not be used if the real service will not be called. This means that dummy values can be provided once there is no intention to invoke the real service. This can be changed at a later date if the real service must be called.
6.3.4 Sockets helper functions
As discussed earlier, the sockets protocol is a very basic way to communicate and does not have the concept of a “message”. Therefore, in order to know how much data to read from a socket, Portus must know the length of the message to receive whenever an application under test connects to the proxy socket. If the request size is fixed, this is quite simple and can be specified using the requestLength property for the service.
By the same token, when the real service is called, Portus must know how much data to read from the socket for the response. Again, if the length is fixed, this can be set using the responseLength property.
In some cases, the lengths may be variable in which case the user must modify a virtual sockets helper class delivered with the project. The principle here is that when lengths are variable, generally the protocol is to include the length (or message type by which a length can be determined) in the first few bytes of the message.
Therefore, when receiving a request on the proxy queue, Portus does the following:
· Issues a “receive” for a maximum of the length provided in the requestLength property.
· The initial data read and the proposed length is passed to the readRequestLength() method in the helper class.
· This method can investigate the payload and return the correct length to receive.
· Portus will continue to receive until that length has been received and will then proceed to process the request.
When receiving a response on the proxy queue, Portus does the following:
· Issues a “receive” for a maximum of the length provided in the responseLength property.
· The initial data read and the proposed length is passed to the readResponseLength() method in the helper class.
· This method can investigate the payload and return the correct length to receive.
· Portus will continue to receive until that length has been received and will then proceed to process the request.
Note that in both cases if the length returned is too short, insufficient data will be passed to the virtual service implementation. On the other hand, if the length returned is too long, the virtual service will hang waiting for data that may never arrive and, if it does, it will mix data for different requests.
6.4 Portus EVS REST transport
While technically not a standard, transport or a protocol, Representational State Transfer (REST) is a technical architecture style in common use today in application systems. Portus EVS supports the virtualization of REST services using the HTTP protocol running over TCP/IP.
6.4.1 REST verbs
The REST architecture over HTTP uses standard HTTP methods to implement a form of Create, Read, Update and Delete (CRUD) type interface as follows:
· GET: Read a resource or set of resources.
· PUT: Replace a resource or an entire set of resources.
· POST: Create a resource or an entire set of resources.
· DELETE: Delete a resource or an entire set of resources.
Note that this is purely a theoretical definition and often services do not comply with the theory and, for example, update resources on a GET request. It’s simply how some applications have evolved.
In addition, the following HTTP methods are supported by Portus EVS:
· HEAD: to simply return the headers for a GET request without any response content for the request.
· OPTIONS: represents a request for information about the communication options available on the request/response chain identified by the Request-URI.
Each method can optionally accept a payload as part of the request while some return a payload as part of the response. Portus SV supports multiple and/or mixed payloads on the requests. The payloads supported currently are as follows:
· RAW: The data is provided as supplied by the caller.
· XML: XML Documents are provided as content to the request and/or returned as content on the response.
· JSON: JSON Documents are provided as content to the request and/or returned as content on the response.
The following table summarises whether content is supported in the request or returned in the response for each supported method:
|
Method |
Request Content |
Response Content |
|
GET |
NO |
YES |
|
POST |
YES |
YES |
|
PUT |
YES |
YES |
|
DELETE |
NO |
YES |
|
OPTIONS |
NO |
YES |
|
HEAD |
NO |
NO |
The Universal Resource Identifier (URI) provided on any REST request is a key part of any call, normally identifying the resource or resources to which the request relates.
6.4.2 REST semantic
The REST semantic is based on a request/response pair for each method:
· Application under test sends a REST request with a URI to the service listening on a well-known host and port. It optionally provides content where appropriate.
· Service receives the REST request.
· Service processes the request and creates a response.
· Service sends a REST response to the application under test.
· Application under test receives the REST response.
Portus test introduces the concept of proxy REST services for the purposes of service virtualization. The semantic then is as follows when the real service is being called from Portus on behalf of the user:
· Application under test sends a REST request to Portus listening on a well-known host and port. It optionally provides content where appropriate.
· Portus receives the REST request.
· Portus processes the request as appropriate. (i.e. manages payload etc.)
· Portus sends the REST request to the service listening on the actual service host and port (with content where appropriate and provided).
· Service receives the REST request.
· Service processes the request and creates a response.
· Service sends a REST response to the application under test.
· Portus receives the REST response.
· Portus processes the request (e.g. it may record it).
· Portus sends the REST response to the application under test.
· Application under test receives REST response.
Where the real service is not being called, the semantic is different:
· Application under test sends a REST request to Portus listening on a well-known host and port. It optionally provides content where appropriate.
· Portus receives the REST request.
· Portus processes the request as appropriate.
o It may look for a recording matching the input request.
o It may call the virtual service implementation.
o It may record the response.
o It may delay the response based on configuration variables.
· Portus sends the REST response to the application under test.
· Application under test receives REST response.
As can be seen, there are potentially other uses that this can be put to, for example:
· In flight data masking of requests as they return from the real service.
· It is possible to cache responses that are only used should the real service not be available.
· It would be possible to cache responses so that the real service is never called until the recordings ‘time out’ and thus the real service may be called again. This could potentially avoid load on a service where return values only change periodically.
6.4.3 Recordings for REST services
When a HTTP REST payload is recorded, there is significant HTTP metadata from the various HTTP headers that must also be recorded. This is written as an XML document to the recordings directory with the payload and will have the same filename as the payload. If the payload is to be replayed, the HTTP Headers are also reconstructed to give a 100% accurate response to the application under test.
6.4.4 Recording keys for REST services
Note that as a REST virtual service has multiple methods, the recording keys specified in the service configuration are different. The following table describes how the keys may be specified for each type of request:
|
Configuration keyword |
Description |
|
recordingKeysGet |
Contains the recording keys to be used for the GET request |
|
recordingKeysPost |
Contains the recording keys to be used for the POST request |
|
recordingKeysPut |
Contains the recording keys to be used for the PUT request |
|
recordingKeysDelete |
Contains the recording keys to be used for the DELETE request |
|
recordingKeysHead |
Contains the recording keys to be used for the HEAD request |
|
recordingKeysOPTIONS |
Contains the recording keys to be used for the OPTIONS request |
Where there is content for the request type, the standard ways of building a recordings key from the content is described in the documentation for each content type. For REST services, it also is possible to specify the following:
· ~RequestPath~: This will result in the path of the URI provided to the request being used as part of the recording key for the payload.
· ~QueryVariable~: This can be used one or more times to cause the value of the query variable specified on the statement to be used as part of the recording key for the payload.
6.4.5 REST service properties
When a virtual service uses REST, the following documents the REST related properties which will be read from the service configuration properties file.
|
Parameter |
Required |
Description |
|
serviceHost |
YES |
This is the host name or IP address where the actual REST service is running |
|
servicePort |
YES |
This is the port number on which the actual REST service is waiting for requests. |
6.4.6 Virtual Service implementation call
When the virtual service implementation is called from the Portus framework, Portus calls a unique function within the virtual service implementation for each of the types of call (e.g. GET, POST, PUT, DELETE, HEAD and OPTIONS). As part of this call, the metadata for the request and response messages, in the form of a HttpServletRequest and HttpServletResponse respectively, is passed to the virtual service implementation along with the request payload (if any). The URI for the request is also available from the HttpServletRequest provided. This gives the user the opportunity to:
· Check the value of the URI, any request header passed on the request or the request payload if any.
· Check and/or set the value of any response header to be returned on the response to the user.
This provides the utmost flexibility to the virtual service implementation.
6.5 Portus EVS JMS transport
JMS is a part of the Java Platform, Enterprise Edition, and is defined by a specification developed under the Java Community Process as JSR 914. It is a messaging standard that allows application components based on the Java Enterprise Edition (Java EE) to create, send, receive, and read messages. It is used extensively today for applications exchanging messages across heterogeneous systems.
6.5.1 Different JMS implementations
There are many different implementations of the JMS standard including open source and commercial products. In theory, these should work seamlessly if they have implemented the standard correctly. Ostia have implemented using the AMQP protocol but support for other protocols is available on request.
6.5.2 JMS capabilities
JMS offers two quite different ‘Messaging Domains’:
1. The Point-to-Point Messaging Domain:
· A point-to-point (PTP) product or application is built on the concept of message queues, senders and receivers. Each message is addressed to a specific queue and receiving clients extract messages from the queues established to hold their messages. Queues retain all messages sent to them until the messages are consumed or expire.
2. The Publish/Subscribe Messaging Domain
· In a publish/subscribe (pub/sub) product or application, clients address messages to a topic, which functions somewhat like a bulletin board. Publishers and subscribers are generally anonymous and can dynamically publish or subscribe to the content hierarchy. The system takes care of distributing the messages arriving from a topic’s multiple publishers to its multiple subscribers. Topics retain messages as long as it takes to distribute them to current subscribers.
The PTP domain is most appropriate for Portus EVS virtualization as it represents the more common type of applications an organization would wish to virtualize.
Pub/sub has limited support which can be extended based on a use case where virtualization can be helpful.
6.5.3 JMS PTP service semantic
Note that JMS documents and implementations use the terms Queue and Destination interchangeably. For the sake of brevity, this document refers to queues only, however, the same can apply to a JMS destination.
PTP products or applications have a specific messaging based semantic with the majority of services having the following semantic:
· Application under test places a request on the service request queue “serviceReqQ”.
· Service takes the request off the service request queue “serviceReqQ”.
· Service processes the request.
· Service puts the response onto the service response queue “serviceRspQ”,
· Application under test removes the response from the service response queue “serviceRspQ”.
Portus EVS introduces the concept of proxy queues for the purposes of service virtualization. The semantic then is as follows when the real service is being called from Portus on behalf of the user:
· Application under test places a request on the proxy request queue “proxyReqQ”.
· Portus takes the request off the proxy request queue “proxyReqQ”.
· Portus processes the request as appropriate. (I.e. manages payload etc.)
· Portus places the request on the service request queue “serviceReqQ”.
· Service takes the request off the service request queue “serviceReqQ”.
· Service processes the request.
· Service puts the response onto the service response queue “serviceRspQ”,
· Portus takes the response off the service response queue “serviceRspQ”.
· Portus processes the request (e.g. it may record it).
· Portus places the response on the proxy response queue “proxyRspQ”.
· Application under test removes the response from the proxy response queue “proxyRspQ”,
Where the real service is not being called, the semantic is different:
· Application under test places a request on the proxy request queue “proxyReqQ”.
· Portus takes the request off the proxy request queue “proxyReqQ”.
· Portus processes the request as appropriate.
o It may look for a recording matching the input request.
o It may call the virtual service implementation.
o It may record the response.
o It may delay the response based on configuration variables.
· Portus places the response on the proxy response queue “proxyRspQ”.
As can be seen, there are potentially other uses that this can be put to, for example:
· In flight data masking of requests as they return from the real service.
· It is possible to cache responses that are only used should the real service not be available.
· It would be possible to cache responses so that the real service is never called until the recordings ‘time out’ and thus the real service may be called again. This could potentially avoid load on a service where return values only change periodically.
6.5.4 Recordings for JMS services
When a JMS Service payload is recorded, there is significant JMS metadata from the JMS Message that must also be recorded. This is written as an XML document to the recordings directory with the payload and will have the same filename as the payload. If the payload is to be replayed, the JMS metadata is also reconstructed to give a 100% accurate response to the application under test.
6.5.5 JMS service properties
When a virtual service uses JMS as a transport, the following documents the JMS related properties which will be read from the service configuration properties file:
|
Parameter |
Required |
Description |
|
jmsProxyHost |
Yes |
Identifies the hostname or IP address where the JMS instance is running for proxy queues.
Default: None |
|
jmsProxyPort |
No |
Identifies the port number on which the JMS instance is listening.
Default: 5,672 |
|
jmsProxyUserid |
No |
The userid for the JMS instance where the proxy queues are defined when a userid is required to access the instance.
Default: “” |
|
jmsProxyPassword |
No |
The password associated with the jmsProxyUserid for the JMS Instance where the proxy queues are defined when a password is required to access the instance.
Default: “” |
|
jmsProxyInputQName |
Yes |
The name of the JMS Proxy Input queue for the virtual service.
Default: none |
|
jmsProxyOutputQName |
Yes |
The name of the JMS Proxy Output queue for the virtual service.
Default: none |
|
jmsServiceHost |
Yes |
Identifies the hostname or IP address where the JMS instance is running for the service queues.
Default: None |
|
jmsServicePort |
No |
Identifies the port number on which the JMS instance is listening.
Default: 5,672 |
|
jmsServiceUserid |
No |
The userid for the JMS instance where the service queues are defined when a userid is required to access the instance.
Default: “” |
|
jmsServicePassword |
No |
The password associated with the jmsServiceUserid for the JMS Instance where the service queues are defined when a password is required to access the instance.
Default: “” |
|
jmsServiceInputQName |
Yes |
The name of the JMS Service Input queue for the actual service.
Default: none |
|
jmsServiceOutputQName |
Yes |
The name of the JMS Service Output queue for the actual service.
Default: none |
Note that while some jmsService* definitions are required, they will not be used if the real service will not be called. This means that dummy values can be provided once there is no intention to invoke the real service. These settings can be changed later if the real service must be called in the future.
6.5.6 Virtual Service implementation call
When the virtual service implementation is called from the Portus framework, the metadata for the request and response message, both in the form of a JMS Message class, is passed to the virtual service implementation along with the payload. This gives the user the opportunity to:
· Check the values from the JMS Message received on the JMS request message.
· Check and/or set the value of any value for the JMS Response message to be returned to the user.
This provides the utmost flexibility to the virtual service implementation.
7 Payload support
7.1 Portus EVS XML payload
XML is a common payload for services over MQ and other transports.
7.1.1 Provided to the virtual service
Portus handles XML payloads by interpreting the XSD schema associated with an XML request and response and then parses the request as a Plain Old Java Object (POJO) and passes this to the virtual service implementation as the request payload and will accept a POJO of the request type as the return value.
This provides the user with a simple way to interpret what values are set on the input message and to set up a response message that is schema compliant and data rich.
7.1.2 Service configuration properties
The only service configuration properties that relates to an XML payload is the “recordingKeys” property. This can be set to one or more xpath statements, separated by commas, to be used to select the values in the request document to use to uniquely identify a specific request. If we take the following XML message as an example:
<urn:GetWeather xmlns:urn="urn:getGoogleWeather">
<City>Limerick</City>
<Country>Ireland</Country>
</urn:GetWeather>
If the desire is to record an entry for each City and Country combination, the following recordingKeys statement would be required:
recordingKeys=/GetWeather/City/text(),/GetWeather/Country/text()
In this case, the recording key and thus the filename in the recordings directory for this request would be “LimerickIreland”.
If you wish to simplify this on the basis that a City will never be duplicated in multiple countries, use:
recordingKeys=/GetWeather/City/text()
In this case, the recording key and thus the filename in the recordings directory for this request would be “Limerick”.
If no recordingKeys are provided, or the recordingkeys provided do not exist or are empty, the full request record will be used to create the key. All non-alpha numeric characters will be removed from the request to create a filename. If the result has a length less than 32 bytes, it will be used as the key name. If 32 bytes or longer, the Java string.hash() function is used to create a hash code which is used as the filename.
7.1.3 Recording responses
Any XML response will be recorded in <filename key>.payload file in the recordings directory. This XML may be modified but you must be sure that you maintain schema compliance or unpredictable results will occur.
7.2 Portus EVS SOAP payload
Even though all SOAP request and responses are XML, SOAP is dealt with specifically as a type of payload to make it easier for users to process.
7.2.1 Interpreting the payload
A SOAP request arrives with the following format:
<soapenv:Envelope xmlns:soapenv="http://schemas.xmlsoap.org/soap/envelope/" xmlns:web="http://www.webserviceX.NET">
<soapenv:Header/>
<soapenv:Body>
<web:GetWeather>
<!--Optional:-->
<web:CityName>Dublin</web:CityName>
<!--Optional:-->
<web:CountryName>Ireland</web:CountryName>
</web:GetWeather>
</soapenv:Body>
</soapenv:Envelope>
In this case, Portus will remove the SOAP headers and create a Plain Old Java Object (POJO) around the actual request payload as follows:
<web:GetWeather>
<!--Optional:-->
<web:CityName>Dublin</web:CityName>
<!--Optional:-->
<web:CountryName>Ireland</web:CountryName>
</web:GetWeather>
Similarly, for a SOAP response which looks like the following:
<soap:Envelope xmlns:soap="http://schemas.xmlsoap.org/soap/envelope/" xmlns:xsi="http://www.w3.org/2001/XMLSchema-instance" xmlns:xsd="http://www.w3.org/2001/XMLSchema">
<soap:Body>
<GetWeatherResponse xmlns="http://www.webserviceX.NET">
<GetWeatherResult><![CDATA[<?xml version="1.0" encoding="utf-16"?>
<CurrentWeather>
<Location>Dublin Airport, Tuesday(EIDW) 53-26N 006-15W 85M</Location>
<Time>Aug 03, 2016 - 05:30 PM EDT / 2016.08.03 2130 UTC</Time>
<Wind> from the WSW (240 degrees) at 17 MPH (15 KT):0</Wind>
<Visibility> greater than 7 mile(s):0</Visibility>
<SkyConditions> mostly cloudy</SkyConditions>
<Temperature> 59 F (15 C)</Temperature>
<DewPoint> 53 F (12 C)</DewPoint>
<RelativeHumidity> 82%</RelativeHumidity>
<Pressure> 29.56 in. Hg (1001 hPa)</Pressure>
<Status>Success</Status>
</CurrentWeather>]]>
</GetWeatherResult>
</GetWeatherResponse>
</soap:Body>
</soap:Envelope>
Portus will create a POJO based on the following response data and wrap the appropriate SOAP response headers around it before returning to the caller.
<GetWeatherResponse xmlns="http://www.webserviceX.NET">
<GetWeatherResult><![CDATA[<?xml version="1.0" encoding="utf-16"?>
<CurrentWeather>
<Location>Dublin Airport, Tuesday(EIDW) 53-26N 006-15W 85M</Location>
<Time>Aug 03, 2016 - 05:30 PM EDT / 2016.08.03 2130 UTC</Time>
<Wind> from the WSW (240 degrees) at 17 MPH (15 KT):0</Wind>
<Visibility> greater than 7 mile(s):0</Visibility>
<SkyConditions> mostly cloudy</SkyConditions>
<Temperature> 59 F (15 C)</Temperature>
<DewPoint> 53 F (12 C)</DewPoint>
<RelativeHumidity> 82%</RelativeHumidity>
<Pressure> 29.56 in. Hg (1001 hPa)</Pressure>
<Status>Success</Status>
</CurrentWeather>]]></GetWeatherResult>
</GetWeatherResponse>
7.2.2 Provided to the virtual service
Portus uses the details from the WSDL for the request and response schemas for each method that can be called for the web service and creates a type specific POJO for each. The request POJO is passed as a parameter to the virtual service implementation and it is expected that an object of the response schema type is returned from the virtual service implementation.
This provides the user with a simple way to interpret what values are set on the input message and to set up a response message that is schema compliant and data rich.
Note that unlike other virtual service implementations, a SOAP implementation will have multiple methods to be implemented as a method in the virtual service implementation class will be required for each potential operation in defined in the WSDL.
7.2.3 Service configuration properties
The only service configuration properties that relates to an XML payload is the “recordingKeys” property. This needs to be extended for a SOAP virtual service as there may be multiple request message types that can be sent to the virtual service. For this reason, the recording keys for each operation are set in the service properties by appending the operation name to the string “recordingKeys” so for the previous example, the recording keys must be set in the property “recordingKeysGetWeather”.
This can then be set to one or more xpath statements, separated by commas, to be used to select the values in the entire SOAP request to use to uniquely identify a specific request. If we take the previously discussed SOAP request as an example:
<soapenv:Envelope xmlns:soapenv="http://schemas.xmlsoap.org/soap/envelope/" xmlns:web="http://www.webserviceX.NET">
<soapenv:Header/>
<soapenv:Body>
<web:GetWeather>
<!--Optional:-->
<web:CityName>Dublin</web:CityName>
<!--Optional:-->
<web:CountryName>Ireland</web:CountryName>
</web:GetWeather>
</soapenv:Body>
</soapenv:Envelope>
If the desire is to record an entry for each CityName and CountryName combination, the following recordingKeys statement would be required:
recordingKeysGetWeather=/soapenv:Envelope/soapenv:Body/web:GetWeather/web:CountryName/text(),/soapenv:Envelope/soapenv:Body/web:GetWeather/web:CityNamex/text()
Note that SOAP messages are heavily typed which leads to some relatively long winded xpath statements. In this case, the recording key and thus the filename in the recordings directory for this request would be “DublinIreland”.
If you wish to simplify this on the basis that a CityName will never be duplicated in multiple countries, use:
recordingKeysGetWeather=/soapenv:Envelope/soapenv:Body/web:GetWeather/web:CityName/text()
In this case, the recording key and thus the filename in the recordings directory for this request would be “Dublin”.
If no recordingKeys are provided for a given operation, or the recordingkeys provided do not exist or are empty, the full SOAP request will be used to create the key. All non-alpha numeric characters will be removed from the request to create a filename. If the result has a length less than 32 bytes, it will be used as the key name. If 32 bytes or longer, the Java string.hash() function is used to create a hash code which is used as the filename.
7.2.4 Recording responses
Any SOAP response will be recorded in <filename key>.payload file in the recordings directory. This SOAP may be modified but you must be sure that you maintain schema compliance or unpredictable results will occur.
7.3 Portus EVS record payload
A ‘record’ payload is simply a set of binary data which is mapped by some metadata. This is normally a language construct such as a COBOL structure contained in a COBOL copybook. This was the format used for most services prior to the creation of the XML and JSON standards and was used widely for client/server communications.
7.3.1 Defining the Meta Data
The COBOL meta data is provided as a COBOL copybook containing the COBOL structure that maps to the data. It is necessary to give Portus EVS some further details about the meta data and the payloads that will be processed so that these can be interpreted correctly. The following are the additional details that can be provided:
7.3.2 COBOL Source Columns
Initial COBOL compilers were very strict about column positions and nothing could be passed outside of column 72. Those who remember punch cards will understand this well. However, over time, compilers have become less fussy so there are a number of options here:
|
Columns Specification |
Description |
|
USE_LONG_LINE |
This will interpret the COBOL relatively strictly in terms of column placements but will allow COBOL definitions to be in columns past column 72. This is the default and recommended for most copybooks. |
|
FREE_FORMAT |
This will attempt to interpret the COBOL in free format with no checking of column placements. |
|
USE_COLS_6_TO_80 |
This will force the processing to only use columns 6 to 80. |
|
USE_PROPERTIES_FILE |
This will force the processing to use a properties file. This should not be required but if a copybook is found that cannot be processed by the other options, please contact Ostia support. |
|
USE_STANDARD_COLUMNS |
This will force the processing to only use columns 6 to 72. |
|
USE_SUPPLIED_COLUMNS |
This is included for completeness. It should not be used. |
7.3.3 COBOL Structure Split
COBOL copybooks come in various forms and can contain multiple stand alone structures. This option enables these to be dealt with as follows:
|
Split Specification |
Description |
|
SPLIT_NONE |
The copybook will be processed in its entirety as a single structure. As most copybooks are stand alone, this is the default and recommended option. |
|
SPLIT_01_LEVEL |
If a copybook contains multiple 01 sections, specify this option and the 01 sections will be treated as separate structures. |
|
SPLIT_HIGHEST_REPEATING |
If a copybook contains multiple sections that map individual data structures, this will split them based on the highest repeating section name. |
7.3.4 Input Data Organization
The data to be processed by Jrecord for a given structure will have a specific organization on disk. This is generally only important when processing files from disk as within Portus EVS, you will always be dealing with in core messages that are being passed, however, the setting may still have relevance:
|
Split Specification |
Description |
|
IO_FIXED_LENGTH
|
The data is fixed length chunk. This is the default option. |
|
IO_DEFAULT |
The framework will try to work out the format on the file. |
|
IO_STANDARD_TEXT_FILE |
This is a standard single byte text filed with end of record markers. |
|
IO_UNICODE_TEXT |
This is a standard Unicode text filed with end of record markers. |
|
IO_CONTINOUS_NO_LINE_MARKER |
The data has no end of record markets. |
|
IO_VB |
The data is a variable length file from mainframe. |
7.3.5 Input Data Dialect
The dialect refers to the way that various numeric formats are processed. There is extensive support in the tool for a large number of dialects so the most commonly used are listed here:
|
Split Specification |
Description |
|
FMT_INTEL |
The data is in the format of an Intel processor (little endian essentially) |
|
FMT_MAINFRAME |
The data is in the format of a mainframe processor (big endian essentially) |
The following is a full list of supported options. Please contact Ostia support if either of the above does not fit your needs:
· FMT_INTEL
· FMT_MAINFRAME
· FMT_FUJITSU
· FMT_BIG_ENDIAN
· FMT_GNU_COBOL
· FMT_FS2000
· FMT_GNU_COBOL_MVS
· FMT_GNU_COBOL_MF
· FMT_GNU_COBOL_BE
· FMT_FS2000_BE
· FMT_OPEN_COBOL_MVS_BE
· FMT_OC_MICRO_FOCUS_BE
· FMT_MAINFRAME_COMMA_DECIMAL
· FMT_FUJITSU_COMMA_DECIMAL
· FMT_OPEN_COBOL
· FMT_OPEN_COBOL_MVS
· FMT_OC_MICRO_FOCUS
· FMT_OPEN_COBOL_BE
7.3.6 Input Data Code page
This is also known in the jrecord world as the ‘font’. This is the code page in which the character elements of a COBOL structure are encoded. This is a standard for which there is much documentation on the internet. Please refer to the drop down in the GUI for the full list of supported code pages by the tool.
7.3.7 Interpreting the record data
The jrecord tool enables the data in the request and response records to be referenced via their field names using standard java calls. Consider the following request structure:
000100*
000200* Sample Ostia COBOL Copybook containing a request structure
000400*
000700* RECORD LENGTH IS 12.
000800*
000900 01 Request.
001000 03 Operation PIC X(04).
001100 03 Account PIC S9(08).
With the following data record:
GET 00000001
The data can be referenced via an abstract line function thus the two fields
may be referenced as follows:
String Operation = requestLine.getFieldValue(“Operation”).asString();
String Account = requestLine.getFieldValue(“Account”).asString();
For the creation of response records, consider the following response structure:
01 CustomerRecord.
03 Account pic 9(8).
03 FirstName pic x(20).
03 Surname pic x(20).
03 Address1 pic x(20).
03 Address2 pic x(20).
03 Address3 pic x(20).
To build the record equivalent to these fields, code such as the following is required.
AbstractLine line = null;
// Create Response
line = builder.newLine();
line.getFieldValue(“Account”).set("00000001");
line.getFieldValue(“FirstName”).set("Peter");
line.getFieldValue(“Surname”).set("Piper");
line.getFieldValue(“Address1”).set("1 High Street");
line.getFieldValue(“Address2”).set("Monto");
line.getFieldValue(“Address3”).set("Dublin");
writer.write(line);
writer.close();
Please refer to one of the COBOL based tutorials for further information.
7.3.8 Dealing with Binary Data
COBOL is by definition a business language and doesn’t always lend itself well to working with binary data, however, over the years, many organizations have use COBOL fields to contain binary data. In order to get data from a field in COBOL to a byte[] array as binary in java, do the following. The field containing the data in the COBOL structure is called BINARY-DATA-FIELD and following this, the data will be in a byte[] array called data:
//
// we have to interpret the data in the payload field as hex.
//
String hexData = request.getLine().getFieldValue("BINARY-DATA-FIELD").asHex();
byte[] data = DatatypeConverter.parseHexBinary(hexData);
This will place the binary content of the field for a length of the BINARY-DATA-FIELD field into the ‘data’ byte array.
To place binary data back into a COBOL field, the reverse is as follows assuming the data is in a byte[] array called retdata. Note this must be done by completing a byte array the full size of the target field:
byte[] retfield = new byte[line.getFieldValue("BINARY-DATA-FIELD getFieldDetail().getLen()];
System.arraycopy(retdata, 0, retfield, 0, retdata.length);
line.getFieldValue("OUT-BALTUS2-MSG-PAYLOAD").setHex(DatatypeConverter.printHexBinary(retfield));
7.3.9 Provided to the virtual service
Portus handles record payloads by interpreting the COBOL structures associated with a record request and response and then makes it available via a custom java object that allows reference to the data by field name from the COBOL structure as outlined previously.
This provides the user with a simple way to interpret what values are set on the input message and to set up a response message that complies with the data structure and is data rich.
7.3.10 Service configuration properties
The only service configuration properties that relates to a record payload is the “recordingKeys” property. This can be set to one or more field names from the COBOL request structure, separated by commas, to be used to select the values in the request record to use to uniquely identify a specific request. If we take the previous example request:
000100*
000200* Sample Ostia COBOL Copybook containing a request structure
000400*
000700* RECORD LENGTH IS 12.
000800*
000900 01 Request.
001000 03 Operation PIC X(04).
001100 03 Account PIC S9(08).
GET 00000001
If the desire is to record an entry for each Account number, the following recordingKeys statement would be required:
recordingKeys=Account
In this case, the recording key and thus the filename in the recordings directory for this request would be “00000001”.
If the desire was to include the operation name in the key, the following would be required:
recordingKeys=Operation,Account
In this case, the recording key and thus the filename in the recordings directory for this request would be “GET 00000001”.
If no recordingKeys are provided, or the recordingkeys provided do not exist or are empty, the full request record will be used to create the key. All non-alpha numeric characters will be removed from the request to create a filename. If the result has a length less than 32 bytes, it will be used as the key name. If 32 bytes or longer, the Java string.hash() function is used to create a hash code which is used as the filename.
7.4 Portus EVS byte payload
This is simply raw format payload for which no metadata exists or where Portus does not support the metadata available. It is managed as a Java byte[] array internally.
7.4.1 Interpreting the byte data
This will be up to the virtual service implementation.
7.4.2 Provided to the virtual service
Portus simply passes the request data received as a Java byte[] array to the virtual service implementation and expects a response to be returned as a Java byte[] array.
7.4.3 Service configuration properties
The only service configuration properties that relates to a record payload is the “recordingKeys” property. This can be set to one or more offset/length values to identify the portions of the request message to be used to construct the key for the recording. If we take the following example request:
GET 00000001
If the desire is to record an entry based on the last 4 bytes of the number in the request, the following would be required:
recordingKeys=9:4
In this case, the recording key and thus the filename in the recordings directory for this request would be “0001”.
If the desire was to include the operation name in the key, the following would be required:
recordingKeys=1:4,9:4
In this case, the recording key and thus the filename in the recordings directory for this request would be “GET 0001”.
If no recordingKeys are provided, or the recordingkeys provided do not exist or are empty, the full request data will be used to create the key. All non-alpha numeric characters will be removed from the request to create a filename. If the result has a length less than 32 bytes, it will be used as the key name. If 32 bytes or longer, the Java string.hash() function is used to create a hash code which is used as the filename.
7.4.4 Recording responses
Any byte response will be recorded in <filename key>.payload file in the recordings directory. This will be the format that would be returned on the call. While this may be modified, care must be taken if there is binary data in the payload as the editor could translate characters and thus corrupt the binary fields.
7.5 Portus EVS JSON payload
JSON (JavaScript Object Notation) is a common payload for services over JMS, MQ, REST and other transports.
7.5.1 Provided to the virtual service
Portus handles JSON payloads by interpreting a JSON sample record or the JSON schema associated with a JSON request and response and then parses the request as a Plain Old Java Object (POJO). This is then passed to the virtual service implementation as the request payload and will accept a POJO of the request type as the return value when request and content payload is of type JSON.
This provides the user with a simple way to interpret what values are set on the input message and to set up a response message that is schema compliant and data rich.
7.5.2 Service configuration properties
The only service configuration properties that relates to a JSON payload is the “recordingKeys” property. This can be set to one or more JsonPath statements, separated by commas, to be used to select the values in the request document to use to uniquely identify a specific request. If we take the following JSON message as an example:
{
"Account": 1,
"Firstname":"Peter",
"Surname":"Piper",
"Address1":"Ballydehob",
"Address2":"Mayo",
"Address3": "Ireland"
}
If the desire is to record an entry for each Firstname, Surname and Address3 combination, the following recordingKeys statement would be required:
$['Firstname'],$['Surname'],$['Address3']
In this case, the recording key and thus the filename in the recordings directory for this request would be “PeterPiperIreland”.
If you wish to simplify this on the basis that a Address2 will never be duplicated in multiple countries, use:
recordingKeys=$['Firstname']
In this case, the recording key and thus the filename in the recordings directory for this request would be “Mayo”.
If no recordingKeys are provided, or the recordingkeys provided do not exist or are empty, the full request record will be used to create the key. All non-alpha numeric characters will be removed from the request to create a filename. If the result has a length less than 32 bytes, it will be used as the key name. If 32 bytes or longer, the java string.hash() function is used to create a hash code which is used as the filename.
7.5.3 Recording responses
Any JSON response will be recorded in <filename key>.payload file in the recordings directory. This JSON may be modified but you must be sure that you maintain schema compliance or unpredictable results will occur.
8 Additional Portus Utility Information
8.1 Portus Integrate API
Portus integrate uses standard REST and SOAP based services to expose access to databases, files and applications on various platforms and technologies. These are standard services and are documented here. These services can be accessed directly from Java using standard capabilities to access SOAP or REST style services, however, to enable easier integration from the Portus EVS environment, Ostia offer a simpler API to access those services which is outlined in this document.
Note that this documentation must be used in association with the documentation referenced above.
8.1.1 The Key Requirements for Using a Service
The following data is required from Portus Integrate to access a service using the API:
1. The Host name or IP address where the Portus Integrate server is running.
2. The Port number on which the Portus Integrate server is listening.
3. The Service name of the service defined in the Portus Integrate server.
For the purposes of demonstration, the following may be used for testing as this service is available publically on the Internet:
1. Host: cloud.ostiasolutions.com
2. Port: 56432
3. Service: fyp_country
For example, with these details, we can issue a REST request via a standard browser using: http://cloud.ostiasolutions.com:56432/fyp_country?LIST&name=*
If a service has been defined by the standard Control Centre utilities, this is all that is required, however, in some cases, when services are changed or modified, the following is required in addition and can be determined by editing the XRD (data definition in the Control Centre) for the service:
1. The ServiceRoot.
2. The ServiceGroup.
By way of example, the following examples may be used for testing as this used in this service is available publically on the Internet:
1. Host: cloud.ostiasolutions.com
2. Port: 56432
3. Service: adabas_Employees_9_noxsl
4. ServiceRoot: adabasEmployees
5. ServiceGroup: adabasEmployee
8.1.2 Creating a PortusServiceAPI Service
This is done using the PortusServiceAPI class. For the simple case, it is done as follows:
PortusServiceAPI service = new PortusServiceAPI(<host>, <port> , <Service name>);
For the more complex case, it is done as follows:
PortusServiceAPI service = new PortusServiceAPI(<host>, <port> , <Service name>, "v1" , <ServiceRoot> , <ServiceGroup>);
8.1.3 Using the Service
With each database service, it’s possible to issue a Select, List, Add, Update or Delete.
8.1.4 Using List or Select
For Select and List, a query parameter is provided identical to that documented for the REST Select or List request and it will in turn return 0 or more java HashMaps of the format <String,Object>. For each instance of this, the key will be the name of the field returned and the Object value will be the String value for that field. For certain types of resources, the Object may in turn be a HashMap contain a nested set of data. This cannot occur for relational databases.
The following illustrates how to List all countries in the sample service with a name starting with ‘Al’:
PortusServiceAPI service = new PortusServiceAPI(host, port , Service);
String selection = "name=Al*";
List<HashMap<String , Object>> responses = service.list(selection);
The responses may then be processed as normal using standard Java techniques.
The following illustrates how to Select the data for the country ‘Afghanistan’:
PortusServiceAPI service = new PortusServiceAPI(host, port , Service);
String selection = "condition[1].name=Afghanistan";
List<HashMap<String , Object>> responses = service.select(selection)
The responses may then be processed as normal using standard Java techniques.
8.1.5 Using Add or Update
Add or Update require that you provide a Java HashMap<String,Object> with the field name as the key and the value for that name as the value. For relational databases, the Object will always be a string. As an example of adding some data:
String newKey = "TestCountry";
PortusServiceAPI service = new PortusServiceAPI(host, port , Service );
HashMap<String , Object> newRecord = new HashMap<String , Object>();
newRecord.put("name", newKey);
newRecord.put("iso3","ABC");
newRecord.put("numcode", "5");
newRecord.put("phonecode","53");
service.add(newRecord);
In the following example, we read the data for the country ‘Afghanistan’ and update its iso3 code and numcode:
PortusServiceAPI service = new PortusServiceAPI(host, port , Service );
String selection = "condition[1].name=Afghanistan";
List<HashMap<String , Object>> responses = service.select(selection);
HashMap<String , Object> newRecord = responses.get(0);
//
// now update it
//
newRecord.put("iso3","ABC");
newRecord.put("numcode", "5");
service.add(newRecord);
8.1.6 Using Delete
Delete requires that you provide the primary key of the data you wish to delete. An example of a delete is shown below which will delete the record added in the example above.:
PortusServiceAPI service = new PortusServiceAPI(host, port , Service );
String primaryKey = "name= TestCountry";
service.delete(primaryKey);
8.1.7 Errors
Errors will generally be thrown as Exceptions that can be caught and dealt with in the usual ways in Java. For List and Select, if no records match the provided criteria, the results returned will have 0 content as this is always possible.
8.2 Portus IOS8583 Binary Coded Decimal API
ISO 8583 is an international standard for financial transaction card originated interchange messaging. It is the International Organization for Standardization standard for systems that exchange electronic transactions initiated by cardholders using payment cards. This API implements this standard using a Binary Coded Decimal format where numeric values are packed into the high order and low order nibbles of the target byte. So, a value of ‘12345678’ will be packed to X’12345678’ while value ‘12345’ will be packed to X’012345’.
Note that the API always assumes that the values in the packed records are Big Endian binary values.
In order to use the interface, first initialize the class as follows:
PortusISO8583BCDApi bcdProcess = new PortusISO8583BCDApi();
The bcdProcessfield can now be used to map an ISO8583 Binary Code record to a LinkedHashMap as follows:
LinkedHashMap<String, String> reqdata = bcdProcess.processRecord(BCDdata, <codepage>);
Where:
- reqData will be filled with an entry per field in the data. This can be addressed by issuing a value = reqdata.get(<fieldname>) where ‘<fieldname>’ is the field name documented in ISO8583 Field details section of this document.
- BCDdata is the binary encoded data record.
- ‘<codepage>’ is the data code page for the character data in the stream.
In order to create a binary record, a LinkedHashMap must be built as follows:
LinkedHashMap<String, String> retdata = new LinkedHashMap<String,String>();
retdata.put("Mtiin", "0110");
retdata.put("Response code", "39");
retdata.put("Account identification 1", "Test Account identification 1");
retdata.put("Account identification 2", "Test Account identification 2");
byte[] retrec = bcdProcess.processFields(retdata, <codepage>);
Where:
- The retdata LinkedHashMap will be filled with an entry per field to be created in the resultant data record. This can be populated with values by issuing a retdata.put(<fieldname>,<fieldvalue>) where ‘<fieldname>’ is the field name documented in ISO8583 Field details section of this document and ‘<fieldvalue>’ is the value to be placed in that field.
- Retrec is the binary encoded data record returned.
- ‘<codepage>’ is the data code page for the character data returned in the new binary encoded data record.
8.2.1 ISO8583 Field Details
The following table contains the ISO8583 list of fields supported by the implementation and how the fields are treated. The key is as follows:
- “ISO8583 Field Number” is the number of the field as defined by the ISO8583 specification
- “Portus Field Name” is the name that is used by Portus to refer to this field and is used to return data and to pass data to the API.
- “Minimum Length” is the smallest length of data acceptable for the field.
- “Maximum Length” is the largest length of data acceptable for the field.
o Note when “Maximum Length” = “Minimum Length” the field is of fixed length
- “Length Prefix” determines if the field is prefixed by a length in the data.
o 0 – No length
o 1 - 2 byte length
o 2 – 3 byte length
- “Data Type” is the type of data in the field:
o Numeric – data may contain only the characters 0 to 9. These fields will be encoded using the decimal encoding standard
o Numeric Special Chars – the data may contain the characters defined by Numeric but may also contain special character.
o Binary – Data is a bit map
o Alpha Numeric – the data may contain only characters 0 to 9, a to z or A to Z
o Alpha Numeric Special Chars – the data may contain the characters defined by Alpha Numeric but may also contain special characters
Note that field 1 is documented for completeness and must never be specified as it is created by the implementation based on the data provided via the API.
There is an additional field name which must be provided or returned which is the “Mtiin”, This is a 4-digit request or response message number. This will be mapped to its 2 byte binary equivalent internally by the API.
|
ISO8583 Field Number |
Portus Field Name |
Minimum Length |
Maximum Length |
Length Prefix
|
Data Type |
|
1 |
"Secondary_Bit_Map" |
8 |
8 |
0 |
Binary |
|
2 |
"Primary_Account_Number-PAN" |
16 |
16 |
1 |
Numeric |
|
3 |
"Processing_Code" |
6 |
6 |
0 |
Numeric |
|
4 |
"Amount-Transaction" |
12 |
12 |
0 |
Numeric |
|
5 |
"Amount-Reconciliation" |
12 |
12 |
0 |
Numeric |
|
6 |
"Amount-Cardholder_Billing" |
12 |
12 |
0 |
Numeric |
|
7 |
"Transmission date & time" |
10 |
10 |
0 |
Numeric |
|
8 |
"Amount cardholder billing fee" |
8 |
8 |
0 |
Numeric |
|
9 |
"Conversion_Rate-Reconciliation" |
8 |
8 |
0 |
Numeric |
|
10 |
"Conversion_Rate-Cardholder_Billing" |
8 |
8 |
0 |
Numeric |
|
11 |
"System trace audit number (STAN)" |
6 |
6 |
0 |
Numeric |
|
12 |
"Time local transaction (hhmmss)" |
6 |
6 |
0 |
Numeric |
|
13 |
"Date local transaction (MMDD)" |
4 |
4 |
0 |
Numeric |
|
14 |
"Date-Expiration" |
4 |
4 |
0 |
Numeric |
|
15 |
"Date settlement" |
4 |
4 |
0 |
Numeric |
|
16 |
"Date conversion" |
4 |
4 |
0 |
Numeric |
|
17 |
"Date capture" |
4 |
4 |
0 |
Numeric |
|
18 |
"Merchant type" |
4 |
4 |
0 |
Numeric |
|
19 |
"Acquiring institution country code" |
3 |
3 |
0 |
Numeric |
|
20 |
"PAN extended country code" |
3 |
3 |
0 |
Numeric |
|
21 |
"Forwarding institution. country code" |
3 |
3 |
0 |
Numeric |
|
22 |
"Point_of_Service_Data_Code" |
3 |
3 |
0 |
Numeric |
|
23 |
"Card_Sequence_Number" |
3 |
3 |
0 |
Numeric |
|
24 |
"Function_Code" |
3 |
3 |
0 |
Numeric |
|
25 |
"Point of service condition code" |
2 |
2 |
0 |
Numeric |
|
26 |
"Point of service capture code" |
2 |
2 |
0 |
Numeric |
|
27 |
"Authorizing identification response length" |
1 |
1 |
0 |
Numeric |
|
28 |
"Amount transaction fee" |
5 |
5 |
0 |
Alpha Numeric |
|
29 |
"Amount settlement fee" |
5 |
5 |
0 |
Alpha Numeric |
|
30 |
"Amount transaction processing fee" |
5 |
5 |
0 |
Alpha Numeric |
|
31 |
"Amount settlement processing fee" |
5 |
5 |
1 |
Alpha Numeric |
|
32 |
"Acquiring_Institution_ID_Code" |
1 |
11 |
1 |
Numeric |
|
33 |
"Forwarding_Institution_ID_Code" |
6 |
11 |
1 |
Numeric |
|
34 |
"Primary account number extended" |
1 |
28 |
1 |
Numeric / Special Chars |
|
35 |
"Track 2 data" |
1 |
37 |
1 |
Alpha Numeric |
|
36 |
"Track 3 data" |
1 |
104 |
1 |
Numeric |
|
37 |
"Retrieval_Reference_Number" |
12 |
12 |
0 |
Alpha Numeric |
|
38 |
"Approval_Code" |
6 |
6 |
0 |
Alpha Numeric |
|
39 |
"Response code" |
2 |
2 |
0 |
Alpha Numeric |
|
40 |
"Service_Code" |
3 |
3 |
0 |
Alpha Numeric |
|
41 |
"Card_Acceptor_Terminal_ID" |
16 |
16 |
0 |
Alpha Numeric / Special Chars |
|
42 |
"Card_Acceptor_ID_Code" |
15 |
15 |
0 |
Alpha Numeric / Special Chars |
|
43 |
"Card_Acceptor_Name-Location" |
40 |
40 |
0 |
Alpha Numeric / Special Chars |
|
44 |
"Additional response data" |
1 |
25 |
1 |
Alpha Numeric |
|
45 |
"Track 1 data" |
1 |
76 |
1 |
Alpha Numeric |
|
46 |
"Additional data - ISO" |
1 |
999 |
2 |
Alpha Numeric |
|
47 |
"Additional data - national" |
1 |
999 |
2 |
Alpha Numeric |
|
48 |
"Additional data - private" |
1 |
999 |
2 |
Alpha Numeric |
|
49 |
"Currency_Code-Transaction" |
3 |
3 |
0 |
Numeric |
|
50 |
"Currency_Code-Reconciliation" |
3 |
3 |
0 |
Numeric |
|
51 |
"Currency_Code-Cardholder_Billing" |
3 |
3 |
0 |
Alpha Numeric |
|
52 |
"Personal identification number data" |
8 |
8 |
0 |
Binary |
|
53 |
"Security related control information" |
16 |
16 |
0 |
Numeric |
|
54 |
"Amounts-Additional" |
10 |
120 |
2 |
Alpha Numeric |
|
55 |
"ICC Data - EMV having multiple tags" |
1 |
255 |
2 |
Alpha Numeric / Special Chars |
|
56 |
"Reserved ISO" |
1 |
999 |
2 |
Alpha Numeric / Special Chars |
|
57 |
"Reserved national-57" |
1 |
999 |
2 |
Alpha Numeric / Special Chars |
|
58 |
"Reserved national-58" |
1 |
999 |
2 |
Alpha Numeric / Special Chars |
|
59 |
"Reserved national-59" |
1 |
999 |
2 |
Alpha Numeric / Special Chars |
|
60 |
"Reserved national-60" |
1 |
999 |
2 |
Alpha Numeric / Special Chars |
|
61 |
"Reserved private-61" |
1 |
999 |
2 |
Alpha Numeric / Special Chars |
|
62 |
"Reserved private-62" |
1 |
999 |
2 |
Alpha Numeric / Special Chars |
|
63 |
"Reserved private-63" |
1 |
999 |
2 |
Alpha Numeric / Special Chars |
|
64 |
"Message authentication code (MAC)" |
8 |
8 |
0 |
Alpha Numeric / Special Chars |
|
65 |
"Bitmap extended" |
1 |
1 |
0 |
Binary |
|
66 |
"Settlement code" |
1 |
1 |
0 |
Numeric |
|
67 |
"Extended payment code" |
2 |
2 |
0 |
Numeric |
|
68 |
"Receiving institution country code" |
3 |
3 |
0 |
Numeric |
|
69 |
"Settlement institution country code" |
3 |
3 |
0 |
Numeric |
|
70 |
"Network management information code" |
3 |
3 |
0 |
Numeric |
|
71 |
"Message_number" |
4 |
4 |
0 |
Numeric |
|
72 |
"Message number last" |
4 |
4 |
0 |
Numeric |
|
73 |
"Date-Action" |
6 |
6 |
0 |
Numeric |
|
74 |
"Credits number" |
10 |
10 |
0 |
Numeric |
|
75 |
"Credits reversal number" |
10 |
10 |
0 |
Numeric |
|
76 |
"Debits number" |
10 |
10 |
0 |
Numeric |
|
77 |
"Debits reversal number" |
10 |
10 |
0 |
Numeric |
|
78 |
"Transfer number" |
10 |
10 |
0 |
Numeric |
|
79 |
"Transfer reversal number" |
10 |
10 |
0 |
Numeric |
|
80 |
"Inquiries number" |
10 |
10 |
0 |
Numeric |
|
81 |
"Authorizations number" |
10 |
10 |
0 |
Numeric |
|
82 |
"Credits processing fee amount" |
12 |
12 |
0 |
Numeric |
|
83 |
"Credits transaction fee amount" |
12 |
12 |
0 |
Numeric |
|
84 |
"Debits processing fee amount" |
12 |
12 |
0 |
Numeric |
|
85 |
"Debits transaction fee amount" |
12 |
12 |
0 |
Numeric |
|
86 |
"Credits amount" |
16 |
16 |
0 |
Numeric |
|
87 |
"Credits reversal amount" |
16 |
16 |
0 |
Numeric |
|
88 |
"Debits amount" |
16 |
16 |
0 |
Numeric |
|
89 |
"Debits reversal amount" |
16 |
16 |
0 |
Numeric |
|
90 |
"Original data elements" |
42 |
42 |
0 |
Numeric |
|
91 |
"File update code" |
1 |
1 |
0 |
Alpha Numeric |
|
92 |
"File security code" |
2 |
2 |
0 |
Alpha Numeric |
|
93 |
"Response indicator" |
5 |
5 |
0 |
Alpha Numeric |
|
94 |
"Service indicator" |
7 |
7 |
0 |
Alpha Numeric |
|
95 |
"Replacement amounts" |
42 |
42 |
0 |
Alpha Numeric |
|
96 |
"Message security code" |
8 |
8 |
0 |
Binary |
|
97 |
"Amount net settlement" |
16 |
16 |
0 |
Numeric |
|
98 |
"Payee" |
25 |
25 |
0 |
Alpha Numeric / Special Chars |
|
99 |
"Settlement institution identification code" |
6 |
11 |
1 |
Numeric |
|
100 |
"Receiving_Institution_ID_Code" |
6 |
11 |
1 |
Numeric |
|
101 |
"File name" |
1 |
17 |
1 |
Alpha Numeric / Special Chars |
|
102 |
"Account identification 1" |
1 |
35 |
1 |
Alpha Numeric / Special Chars |
|
103 |
"Account identification 2" |
1 |
35 |
1 |
Alpha Numeric / Special Chars |
|
104 |
"Transaction description" |
1 |
100 |
2 |
Alpha Numeric / Special Chars |
|
105 |
"Reserved for ISO use-105" |
1 |
999 |
2 |
Alpha Numeric / Special Chars |
|
106 |
"Reserved for ISO use-106" |
1 |
999 |
2 |
Alpha Numeric / Special Chars |
|
107 |
"Reserved for ISO use-107" |
1 |
999 |
2 |
Alpha Numeric / Special Chars |
|
108 |
"Reserved for ISO use-108" |
1 |
999 |
2 |
Alpha Numeric / Special Chars |
|
109 |
"Reserved for ISO use-109" |
1 |
999 |
2 |
Alpha Numeric / Special Chars |
|
110 |
"Reserved for ISO use-110" |
1 |
999 |
2 |
Alpha Numeric / Special Chars |
|
111 |
"Reserved for ISO use-111" |
1 |
999 |
2 |
Alpha Numeric / Special Chars |
|
112 |
"Reserved for national use-112" |
1 |
999 |
2 |
Alpha Numeric / Special Chars |
|
113 |
"Reserved for national use-113" |
1 |
999 |
2 |
Alpha Numeric / Special Chars |
|
114 |
"Reserved for national use-114" |
1 |
999 |
2 |
Alpha Numeric / Special Chars |
|
115 |
"Reserved for national use-115" |
1 |
999 |
2 |
Alpha Numeric / Special Chars |
|
116 |
"Reserved for national use-116" |
1 |
999 |
2 |
Alpha Numeric / Special Chars |
|
117 |
"Reserved for national use-117" |
1 |
999 |
2 |
Alpha Numeric / Special Chars |
|
118 |
"Reserved for national use-118" |
1 |
999 |
2 |
Alpha Numeric / Special Chars |
|
119 |
"Reserved for national use-119" |
1 |
999 |
2 |
Alpha Numeric / Special Chars |
|
120 |
"Reserved for private use-120" |
1 |
999 |
2 |
Alpha Numeric / Special Chars |
|
121 |
"Reserved for private use-121" |
1 |
999 |
2 |
Alpha Numeric / Special Chars |
|
122 |
"Reserved for private use-122" |
1 |
999 |
2 |
Alpha Numeric / Special Chars |
|
123 |
"Reserved for private use-123" |
1 |
999 |
2 |
Alpha Numeric / Special Chars |
|
124 |
"Reserved for private use-124" |
1 |
999 |
2 |
Alpha Numeric / Special Chars |
|
125 |
"Reserved for private use-125" |
1 |
999 |
2 |
Alpha Numeric / Special Chars |
|
126 |
"Reserved for private use-126" |
1 |
999 |
2 |
Alpha Numeric / Special Chars |
|
127 |
"Reserved for private use-127" |
1 |
999 |
2 |
Alpha Numeric / Special Chars |
|
128 |
"Message authentication code" |
8 |
8 |
0 |
Binary |
8.3 Portus Integrate Extended API
The standard Portus API was designed as a simple, easy to use API to access Portus Integrate services, however, when more complex approaches are needed for working with result sets, versioning or transactionality is required, this interface must be used as it is more functional. It also hides details of the Portus service namespaces.
Portus integrate uses standard REST and SOAP based services to expose access to databases, files and applications on various platforms and technologies. These are standard services and are documented here. In addition, the various soap headers used to extend the functionality are also documented there. These services can be accessed directly from Java using standard capabilities to access SOAP or REST style services, however, to enable easier integration from the Portus EVS environment, Ostia offer a full functional API to access those services using the extended features which is documented below.
Note that this documentation must be used in association with the documentation referenced above.
8.3.1 The Key Requirements for Using a Service
The only requirement to use a Portus Integrate service is that the WSDL for the service is available. The following is an example of a WSDL that can be used by this interface which represents a relational table:
http://cloud.ostiasolutions.com:56432/fyp_country?WSDL
Other data sources use more complex structures such as the following which exposes an ADABAS file:
http://cloud.ostiasolutions.com:56432/adabas_Employees_9_noxsl?WSDL
Where a database resource is protected and a userid and password is required, these can also be provided using this interface.
8.3.2 Creating a PortusServiceAPISoapSoap Service
This is done using the PortusServiceAPISoap class. The class must be instantiated as follows:
PortusServiceAPISoap service = new PortusServiceAPISoap(<wsdl>, <userid> , <password>);
If no userid and password is required, the service can be instantiated as follows:
PortusServiceAPISoap service = new PortusServiceAPISoap(<wsdl>, null , null);
8.3.3 Using the Service
With each database service, it’s possible to issue the following commands:
- List to return zero or more records based on primary or secondary keys.
- SelectCount to return the number of records that will be returned for a specific set of keys.
- Select/SelectNext/SelectEnd to create result sets and return those records using multiple calls.
- Add to add a new record to the back end database.
- Update to update a record on the back end database.
- Delete to delete the record on the back end database.
- GetRequest to get a sample request for any of the above functions.
- GetHeaders to get the soap headers understood by the service in use. (These are documented in the documentation referenced at the start of this document.
8.3.4 Providing Key Data to The Delete or List functions
Data is provided to the List interface by way of java HashMaps which at the simplest level is made up of XML node names and values. So, in the simple case of a list function for the sample, the key field values are as follows:
<soapenv:Body>
<fyp:fyp_countryGroupListElement>
<name>?</name>
</fyp:fyp_countryGroupListElement>
</soapenv:Body>
In order to set up a key for a List request, the following java code would be required:
PortusServiceAPISoap service = new PortusServiceAPISoap(<wsdl>,<userid>,<password>);
HashMap<String,Object> keys = new HashMap<String,Object>();
Keys.put("name”,”Al*");
List<HashMap<String , Object>> responses = service.list(keys);
For more complex data sources, the key data may look like this:
<soapenv:Body>
<adab:adabasEmployeeListElement>
<Personnel_Data>
<personnel_id>?</personnel_id>
<ID_Data>
<personnel_no>?</personnel_no>
</ID_Data>
</Personnel_Data>
<Full_Name>
<name>?</name>
</Full_Name>
<birth>?</birth>
<!--1 to 4 repetitions:-->
<Private_Address>
<city>?</city>
<Phone_email>
<!--1 to 8 repetitions:-->
<email>?</email>
</Phone_email>
</Private_Address>
<!--1 to 4 repetitions:-->
<Business_Address>
<city>?</city>
<Phone_email>
<!--1 to 8 repetitions:-->
<email>?</email>
</Phone_email>
</Business_Address>
<department>?</department>
<job_title>?</job_title>
<!--1 to 4 repetitions:-->
<Income>
<!--1 to 8 repetitions:-->
<bonus>?</bonus>
</Income>
<!--1 to 8 repetitions:-->
<language>?</language>
<ISN_Adabas_Driver_212_9>?</ISN_Adabas_Driver_212_9>
<H1>
<leave_due>?</leave_due>
<leave_taken>?</leave_taken>
</H1>
<S2>
<department>?</department>
<name>?</name>
</S2>
<S3>
<curr_code>?</curr_code>
<salary>?</salary>
</S3>
<S1>
<department>?</department>
</S1>
</adab:adabasEmployeeListElement>
</soapenv:Body>
In order to provide keys for a list for this, the keys must reflect the key structure. For the above, to provide a key for the personnel_id field, the following java is required:
HashMap<String,Object> keys = new HashMap<String,Object>();
HashMap<String,Object> subKey = new HashMap<String,Object>();
subKey.put("personnel_id", "1110010*");
keys.put("Personnel_Data",
subKey);
List<HashMap<String , Object>> responses
= service.list(keys);
8.3.5 Providing Data to The Add or Update functions
In a similar way, add and update will be passed a HashMap containing the various fields to be added to or updated on the target resource. For example, the following adds a record to the simple example:
HashMap<String , Object> newRecord = HashMap<String , Object>();
newrecord.put("name", “new country name”);
newRecord.put("iso3","ABC");
newRecord.put("numcode", "5");
newRecord.put("phonecode","53");
service.add(newRecord);
For the more complex example, Java code must reflect the structure of the XML. The following is the first part of the java required:
HashMap<String , Object> newRecord = new HashMap<String , Object>();
HashMap<String , Object> personnel_data = new HashMap<String , Object>();
personnel_data.put("personnel_id", "12345678");
newRecord.put("Personnel_Data", personnel_data);
HashMap<String,Object> full_name = new HashMap<String,Object>();
newRecord.put("Full_Name",full_name);
full_name.put("firstname", "Peter");
full_name.put("middlename", "Frank");
full_name.put("name", "Piper");
List<HashMap> list = new ArrayList<HashMap>();
newRecord.put("Private_Address" , list);
HashMap<String,Object> private_address = new HashMap<String,Object>();
list.add(private_address);
HashMap<String,Object> phone_email = new HashMap<String,Object>();
private_address.put("Phone_email",phone_email);
phone_email.put("area_code", "086");
phone_email.put("phone", "2490683");
newRecord.put("mar_stat", "M");
service.add(newRecord);
8.3.6 Providing Key Data to The Select or SelectCount functions
The Select keys are more complex as it’s possible to create relatively complex queries. Consider the following select or selectCount request:
<soapenv:Body>
<fyp:fyp_countryGroupSelectElement>
<!--1 or more repetitions:-->
<condition>
<!--Zero or more repetitions:-->
<name Condition="NE">?</name>
</condition>
</fyp:fyp_countryGroupSelectElement>
</soapenv:Body>
The following java builds the conditions that are required to get the data for the country called “Afghanistan” or “American Samoa”:
HashMap<String,Object> conditions = new HashMap<String,Object>();
List<List> conditionsList = new ArrayList<List>();
conditions.put(“condition”, conditionsList);
List<HashMap> conditionList = new ArrayList<HashMap>();
conditionsList.add(conditionList);
HashMap<String , Object> condition1 = new HashMap<String , Object>() ;
PortusServiceAPICondition cond1 = new PortusServiceAPICondition ();
cond1.setCondition(ConditionType.EQ);
cond1.setValue("Afghanistan");
condition1.put("name", cond1);
conditionList.add(condition1);
conditionList = new ArrayList<HashMap>();
conditionsList.add(conditionList);
HashMap<String , Object> condition2 = new HashMap<String , Object>() ;
PortusServiceAPICondition cond2 = new PortusServiceAPICondition ();
cond2.setCondition(ConditionType.EQ);
cond2.setValue("American Samoa");
condition2.put("name", cond2);
conditionList.add(condition2);
List<HashMap<String , Object>> responses = service.select(conditions);
8.3.7 Data Returned from Select, SelectNext or List
Each of these functions returns a Java List of HashMaps. Each entry in the list represents one record or row from the back end resource. At a simple level where the resource has one level of information, such as for a relational database table, the HashMap will contain an entry for each of the fields or columns in the database. For more complex formats, there will be multiple levels of HashMaps that represent the structure of the back end database.
8.3.8 Errors
Errors will generally be thrown as Exceptions that can be caught and dealt with in the usual ways in Java. For List and Select, if no records match the provided criteria, the results returned will have 0 content as this is always possible.
8.4 The Portus Payload Management API
A key component of the Portus framework is the ability to enable programmers to work with familiar Java objects, namely Plain Old Java Objects (POJOs), which can then be easily created, manipulated and queried without needing to know anything about the type of data or the structure of the data. The Portus framework uses this payload processing extensively internally and exposes this interface to enable programmers to make use of the same capability.
These payloads may then also be passed as parameters to various other APIs provided by the Ostia framework.
8.4.1 Defining a Payload
Payloads are defined as part of the creation of a project or by updating the project after it has initially been built. Within the Portus EVS project, the Payload properties file (found in the project’s src/main/resource/ directory) contains a definition for each payload that is defined to the project including the following:
a. A unique id by which it can be referenced.
b. The format of the payload Meta data (e.g. XSD, JSON, Cobol etc.)
c. The name of the file containing the Meta data. This file must be found in the project src/main/resources/payloads/ directory in the project.
These files are processed during the build step for the project to ensure that the required objects are available at run time for the sandbox.
If you wish to use this interface for COBOL payloads, please contact Ostia.
8.4.2 The Class generated for an XML or JSON Payload
During the build process, a Java class is created in a package for each defined payload. This package will be named as follows:
<groupid>.genreated.sv.pojo.<payloadname>
Where:
- <groupid> is the maven groupid for the sandbox project
- <payloadname> is the name given to the payload
This will become part of the ‘Java Resources’ in an Eclipse project but can be found at in the directory target/payloads/ when the project has been built. Note that the target directory will be deleted when a ‘mvn clean’ is issued.
8.4.3 Creating a PayloadUtils Instance
This is done using the PayloadUtils class. The class must be instantiated as follows:
PayloadUtils myPayload = new PayloadUtils (<payloadId>);
Where ‘<payloadId>’ is the unique id for the payload as defined in the payload properties file.
8.4.4 Using the PayloadUtils Instance
There are currently there functions that can be used on a PayloadUtils instance:
8.4.4.1 getObject
This will return an instance of the Java object defined by the payload. As part of the build, the Portus framework will have built classes in support of this as documented earlier. A typical usage of this would be as follows:
<PayloadClass> myPayloadObject = (<PayloadClass>) myPayload.getObject();
Where:
- ‘<PayloadClass>’ is the java class generated to represent the payload object for JSON and XML.
Once this has completed, the myPayloadObject instance can be used to set/get values in the POJO.
8.4.4.2 writeDataToObject
This will take the data in the form of an XML or JSON string, map this to the POJO object and return the object filled out based on the input. A typical usage of this would be as follows:
<PayloadClass> myPayloadObject = (<PayloadClass>) myPayload.getWriteDataToObject(<data>);
Where:
- ‘<PayloadClass>’ is the java class generated to represent the payload object for JSON and XML.
- ‘<data>’ is the JSON or XML data.
Once this has completed, the myPayloadObject instance can be used to set/get values in the POJO.
8.4.4.3 getPayloadData
This will return the data in the current object as an XML or JSON string. A typical usage of this would be as follows:
String myData = (String) myPayload.getPayloadData();
Following this call, myData will contain the JSON or XML representation of the object.
8.4.5 Errors
Errors will generally be thrown as Exceptions that can be caught and dealt with in the usual ways in Java.
8.5 The Portus Context Management API
The Portus framework requires the ability to maintain a context over multiple calls such that it can accurately reflect how the sandboxed system functions. The Portus framework provides an API to manage this as there are occasions where contexts may be maintained locally to a single instance of a project. This may be the case where a developer is using a sandbox and doesn’t want to or need to share the context. There are also occasions where the context must be shared between sandboxes such as when a performance test is being run across multiple sandboxes. In these cases, a subsequent request may appear on any of the other sandbox instances and thus must have access to the contexts.
8.5.1 What is a Context?
A context at a high level represents some state depending on the use case. In most, if not all scenarios, there will be multiple contexts that are created to support the particular sandbox requirements. Physically the context is a set of data containing information. Ostia tend to use XML but JSON format could also be used and in fact binary objects could be used as well to hold the information. The context API is blind to the format of the data provided for any given context.
Taking some use cases where Ostia have created sandboxes, the following illustrates the contexts required in support of that:
1. A Sandbox for a Credit card payment system:
a. The first context represents the merchant id and holds their password.
b. The second context holds information related to each transaction so that its progress can be mapped throughout the lifecycle of the transaction.
2. A Sandbox to map a banks customer information:
a. The first context represents the customer, their access details and the accounts they have with the bank.
b. The second context represents each account held by the customer and potentially the transactions against that account
3. A Sandbox to map a mobile phone user:
a. The first context represents the customer, their access details and the phone number(s) they have with that provider.
b. The second context represents each phone number and the usage records for that phone.
c. The third context represents the account information for that customer.
8.5.2 Identifying a Context
The Portus framework uses the concept of a ‘set’ which represents a set of related contexts. Within each ‘set’ each different context would require a unique id within the set of contexts. For example, for a customer context, the set name may be ‘customers’ and the ID would then be the customers unique account number. For account information, the set might be ‘accounts’ and the ID would be the individual account number for each account.
The goal is that the contexts can be stored and retrieved easily based on well data well known to the sandbox implementation.
8.5.3 Instantiating the PortusContext Class
In order to use the Portus Context Management API, you must instantiate an instance of PortusContext as follows:
PortusContext myContextMgr = new PortusContext ();
8.5.4 Creating a Context
A context is created using the ‘create’ method as follows:
myContextMgr.create (<set>,<id>,<contextData>);
Or
myContextMgr.create (<set>,<id>,<PortusPayloadObject>);
Where:
- <set> is a string containing the name of the set of data to which the context belongs.
- <id> is the unique id for the context within the set.
- <contextData> is a java byte[] array containing the context data.
- <PortusPayloadObject> is a Portus Payload object containing the data that represents the context.
If the <set> and <id> already exist, an error will occur.
8.5.5 Reading a Context
A context is read using the ‘read’ method as follows:
byte[] <contextData> = myContextMgr.read (<set>,<id>);
Or
myContextMgr.read (<set>,<id>,<PortusPayloadObject>);
Where:
- <set> is a string containing the name of the set of data to which the context belongs.
- <id> is the unique id for the context within the set.
- <contextData> is a java byte[] array in which the context data is returned.
- <PortusPayloadObject> is a Portus Payload object which is populated with the context data.
If the <set> and <id> do not exist, null will be returned.
8.5.6 Updating a Context
A context is updated using the ‘update’ method as follows:
myContextMgr.update (<set>,<id>,<contextData);
Or
myContextMgr.update (<set>,<id>,<PortusPayloadObject>);
Where:
- <set> is a string containing the name of the set of data to which the context belongs.
- <id> is the unique id for the context within the set.
- <contextData> is a java byte[] array containing the context data to update the context
- <PortusPayloadObject> is a Portus Payload object which is used to update the context data.
If the <set> and <id> do not exist, an exception will be thrown.
8.5.7 Deleting a Context
A context is deleted using the ‘delete’ method as follows:
myContextMgr.delete (<set>,<id>);
Where:
- <set> is a string containing the name of the set of data to which the context belongs.
- <id> is the unique id for the context within the set.
If the <set> and <id> do not exist, an exception will be thrown.
8.5.8 Errors
Errors will generally be thrown as Exceptions that can be caught and dealt with in the usual ways in Java.
8.6 The Portus MQ API
While the MQ API is openly available, it can be difficult to navigate the myriad of options around it when all that is required is to be able to put data on a queue or take data off a queue. The Portus MQ API is a simple API which hides a lot of the complexity and provides a neater way to interact with MQ.
8.6.1 The MQ Manager
The key to communicating using MQ is the MQ Manager to be used. The MQ Manager is known by an MQ Manager name and can be accessed locally, if running on the same machine as the code, or remotely when running on a different machine. In order to access a local MQ Manager, the following are required:
1. The MQ Manager name.
2. Userid to access the MQ Manager (optional).
3. Password related to the userid (optional).
To access a remote MQ Manager name, the following is required:
1. The MQ Manager name.
2. The host name or IP address where the MQ Manager is running.
3. The port number on which the MQ Manager is listening (default 1414).
4. The service connection channel to be used.
5. Userid to access the MQ Manager (optional).
6. Password related to the userid (optional)
Apart from the above, you will need to know the queue name(s) that you wish to write to or read from.
8.6.2 Writing to or reading from a queue
Often the requirement is simply to write a single message to a queue or read a single message from a queue. For this reason, the PortusMQAPI offers the ability to write to a specific queue name or read from a specific queue name without having to open and close the queue. The open and close of the queue will be done by the underlying implementation thus simplifying your code.
If you wish to write or read multiple messages, it is more efficient to open the queue and then process as many messages as are required. The API also provides this capability.
8.6.3 Initializing a Connection to a Queue Manager
This is done using the following constructors. For a remote queue manager, do the following:
PortusMQAPI mqapi = new PortusMQAPI(managerName , managerHost , managerPort, managerChannel, userid, password );
Where:
- managerName is the MQ Manager name.
- managerHost is host name or IP address where the MQ Manager is running.
- managerPort is the port number on which the MQ Manager is listening (default 1414).
- managerChannel is the MQ service connection channel to be used.
- userid is the userid to access the MQ Manager (optional).
- password is the password related to the userid (optional).
For a local queue manager, do the following:
PortusMQAPI mqapi = new PortusMQAPI(managerName ,userid, password );
Where:
- managerName is the MQ Manager name.
- userid is the userid to access the MQ Manager (optional).
- password is the password related to the userid (optional).
8.6.4 Open a Queue for Output
To open a queue for output, use the openOutput method as follows:
MQQueue oQueue = mqapi.openOutput(queueName);
Where:
- queueName is the name of the queue you wish to open for output.
8.6.5 Open a Queue for Input
To open a queue for input, use the openInput method as follows:
MQQueue oQueue = mqapi.openInput(queueName);
Where:
- queueName is the name of the queue you wish to open for input.
8.6.6 Writing to a Queue
To write a message to a queue that has been previously opened, do the following:
MQMessage msg = new MQMessage();
mqapi.writeToQueue(oQueue, msg, msgData);
Where:
- oQueue is the MQQueue object returned from openOutput.
- msg is an MQMessage object initialized as required by your interface.
- msgData is the data to be written to the queue.
If you wish to write to a queue that has not been opened, do the following:
mqapi.writeToQueue(queueName, msgData);
Where:
- queueName is the name of the queue you wish to write to.
- msgData is the data to be written to the queue.
8.6.7 Reading from a Queue
To read a message from a queue that has been previously opened, do the following:
MQMessage imsg;
byte[] response = mqapi.readFromQueue(iQueue, imsg , timeout);
Where:
- iQueue is the MQQueue object returned from openInput.
- imsg is an MQMessage object returned when a message is read.
- timeout is the time in milliseconds after which the read will timeout if no message is available on the queue.
- response is the message data when a message is read from the queue.
If you wish to read from a queue that has not been opened, do the following:
byte[] response = mqapi.readFromQueue(queueName, timeout);
Where:
- queueName is the name of the queue from which you wish to read.
- timeout is the time in milliseconds after which the read will timeout if no message is available on the queue.
- response is the message data when a message is read from the queue.
8.6.8 Closing an Open Queue
To close a queue that has been opened for input or output, do the following:
mqapi.close(queue);
Where:
- queue is the MQQueue object returned from openInput or openOutput request.
8.6.9 Termination/Clean-up
In order to clean up and disconnect from the queue manager, do the following:
mqapi.destroy();
8.6.10 Errors
Errors will generally be thrown as MQExceptions that can be caught and dealt with in the usual ways in Java.
8.7 TDOD – Test Data on Demand
8.7.1 Introduction
The TDOD package implements a set of classes providing an API to the Test Data on Demand (TDoD) service functions.
8.7.2 Installing / using TDOD
Add a dependency to the following artifact to your maven based project
<dependency>
<groupId>com.ostiasolutions</groupId>
<artifactId>tdod</artifactId>
<version>1.0-SNAPSHOT</version>
</dependency>
8.7.3 Class reference
TDOD
This is the main class and represents the actual
interface to the TDOD service functions.
Constructor
TDOD(String ep, String userid, String password)
throws Error! Reference source not found.
Where
ep ..
Endpoint of the TDOD service (Example:
http://<yourserver>:<yourport>/GTService)
userid .. User ID as required by the TDOD interface
password .. password for the specified User ID
8.7.4 Method reference
8.7.4.1 validate()
boolean validate() throws Exception
Returns true if a connections has been successfully established, false otherwise.
executeExpression()
String executeExpression(TDODContext ctx, String
expr) throws Error! Reference source not found.
where
ctx .. a
TDODContext previously created by the createNewContext() method
expr .. the TDOD function to be executed
This method returns a String representing
the TDOD service function response.
Note: You must surround the expression in @ (e.g.: @tilde()@)
8.7.4.2 createNewContext()
TDODContext createNewContext(Error! Reference source not found. proj) throws Error! Reference source not found.
where
proj .. a Error! Reference source not found. previously instantiated via one of the methods getProjectByName() or getProjectByID()
This method returns a TDODContext as required by the executeExpression() method.
See Error! Reference source not found.
listProjects()
List<Error! Reference source not found.> listProjects() throws Error! Reference source not found.
Returns a java.util.List of TDOD projects.
getProjectByName()
Error! Reference source not found. getProjectByName(String name) throws Error! Reference source not found.
where
name .. TDOD project for which a reference is to be retrieved.
Returns a Error! Reference source not found. reference to be used with the Error! Reference source not found. method.
getProjectByID()
Error! Reference source not found. getProjectByID(String id) throws Error! Reference source not found.
where
id .. Internal ID assigned to the TDOD Project
Returns a Error! Reference source not found. reference to be used with the Error! Reference source not found. method.
listFunctions()
List<TDODFunction> listFunctions()
throws Error! Reference source not found.
Returns a java.util.List of TDODFunction elements, each representing an available TDOD service function.
listSystemVariables()
List<TDODVariable>
listSystemVariables() throws Error! Reference source not found.
Returns a java.util.List of TDODVariable elements, each representing a defines TDOD system variable.
8.7.5 Support Classes
All support classes are available thru package com.ostiasolutions.tdod.pojo
TDODException
Extends java.lang.Exception and thus all methods
available for Exception also apply here.
TDODContext
TDODContext establishes a link to a TDODProject and
is required for any service function execution via Error! Reference source not found.
A TDODContext is created by the Error! Reference source not found. method and requires a Error! Reference source not found. as input.
TDODProject
Maps an instance of a TDOD Project as defined on
the TDOD server.
A TDODProject is required to create a Error! Reference source not found.
8.7.5.1 Methods:
getName()
Returns the project “name”
getId()
Returns the project’s internal ID
getProjectVersions()
Returns a java.util.List of Error! Reference source not found.
elements.
getProjectVersionById(string
id)
Returns a reference to a specific Error! Reference source not found.
8.7.6 TDODProjectVersion
is an inner class to TDODProject and maps a specific version of a TDOD project.
8.7.6.1 Methods:
getName()
Returns the project version “name”
getId()
Returns the project version’s internal ID
getParent()
Returns the project version’s parent, a Error! Reference source not found.
8.7.7 Examples
8.7.7.1 Example 1 – retrieve and list TDOD functions
TDOD tdod = null;
try {
// Instantiate TDOD
tdod = new TDOD("http://my.server:8090/GTService", "tdoduser", "tdodpass");
tdod.validate(); //
validate the connection
// List available functions
List<TDODFunction> tdf = tdod.listFunctions();
for (TDODFunction tf : tdf) {
System.out.println(tf.getName());
}
} catch (TDODException e) {
e.printStackTrace();
} catch (Exception e) {
e.printStackTrace();
}
Result:
abs(number)
add(number,number)
addchecksum(number,method)
adddays(date,days)
addluhn(number)
addmillisecs(timestamp,milliseconds)
addmod97(number)
addmonths(date,months)
addrand(number,min,max)
addranddays(date,min,max)
addseconds(datetime,seconds)
addseconds(time,seconds)
addverhoeff(number)
addyears(date,years)
alphanum(string)
asc(string)
atsign()
8.7.7.2 Example 2 – execute the randtext function
TDOD tdod = null;
try {
// Instantiate TDOD
tdod = new TDOD("http://my.server:8090/GTService", "tdoduser", "tdodpass");
tdod.validate(); //
validate the connection
TDODProject tdp = tdod.getProjectByName("My
Project"); // Need project ref
TDODContext tdc = tdod.createNewContext(tdp);
// Need context for execute..
for (int i = 0; i < 4; i++)
{
String sResult = tdod.executeExpression(tdc,
"@randtext(4,12)@");
System.out.println("randtext(" + i
+ ") = " + sResult);
}
} catch (TDODException e) {
e.printStackTrace();
} catch (Exception e) {
e.printStackTrace();
}
Result:
randtext(0) = Nmxmctgoryxe
randtext(1) = Fvhqvprwut E
randtext(2) = Ruyn F Dqy
randtext(3) = Khdwvftbrg
9 Portus EVS problem determination
The enhanced Portus framework has three distinct areas where there may be issues:
1. Working with the wizard GUIs.
2. Generating the virtual service project.
3. Running the virtual service project.
This document details where to look for information and what will be required by Ostia to raise a support request.
9.1 The virtual service wizards
These wizards run within the Tomcat installed as part of the Portus installation or deployed on the Cloud environment. When errors occur, Ostia will require a minimum of the following to progress a support request:
1. A description of the error that has occurred.
2. A screen shot of the screen immediately before the error occurs.
3. A screen shot of the screen immediately after the error occurs.
4. Any messages that have been sent to the Tomcat console.
9.2 Generating the virtual service project
As a final part of the various wizards after all information has been collected, the virtual service Maven project is generated. By default, the output from this process is quite minimal, however, if the generation fails for some reason, please change the logging from Basic to Verbose as follows:
Select File->Preferences and you will be presented with the following dialog box:
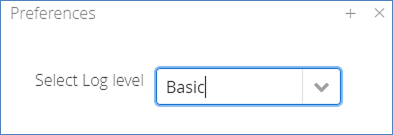
Select the drop-down tab and select ‘Verbose’ as follows:
Now hit the ‘Build’ button again to try to build the project again. Note you may need to delete any previously generated project of the same name or this may also fail.
Review the ‘Verbose’ output to determine if there is something local in the configuration that has caused the failure. If this is not clear, open an issue with Ostia support including the following:
1. A description of the problem.
2. The total verbose output from the build.
9.3 Running the virtual service
The most likely reason for a build or run time failure of the virtual service project is likely to be due to changes made in the virtual service implementation locally. If you need further debugging and output from the Portus framework, each project created will have a file call logback.xml in the /src/main/resources folder in the project or in the class path of a package product. The default logging here is ‘INFO’ as shown below:
<!-- By default, the level of the root level is set to INFO -->
<root level="INFO">
<appender-ref ref="STDOUT" />
</root>
To turn on more extensive debugging, modify this member as follows:
<!-- By default, the level of the root level is set to INFO -->
<root level="DEBUG">
<appender-ref ref="STDOUT" />
</root>
This will give extensive output from the Portus framework. Following a review of this, if you are still convinced that there is a problem with the framework, please open an issue with Ostia with the following information:
1. A description of the problem.
2. The full debug output of the problem is occurring.
3. The source of the virtual service implementation in use if possible.
10 Portus EVS tutorials – Manage Project GUI
10.1 Tutorial to create a MQ RAW virtual service
This tutorial will guide you through the steps required to build a Portus virtual service using an RAW payload.
10.1.1 Prerequisites
In order to complete this tutorial, you will need:
The VirtualServiceImpl.java (ServiceImp.java in newer projects) provided in the ./Portus/Samples/MQ-RAW-VS/ directory in the product installation.
Access to a MQ Queue Manager with queues defined as follows:
Important note:
You will need to use names
for existing queues in your environment or create new queues and specify them
by name during project creation. Host, Manager Name and credentials will also
be dependent on your environment setup and configuration for MQ.
- For the purpose of the tutorial, we will be using a remote queue manager called ‘MQ.PORTUS
- For the purpose of the tutorial, we will be using the following names:
- Proxy Input Queue: MQ_RAW_VS_DEMO.proxy.input
- Proxy Output Queue: MQ_RAW_VS_DEMO.proxy.output.
- Service Input Queue: MQ_RAW_VS_DEMO.service.input.
- Service Output Queue: MQ_RAW_VS_DEMO.service.out.
- Note:
The two service queue names are not used in this tutorial but are included here for completeness.
- Access to a utility that will enable you to place data on and take data off a queue. We will use the WebSphere MQ Explorer from IBM
- This tutorial uses Eclipse and so an Eclipse environment will be required to complete the tutorial as is.
· The Maven M2Eclipse plugin for Eclipse will be required to run the generated project from within Eclipse. This step can alternatively be executed via the command line for users who are more familiar with Maven.
10.1.2 Create the virtual service
From the Portus landing page, click on the ‘Project Management’ Link and you will be presented with the following screen:

· We will leave ‘Project Groupid’ and ‘Maven Archetype Catalog’ as is for this tutorial. This is required if you wish to use the provided sample files without modification.
· Set the ‘Project Directory’ location to where you want to create the project. This can be done via the ‘Select project directory’ button or by typing directly into the directory path field.
· Once ‘New Project’ has been selected, the ‘Project Transport’ option becomes available. Select ‘MQ’ from the transport dropdown list.
· Enter a new name for the project.
Once the above details have been filled in, you will have a completed layout similar to the following:
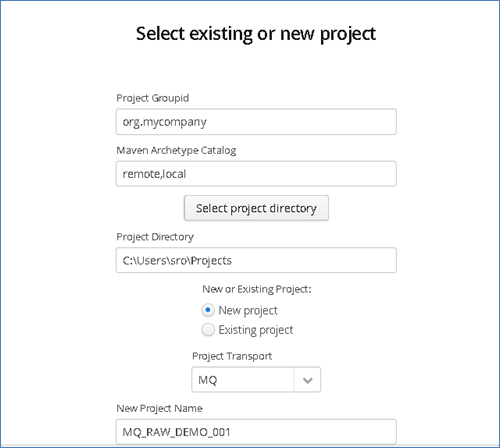
Click Next to move to the Environment and options page:

Fill in the proxy and service MQ details using the MQ names and MQ manager configuration details appropriate for your environment. The ‘Browse QNames’ option can be used to populate details once the correct hostname has been provided. Once completed, you should have a screen similar to the following:
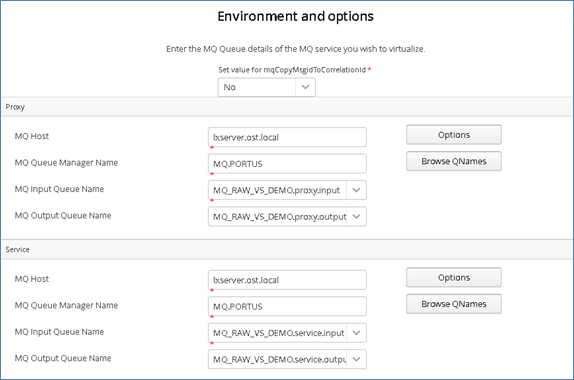
Credentials can be added via the ‘Options’ button if required.
Click ‘Next’ when completed.
On the Payload Processing page, we do not need to add any external payload as we will be putting raw messages directly on to the queues, however, we still need to provide the payload ID and format:
· Click the ‘Add’ button and select RAW from the payload dropdown.
· Type in a Payload ID – In this example we will simple use the ID ‘request’.
· Click OK to add the request.
· Repeat this process, this time providing the ID ‘response’.
Once completed, you should see both listed on the Payload Processing page:
Click ‘Next’ when completed to move to the Method Processing page.
On this page, select the request and response payloads:
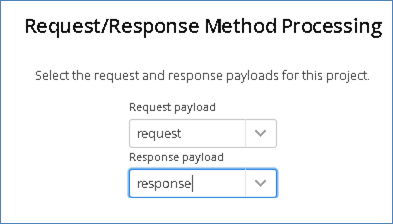
Click ‘Next’ when completed.
On the final page, review the details shown.
You can set the log output to basic or verbose via the ‘File’ Dropdown on this page depending on your preference (output is set to basic by default). Select ‘Build Project’ when you are ready to begin the project creation process. This may take some time depending on your hardware and environment.
The log window will show build progress and a completion popup message will be shown on success.
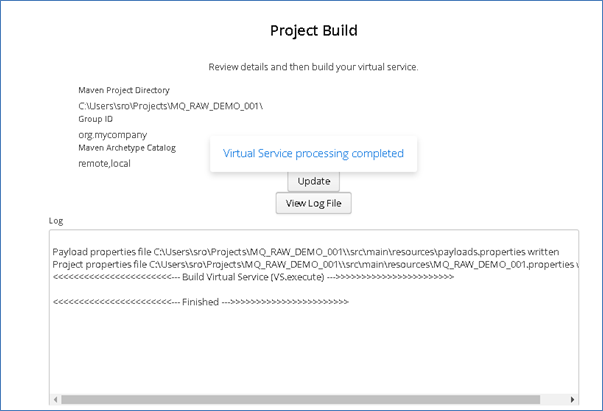
10.1.3 Importing and running the virtual service project
Within your Eclipse environment, click on ‘File’ -> ‘Import’…. And you will see the following screen.

Select ‘Existing Maven Project’ and then hit ‘Next’.
Select the project we have just generated in the next screen:

Click ‘Finish’ and the project will be imported to your Eclipse environment.
If this is your first time importing an EVS project of this type into Eclipse, you may encounter a warning similar to the following:
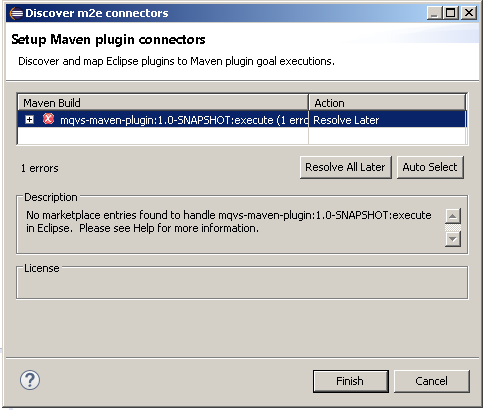
If so, click ‘Finish’ and ‘OK’ to import the build. Once the project has been imported, open the pom, click on the overview warning message and select ‘Mark goal execute as ignored in eclipse preferences’. This should resolve the issue.
Once complete, you should see a layout similar to the following in the ‘Project Explorer’ window:
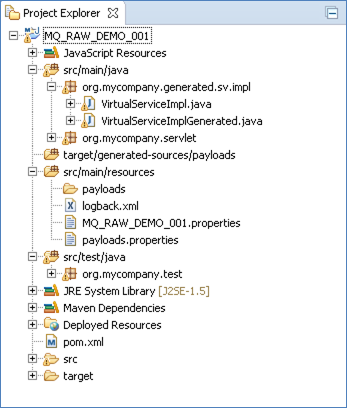
10.1.4 Running your project
Within Eclipse, right click on your project and select ‘Debug As’ -> ‘Maven build’… This will open the run configuration window.
In the Goals field, enter ‘Jetty:run’:
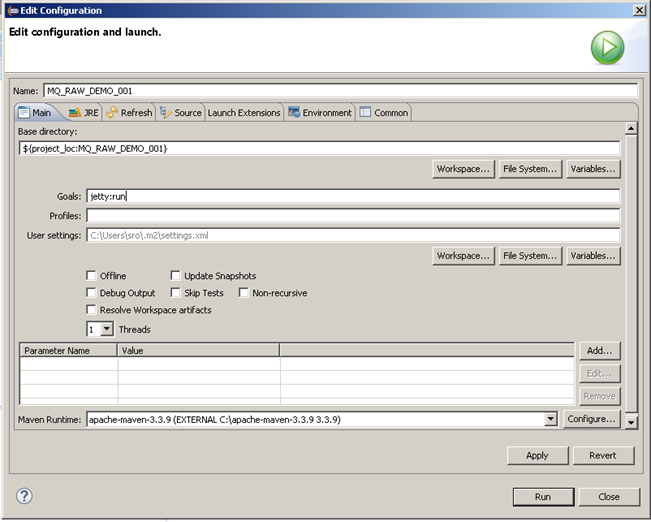
Click ‘Debug’ to run the project.
The console output window in Eclipse will show the startup details. Once the following lines are displayed then the service is ready to be used.
[INFO] Started Jetty Server
[INFO] Starting scanner at interval of 10 seconds.
Congratulations, you have just created and started your first MQ virtual service with a RAW payload.
10.1.5 Invoking the service
Start the WebSphere Explorer and navigate to the proxy input queue defined in your project, right click the queue name and select ‘Put Test Message’ from the context menu:
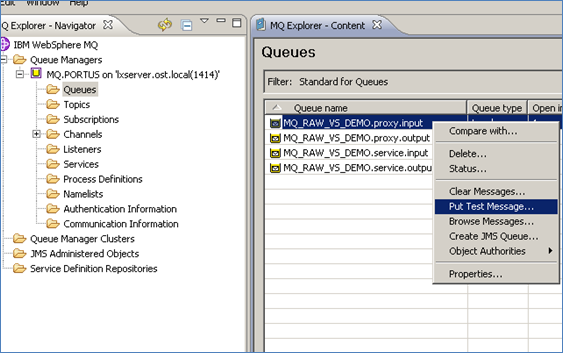
Put a plain text message in the ‘Message data’ field:
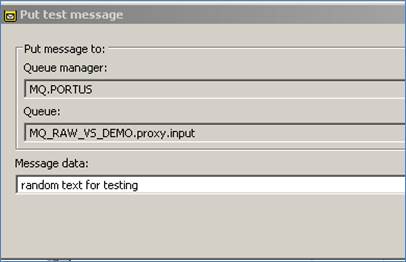
Refresh the view and you should see a new message appear on the output queue
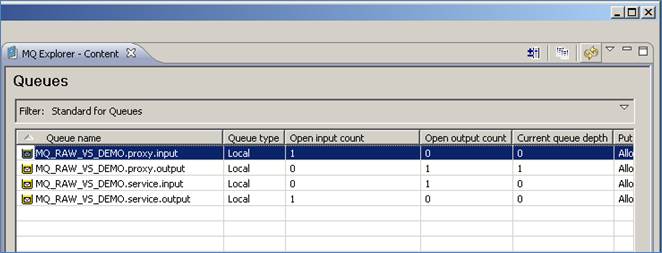
Right click the proxy.output queue and select ‘browse messages’ from the context menu
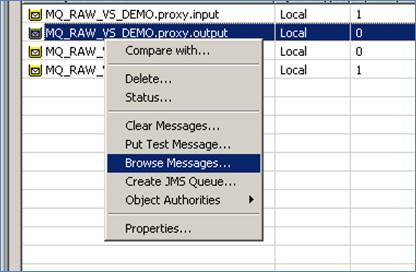
Open the message and switch to the Data tab. The Message data field should contain a random word sent by the service, in this case ‘should’:
Now that we know the base service is functioning as intended, we are ready to modify the project.
10.1.6 Modifying the virtual service
While we now have a virtual service delivering data, it needs to be modified to better reflect the real world. Within your project structure you will find the VirtualServiceImpl.java (ServiceImp.java in newer projects) file which creates the default response:
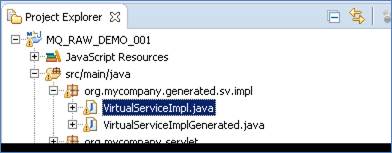
This VirtualServiceImpl.java (ServiceImp.java in newer projects) contains the logic used by the service. Newly created projects provide a base implementation which can be expanded and improved by users. To demonstrate this, we will replace the contents of the default implementation with the improved sample implementation provided in the MQ-RAW-VS samples directory.
To begin, terminate the service in eclipse if it is still running.
Once the service is stopped, replace the contents of the Projects VirtualServiceImpl.java (ServiceImp.java in newer projects) with the contents of the sample implementation.
Save the project and run it as before.
Once the service is running, return to the WebSphere interface.
Put a new test message on the proxy.input queue, this time using the request GET 00000001

This time, when we read the response, we see the following data:
The new implementation states that this exact text should be returned in the case that the user requests account no. 00000001 or return random generated data for unknown accounts.
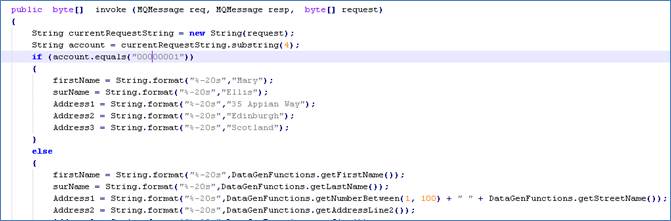
If you repeat this section of the tutorial and change the request, you will find that the data returned will also change.
10.2 Tutorial to create a MQ XML virtual service
This tutorial will guide you through the steps required to build a Portus virtual service using an XML payload.
10.2.1 Prerequisites
In order to complete this tutorial, you will need:
- The sample weather_request.xsd and weather_response.xsd files, the GetWeatherRequest.xml and GetWeatherResponse.xml files and the VirtualServiceImpl.java (ServiceImp.java in newer projects) provided in the ./Portus/Samples/MQ-XML-VS/ directory in the product installation.
- Access to a MQ Queue Manager with queues defined as follows:
Important note:
You will need to use names
for existing queues in your environment or create new queues and specify them
by name during project creation. Host, Manager Name and credentials will also
be dependent on your environment setup and configuration for MQ.
- For the purpose of the tutorial, we will be using a remote queue manager called ‘MQ.PORTUS
- For the purpose of the tutorial, we will be using the following names:
- Proxy Input Queue: MQ_XML_VS_DEMO.proxy.input
- Proxy Output Queue: MQ_XML_VS_DEMO.proxy.output.
- Service Input Queue: MQ_XML_VS_DEMO.service.input.
- Service Output Queue: MQ_XML_VS_DEMO.service.out.
- Note:
The two service queue names are not used in this tutorial but are included here for completeness.
- Access to a utility that will enable you to place data on and take data off a queue. We will use the RFHUtil utility available for free from IBM here.
- This tutorial uses Eclipse and so an Eclipse environment will be required to complete the tutorial as is.
· The Maven M2Eclipse plugin for Eclipse will be required to run the generated project from within Eclipse. This step can alternatively be executed via the command line for users who are more familiar with Maven.
10.2.2 Create the virtual service
From the Portus landing page, click on the ‘Project Management’ Link and you will be presented with the following screen:

· We will leave ‘Project Groupid’ and ‘Maven Archetype Catalog’ as is for this tutorial. This is required if you wish to use the provided sample files without modification.
· Set the ‘Project Directory’ location to where you want to create the project. This can be done via the ‘Select project directory’ button or by typing directly into the directory path field.
· Once ‘New Project’ has been selected, the ‘Project Transport’ option becomes available. Select ‘MQ’ from the transport dropdown list.
· Enter a new name for the project.
Once the above details have been filled in, you will have a completed layout similar to the following:

Click Next to move to the Environment and options page:

Fill in the proxy and service MQ details using the MQ names and MQ manager configuration details appropriate for your environment. The ‘Browse QNames’ option can be used to populate details once the correct hostname has been provided. Once completed, you should have a screen similar to the following:
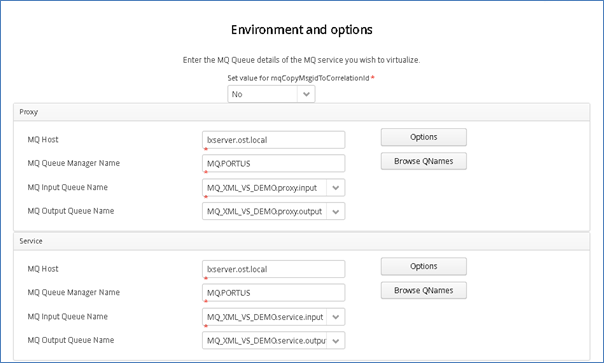
Credentials can be added via the ‘Options’ button if required.
Click ‘Next’ when completed.
On the Payload Processing page, add the request and response samples which can be found in the Samples\MQ-XML-VS directory:
· Click the ‘Add’ button and select XML from the payload dropdown
· Click the ‘Upload’ button in the ‘Add Payload’ window and select the ‘weather_request.xsd sample file
· Click OK to add the request
· Repeat this process, this time selecting the weather_response.xsd sample file.
Once completed, you should see both requests listed on the Payload Processing page:
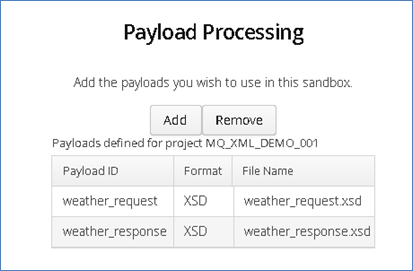
Click ‘Next’ when completed to move to the Method Processing page.
On this page, select the request and response payloads:
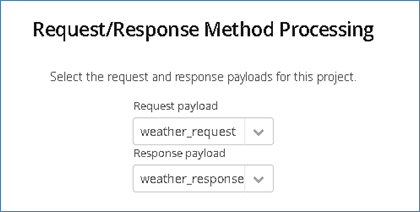
Click ‘Next’ when completed.
On the final page, review the details shown.
You can set the log output to basic or verbose via the ‘File’ Dropdown on this page depending on your preference (output is set to basic by default). Select ‘Build Project’ when you are ready to begin the project creation process. This may take some time depending on your hardware and environment.
The log window will show build progress and a completion popup message will be shown on success.
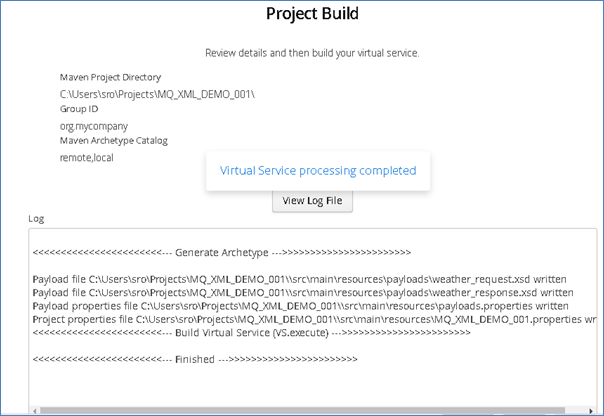
10.2.3 Importing and running the virtual service project
Within your Eclipse environment, click on ‘File’ -> ‘Import’…. And you will see the following screen.
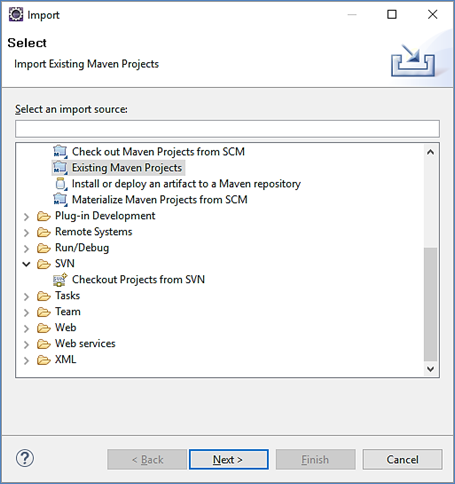
Select ‘Existing Maven Project’ and then hit ‘Next’.
Select the project we have just generated in the next screen:

Click ‘Finish’ and the project will be imported to your Eclipse environment.
If this is your first time importing an EVS project of this type into Eclipse, you may encounter a warning similar to the following:
If so, click ‘Finish’ and ‘OK’ to import the build. Once the project has been imported, open the pom, click on the overview warning message and select ‘Mark goal execute as ignored in eclipse preferences’. This should resolve the issue.
Once complete, you should see a layout similar to the following in the ‘Project Explorer’ window:
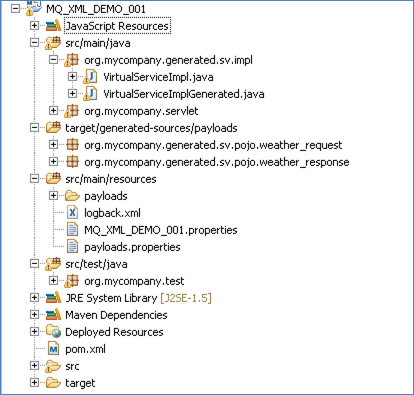
10.2.4 Running your project
Within Eclipse, right click on your project and select ‘Debug As’ -> ‘Maven build’… This will open the run configuration window.
In the Goals field, enter ‘Jetty:run’:

Click ‘Debug’ to run the project.
The console output window in Eclipse will show the startup details. Once the following lines are displayed then the service is ready to be used.
[INFO] Started Jetty Server
[INFO] Starting scanner at interval of 10 seconds.
Congratulations, you have just created and started your first MQ virtual service with a XML payload.
10.2.5 Invoking the service
Start the RFHUtil and you will be presented with a screen as follows:
Fill in the following:
- The queue manager name.
- The proxy input queue defined in your virtual service.
· Open the GetWeatherRequest.xml file from the delivered samples.
The RFHUtil screen should look similar to the following, swapping out what is shown for your environments details:
Click the ‘WriteQ’ button to send the request via the proxy input queue. You should see a message similar to the following if successful:
16.24.07 Message sent to MQ_XML_VS_DEMO.proxy.input length=121
Switch to the ‘Data’ tab to view the request that was sent:
<urn:GetWeather xmlns:urn="urn:getGoogleWeather">
<City>Limerick</City>
<Country>Ireland</Country>
</urn:GetWeather>
Back on the main tab, switch the Queue Name field to the proxy.output queue and click ‘Read Q’ to pick up the response. You should see some basic random data returned in the ‘Data’ tab similar to the following (note that the data format to the right selected is XML):
Now that we know the base service is functioning as intended, we are ready to modify the project.
10.2.6 Modifying the virtual service
While we now have a virtual service delivering data, it needs to be modified to better reflect the real world. Within your project structure you will find the VirtualServiceImpl.java (ServiceImp.java in newer projects) file which creates the default response:
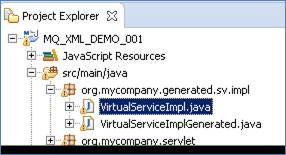
This VirtualServiceImpl.java (ServiceImp.java in newer projects) contains the logic used by the service. Newly created projects provide a base implementation which can be expanded and improved by users. To demonstrate this, we will replace the contents of the default implementation with the improved sample implementation provided in the MQ-XML-VS samples directory.
To begin, terminate the service in eclipse if it is still running.
Once the service is stopped, replace the contents of the Projects VirtualServiceImpl.java (ServiceImp.java in newer projects) with the contents of the sample implementation.
Save the project and run it as before.
Once the service is running, return to the RFHUtils interface.
With RFHUtil, create a request for the input queue as before.
This time, when we read the response, we see the following data:
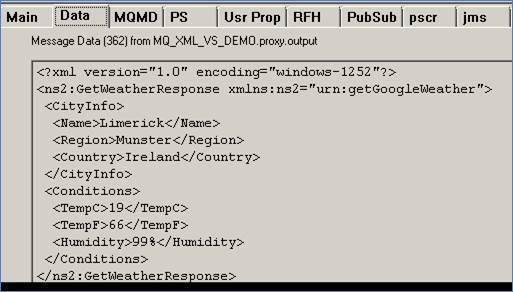
The new implementation states that this exact text should be returned in the case that the user requests Weather for Limerick, Ireland (Which is what is requested when using GetWeatherRequest.xml) or to generate random data for unspecified countries.
If you repeat this section of the tutorial and change the values in GetWeatherRequest.xml, you will find that the data returned will also change.
10.3 Tutorial to create a MQ JSON virtual service
This tutorial will guide you through the steps required to build a Portus virtual service using an JSON payload.
10.3.1 Prerequisites
In order to complete this tutorial, you will need:
- The sample JSON request and response JSON files, the request1.data and requestx.data files and the VirtualServiceImpl.java (ServiceImp.java in newer projects) provided in the ./Portus/Samples/MQ-JSON-VS/ directory in the product installation.
- Access to a MQ Queue Manager with queues defined as follows:
Important note:
You will need to use names
for existing queues in your environment or create new queues and specify them
by name during project creation. Host, Manager Name and credentials will also
be dependent on your environment setup and configuration for MQ.
- For the purpose of the tutorial, we will be using a remote queue manager called ‘MQ.PORTUS
- For the purpose of the tutorial, we will be using the following names:
- Proxy Input Queue: MQ_JSON_VS_DEMO.proxy.input
- Proxy Output Queue: MQ_JSON_VS_DEMO.proxy.output.
- Service Input Queue: MQ_JSON_VS_DEMO.service.input.
- Service Output Queue: MQ_JSON_VS_DEMO.service.out.
- Note:
The two service queue names are not used in this tutorial but are included here for completeness.
- Access to a utility that will enable you to place data on and take data off a queue. We will use the RFHUtil utility available for free from IBM here.
- This tutorial uses Eclipse and so an Eclipse environment will be required to complete the tutorial as is.
· The Maven M2Eclipse plugin for Eclipse will be required to run the generated project from within Eclipse. This step can alternatively be executed via the command line for users who are more familiar with Maven.
10.3.2 Create the virtual service
From the Portus landing page, click on the ‘Project Management’ Link and you will be presented with the following screen:
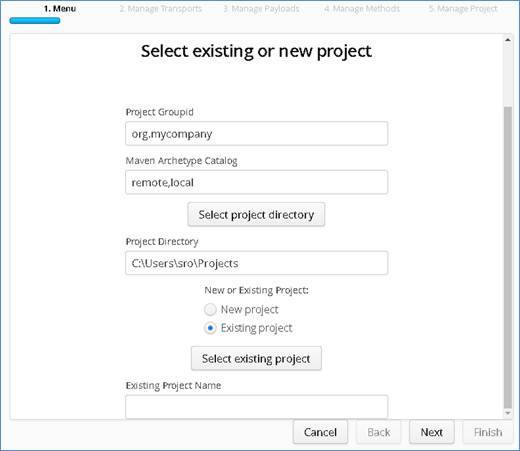
· We will leave ‘Project Groupid’ and ‘Maven Archetype Catalog’ as is for this tutorial. This is required if you wish to use the provided sample files without modification.
· Set the ‘Project Directory’ location to where you want to create the project. This can be done via the ‘Select project directory’ button or by typing directly into the directory path field.
· Once ‘New Project’ has been selected, the ‘Project Transport’ option becomes available. Select ‘MQ’ from the transport dropdown list.
· Enter a new name for the project.
Once the above details have been filled in, you will have a completed layout similar to the following:
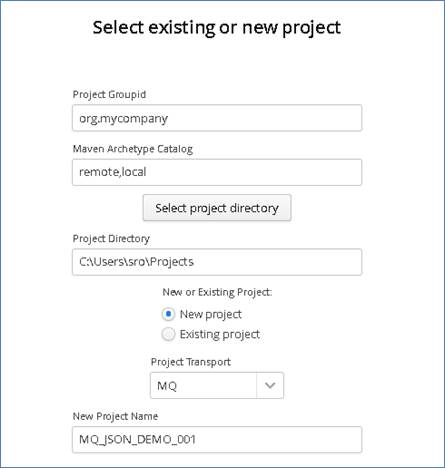
Click Next to move to the Environment and options page:
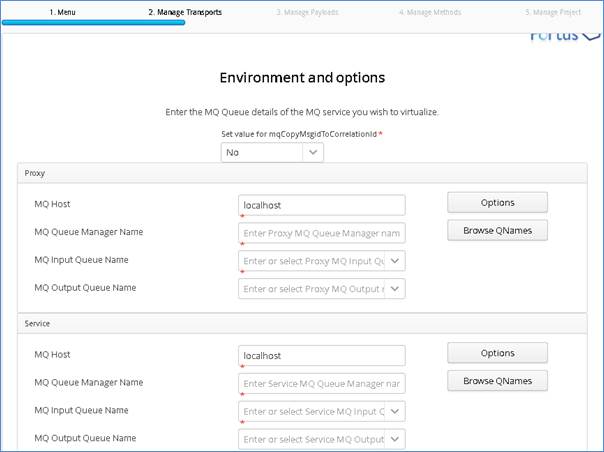
Fill in the proxy and service MQ details using the MQ names and MQ manager configuration details appropriate for your environment. The ‘Browse QNames’ option can be used to populate details once the correct hostname has been provided. Once completed, you should have a screen similar to the following:
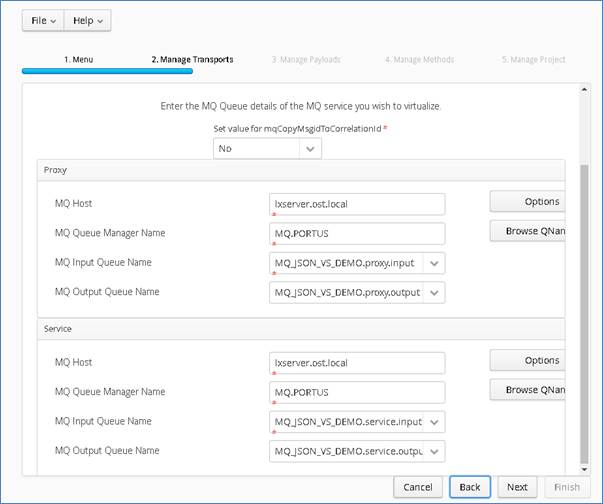
Credentials can be added via the ‘Options’ button if required.
Click ‘Next’ when completed.
On the Payload Processing page, add the request and response samples which can be found in the Samples\MQ-JSON-VS directory:
· Click the ‘Add’ button and select JSON from the payload dropdown
· Click the ‘Upload’ button in the ‘Add Payload’ window and select the ‘request.json’ sample file
· Click OK to add the request
· Repeat this process, this time selecting the response.json sample file.
Once completed, you should see both requests listed on the Payload Processing page:
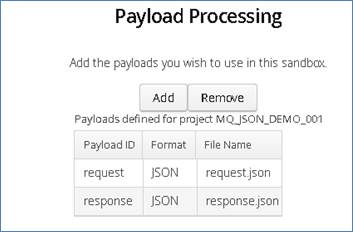
Click ‘Next’ when completed to move to the Method Processing page.
On this page, select the request and response payloads:
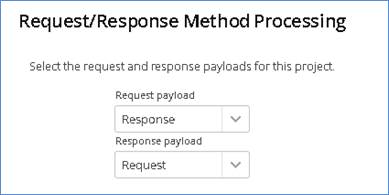
Click ‘Next’ when completed.
On the final page, review the details shown.
You can set the log output to basic or verbose via the ‘File’ Dropdown on this page depending on your preference (output is set to basic by default). Select ‘Build Project’ when you are ready to begin the project creation process. This may take some time depending on your hardware and environment.
The log window will show build progress and a completion popup message will be shown on success.
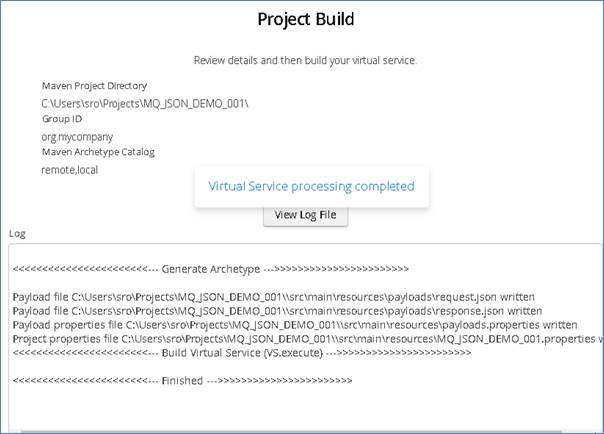
10.3.3 Importing and running the virtual service project
Within your Eclipse environment, click on ‘File’ -> ‘Import’…. And you will see the following screen.
Select ‘Existing Maven Project’ and then hit ‘Next’.
Select the project we have just generated in the next screen:
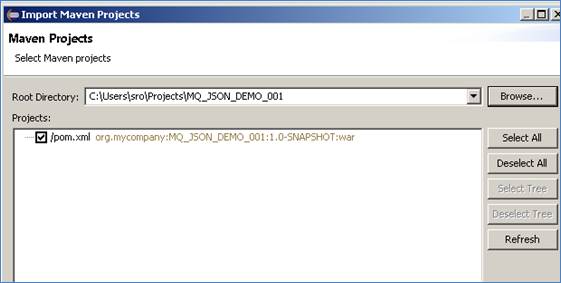
Click ‘Finish’ and the project will be imported to your Eclipse environment.
If this is your first time importing an EVS project of this type into Eclipse, you may encounter a warning similar to the following:
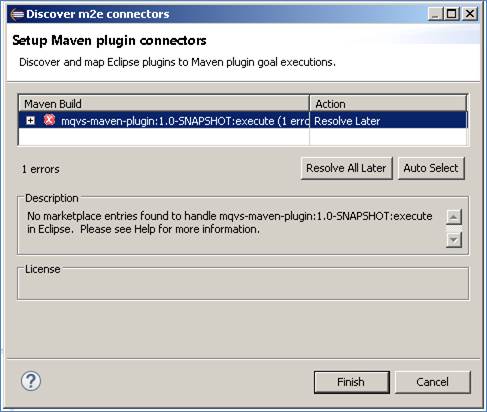
If so, click ‘Finish’ and ‘OK’ to import
the build. Once the project has been imported, open the pom, click on the
overview warning message and select ‘Mark goal execute as ignored in eclipse
preferences’. This should resolve the issue. 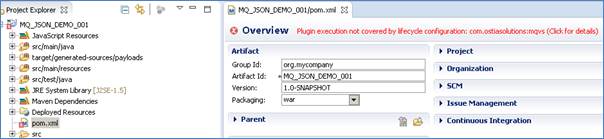
Once complete, you should see a layout similar to the following in the ‘Project Explorer’ window:
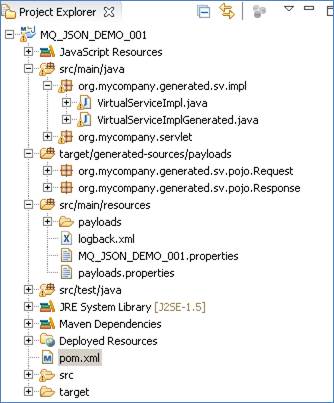
10.3.4 Running your project
Within Eclipse, right click on your project and select ‘Debug As’ -> ‘Maven build’… This will open the run configuration window
In the Goals field, enter ‘Jetty:run’:
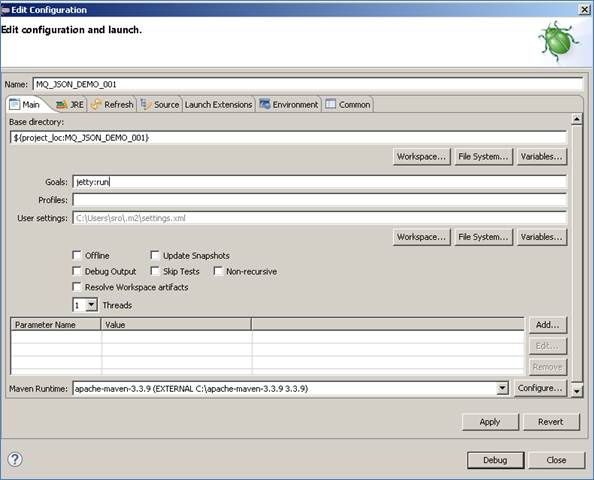
Click ‘Debug’ to run the project.
The console output window in Eclipse will show the startup details. Once the following lines are displayed then the service is ready to be used.
[INFO] Started Jetty Server
[INFO] Starting scanner at interval of 10 seconds.
Congratulations, you have just created and started your first MQ virtual service with a JSON payload.
10.3.5 Invoking the service
Start the RFHUtil and you will be presented with a screen as follows:
Fill in the following:
- The queue manager name.
- The proxy input queue defined in your virtual service.
· Open the request1.data file from the delivered samples.
The RFHUtil screen should look similar to the following, swapping out what is shown for your environments details:
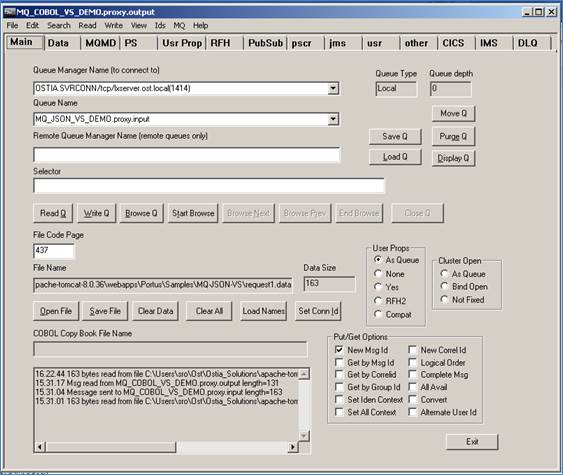
Click the ‘WriteQ’ button to send the request via the proxy input queue. You should see a message similar to the following if successful:
16.24.07 Message sent to MQ_JSON_VS_DEMO.proxy.input length=163
Switch to the ‘Data’ tab to view the request that was sent:
Account=1
Firstname="myFirstName"
Surname="mySurName"
Address1="My Street Address"
Address2="My Town"
Address3="My Country"
Back on the main tab, switch the Queue Name field to the proxy.output queue and click ‘Read Q’ to pick up the response. You should see some basic random data returned in the ‘Data’ tab similar to the following (note that the data format to the right selected is JSON):
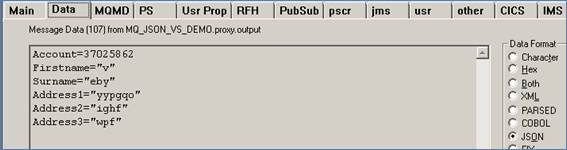
Now that we know the base service is functioning as intended, we are ready to modify the project.
10.3.6 Modifying the virtual service
While we now have a virtual service delivering data, it needs to be modified to better reflect the real world. Within your project structure you will find the VirtualServiceImpl.java (ServiceImp.java in newer projects) file which creates the default response:
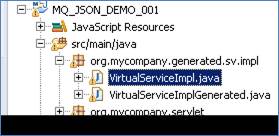
This VirtualServiceImpl.java (ServiceImp.java in newer projects) contains the logic used by the service. Newly created projects provide a base implementation which can be expanded and improved by users. To demonstrate this, we will replace the contents of the default implementation with the improved sample implementation provided in the MQ-JSON-VS samples directory.
To begin, terminate the service in eclipse if it is still running.
Once the service is stopped, replace the contents of the Projects VirtualServiceImpl.java (ServiceImp.java in newer projects) with the contents of the sample implementation.
Save the project and run it as before.
Once the service is running, return to the RFHUtils interface.
With RFHUtil, create a request for the input queue as before
This time, when we read the response, we see the following data:
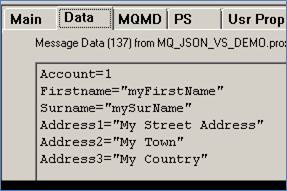
The new implementation states that this exact text should be returned in the case that the user requests account 1 or 2 (Which is what is requested when using request1.json) or to generate random data for unspecified account numbers.
If you repeat this section of the tutorial using requestx.json, you will find that the data returned is more realistic and will be different each time a call is made, as the account number requested in requestx.json is unspecified in the implementation.
10.4 Tutorial to create a MQ COBOL virtual service
This tutorial will guide you through the steps required to build a Portus virtual service using a COBOL payload.
10.4.1 Prerequisites
In order to complete this tutorial, you will need:
- The sample COBOL request and response copybooks delivered in the ./Portus/Samples/MQ-COBOL-VS/ directory in the product installation.
- The sample COBOL request data delivered in the ./Portus/Samples/MQ-COBOL-VS/ directory in the product installation.
- Access to an MQ Queue Manager with 4 queues defined.
Important note:
You will need to use names for existing queues in your environment or create new queues and specify them by name during project creation. Host, Manager Name and credentials will also be dependent on your environment setup and configuration for MQ.
- For the purpose of the tutorial, we will be using a local queue manager called ‘MQ.PORTUS’
- For the purpose of the tutorial, we will be using the following names:
- Proxy Input Queue: MQ_COBOL_VS_DEMO.proxy.input.
- Proxy Output Queue: MQ_COBOL_VS_DEMO.proxy.output.
- Service Input Queue: MQ_COBOL_VS_DEMO.service.input
- Service Output Queue: MQ_COBOL_VS_DEMO.service.output
- Note:
The two service queue names are not used in this tutorial but are included here for completeness.
- Access to a utility that will enable you to place data on and take data off a queue. We will use the RFHUtil utility available for free from IBM here.
· This tutorial uses Eclipse and so, an Eclipse environment will be required to complete the tutorial as written.
10.4.2 Create the virtual service
· We will leave ‘Project Groupid’ and ‘Maven Archetype Catalog’ as is for this tutorial. This is required if you wish to use the provided sample files without modification.
· Set the ‘Project Directory’ location to where you want to create the project. This can be done via the ‘Select project directory’ button or by typing directly into the directory path field.
· Once ‘New Project’ has been selected, the ‘Project Transport’ option becomes available. Select ‘MQ’ from the transport dropdown list.
· Enter a new name for the project.
Once the above details have been filled in, you will have a completed layout similar to the following:
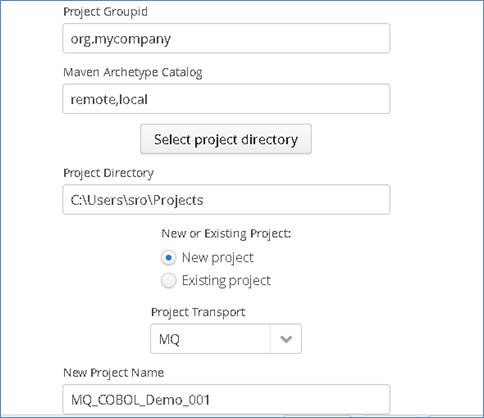
Click Next to move to the Environment and options page:
Fill in the proxy and service MQ details using the MQ names and MQ manager configuration details appropriate for your environment. The ‘Browse QNames’ option can be used to populate details once the correct hostname has been provided. Once complete, you should have a screen similar to the following:
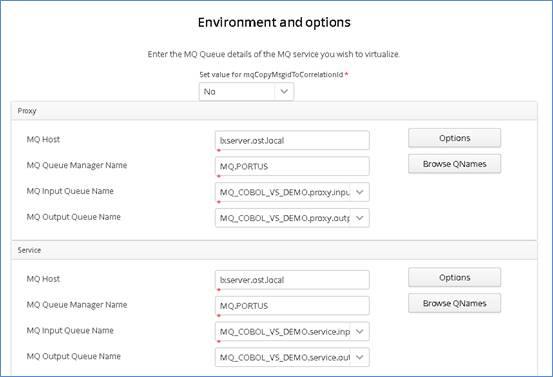
Credentials can be added via the ‘Options’ button if required.
Click ‘Next’ when completed.
On the Payload Processing page, add the request and response samples which can be found in the Samples\MQ-COBOL-VS directory:
· Click the ‘Add’ button and select COBOL from the payload dropdown
· Click the ‘Upload’ button in the ‘Add Payload’ window and select the ‘Request.cpy’ sample file
· Click OK to add the request
· Repeat this process, this time selecting the Response.cpy sample file.
Once completed, you should see both requests listed on the Payload Processing page:
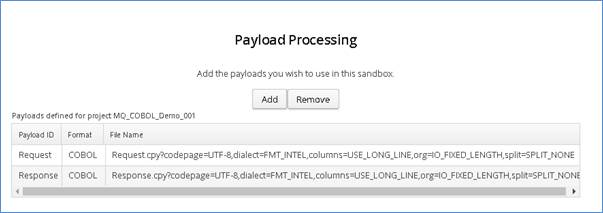
Click ‘Next’ when completed to move to the Method Processing page.
On the Manage Methods page, select the request and response payloads
Click ‘Next’ when completed.
On the final page, review the details shown.
You can set the log output to basic or verbose via the ‘File’ Dropdown on this page depending on your preference (output is set to basic by default). Select ‘Build Project’ when you are ready to begin the Project creation process. This may take some time depending on your hardware and environment.
The log window will show build progress and a completion popup message will be shown on success.
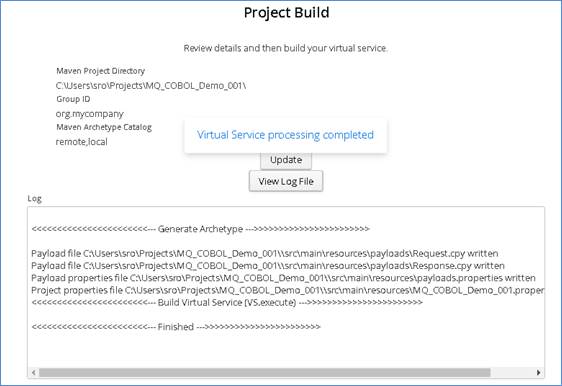
10.4.3 Importing and running the virtual service project
Within your Eclipse environment, click on ‘File’ -> ‘Import’…. And you will see the following screen.
Select ‘Existing Maven Project’ and then hit ‘Next’.
Select the project we have just generated in the next screen:
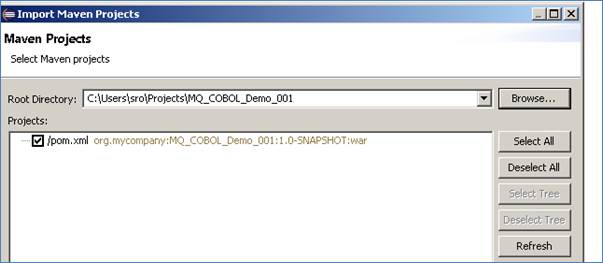
Click ‘Finish’ and the project will be imported to your Eclipse environment.
If this is your first time importing an EVS project into Eclipse, you may encounter a warning similar to the following:
Once complete, you should see a layout similar to the following in the ‘Project Explorer’ window:
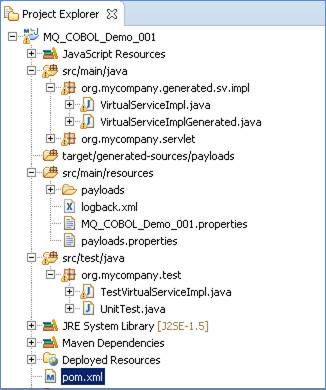
10.4.4 Running your project
Within Eclipse, right click on your project and select ‘Debug As’ -> ‘Maven build’… This will open the run configuration window
In the Goals field, enter ‘Jetty:run’:
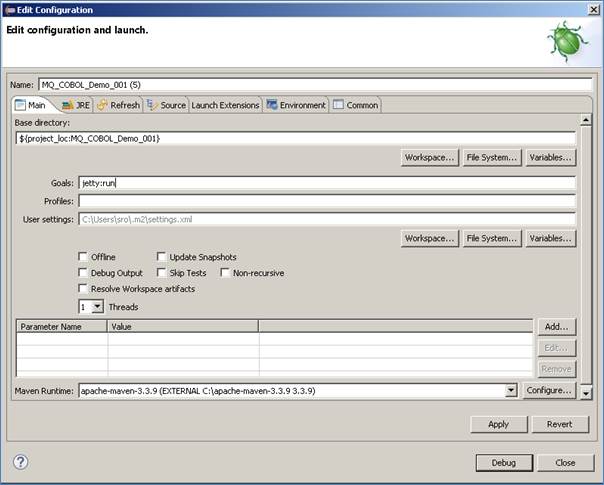
Click ‘Debug’ to run the project.
The console output window in Eclipse will show the startup details. Once the following lines are displayed then the service is ready to be used.
[INFO] Started Jetty Server
[INFO] Starting scanner at interval of 10 seconds.
Congratulations, you have just created and started your first MQ virtual service with a COBOL payload.
10.4.5 Invoking the service
Start the RFHUtil and you will be presented with a screen as follows:
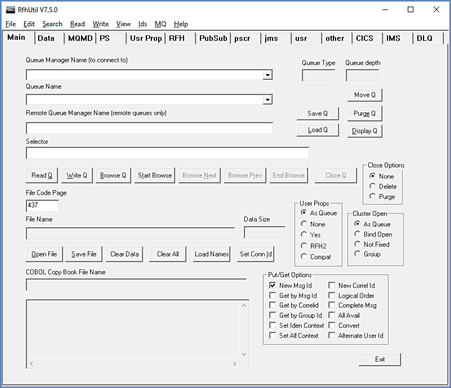
Fill in the following:
- The queue manager name.
- The proxy input queue defined to your virtual service.
· Open the request1.data file from the delivered samples.
The RFHUtil screen should look similar to the following, swapping out what is shown for your environments details:
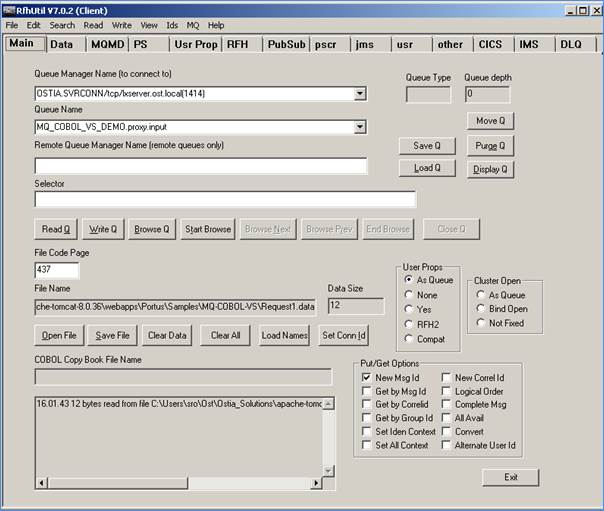
Message sent to MQ_COBOL_VS_DEMO.proxy.input length=12
Switch to the ‘Data’ tab to view the request that was sent:
00000000 GET 00000001
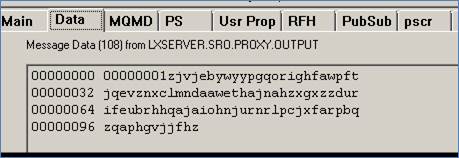
Now that we know the base service is functioning as intended, we are ready to modify the project.
10.4.6 Modifying the virtual service
While we now have a virtual service delivering data, it needs to be modified to better reflect the real world. Within your project structure you will find the VirtualServiceImpl.java (ServiceImp.java in newer projects) file which creates the default response:
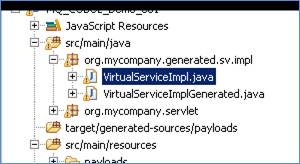
To begin, terminate the service if it is still running.
Once the service is stopped, replace the contents of the Projects VirtualServiceImpl.java (ServiceImp.java in newer projects) with the contents of the sample implementation.
Save the project and run it as before.
Once the service is running, return to the RFHUtils interface.
With RFHUtil, create a request for the input queue as before.
Hit the ‘Write Q’ button to put the request on the input queue. If you then read the response from the queue using RFHUtil, you will see the generated data like the following:

Issuing another request will result in different data:
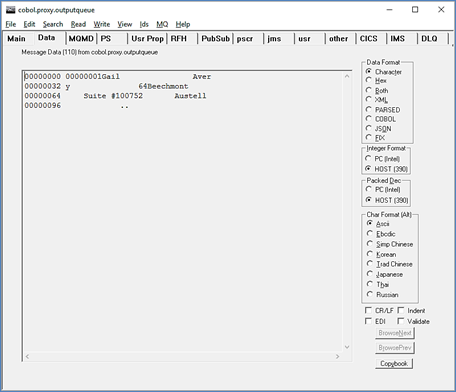
As the service is now configured, set data specified in the implementation will be provided for accounts 1 and 2. Requests for unspecified accounts will return randomly generated data.
10.5 Tutorial to create a MQ XML-COBOL virtual service
This tutorial will guide you through the steps required to build a Portus virtual service using mixed XML COBOL payloads.
10.5.1 Prerequisites
In order to complete this tutorial, you will need:
- The sample files delivered in the ./Portus/Samples/MQ-XMLCOBOL-VS/ directory in the product installation.
- Access to an MQ Queue Manager with 4 queues defined.
Important note:
You will need to use names for existing queues in your environment or create new queues and specify them by name during project creation. Host, Manager Name and credentials will also be dependent on your environment setup and configuration for MQ.
- For the purpose of the tutorial, we will be using a local queue manager called ‘MQ.PORTUS’
- For the purpose of the tutorial, we will be using the following names:
- Proxy Input Queue: MQ_XML_COBOL_VS_DEMO.proxy.input.
- Proxy Output Queue: MQ_XML_COBOL_VS_DEMO.proxy.output.
- Service Input Queue: MQ_XML_COBOL_VS_DEMO.service.input
- Service Output Queue: MQ_XML_COBOL_VS_DEMO.service.output
- Note:
The two service queue names are not used in this tutorial but are included here for completeness.
- Access to a utility that will enable you to place data on and take data off a queue. We will use the RFHUtil utility available for free from IBM here.
· This tutorial uses Eclipse and so, an Eclipse environment will be required to complete the tutorial as written.
10.5.2 Create the virtual service
From the Portus landing page, click on the ‘Project Management’ Link and you will be presented with the following screen:
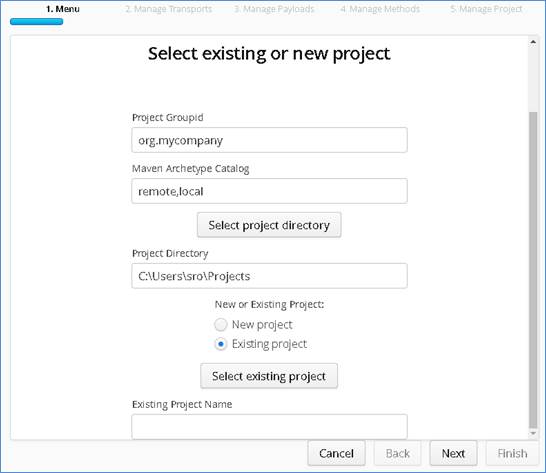
· We will leave ‘Project Groupid’ and ‘Maven Archetype Catalog’ as is for this tutorial. This is required if you wish to use the provided sample files without modification.
· Set the ‘Project Directory’ location to where you want to create the project. This can be done via the ‘Select project directory’ button or by typing directly into the directory path field.
· Once ‘New Project’ has been selected, the ‘Project Transport’ option becomes available. Select ‘MQ’ from the transport dropdown list.
· Enter a new name for the project.
Once the above details have been filled in, you will have a completed layout similar to the following:
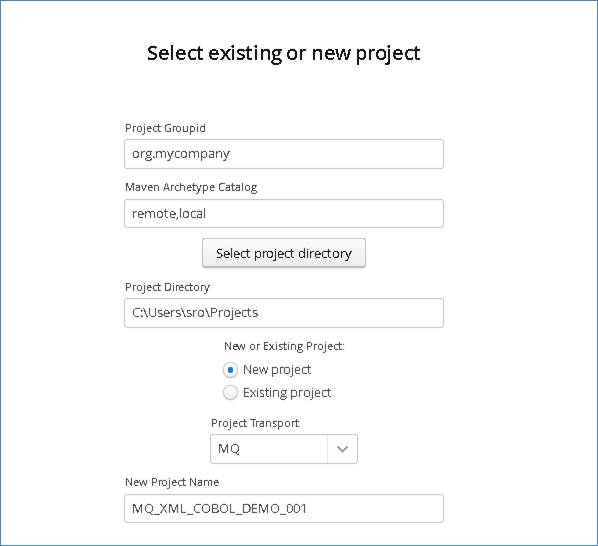
Click Next to move to the Environment and options page:

Fill in the proxy and service MQ details using the MQ names and MQ manager configuration details appropriate for your environment. The ‘Browse QNames’ option can be used to populate details once the correct hostname has been provided. Once complete, you should have a screen similar to the following:
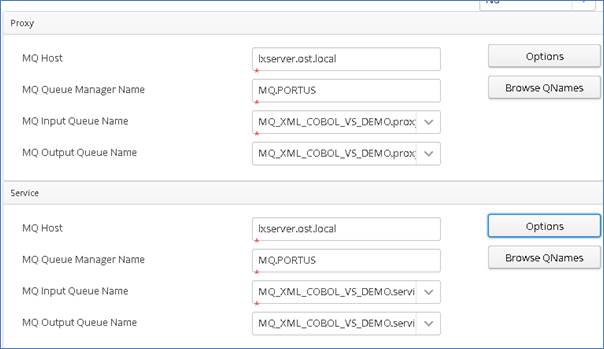
Credentials can be added via the ‘Options’ button if required.
Click ‘Next’ when completed.
On the Payload Processing page, add the request and response samples which can be found in the Samples\MQ-XML-COBOL-VS directory:
· Click the ‘Add’ button and select COBOL from the payload dropdown
· Click the ‘Upload’ button in the ‘Add Payload’ window and select the ‘CPL004.cpy’ sample file
· Click OK to add the request
· Repeat this process, this time selecting XSD as the format and the weather_request.xsd as the payload.
Once completed, you should see both requests listed on the Payload Processing page:
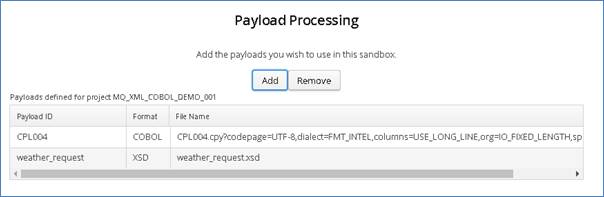
Click ‘Next’ when completed to move to the Method Processing page.
On the Manage Methods page, select the request and response payloads
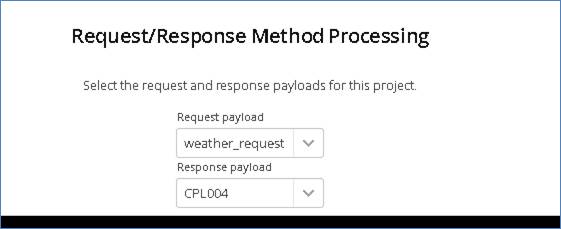
Click ‘Next’ when completed.
On the final page, review the details shown.
You can set the log output to basic or verbose via the ‘File’ Dropdown on this page depending on your preference (output is set to basic by default). Select ‘Build Project’ when you are ready to begin the Project creation process. This may take some time depending on your hardware and environment.
The log window will show build progress and a completion popup message will be shown on success.
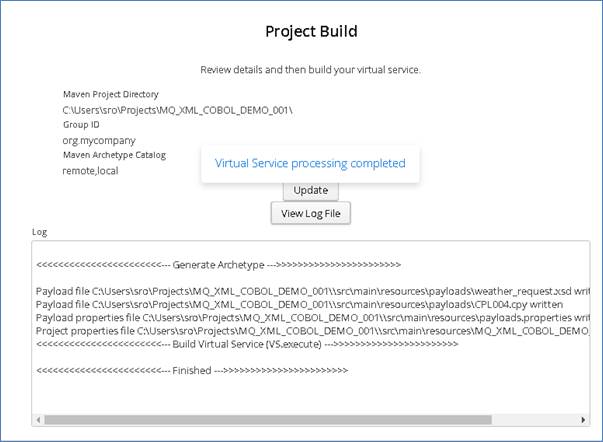
10.5.3 Importing and running the virtual service project
Within your Eclipse environment, click on ‘File’ -> ‘Import’…. And you will see the following screen.
Select ‘Existing Maven Project’ and then hit ‘Next’.
Select the project we have just generated in the next screen:
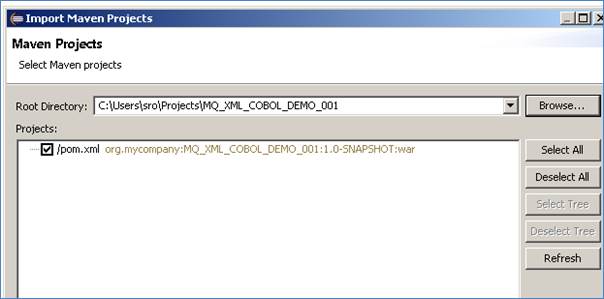
Click ‘Finish’ and the project will be imported to your Eclipse environment.
If this is your first time importing an EVS project into Eclipse, you may encounter a warning similar to the following:
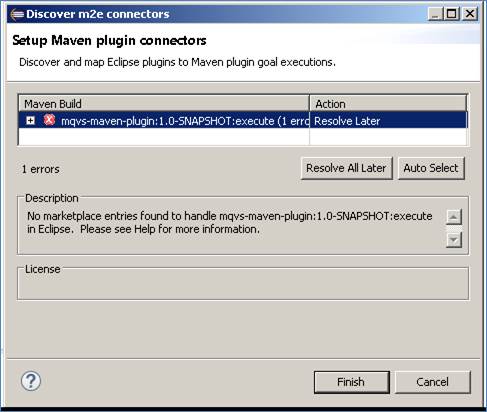
If so, click ‘Finish’ and ‘OK’ to import the build. Once the project has been imported, open the pom, click on the overview warning message and select ‘Mark goal execute as ignored in eclipse preferences’. This should resolve the issue.
Once complete, you should see a layout similar to the following in the ‘Project Explorer’ window:
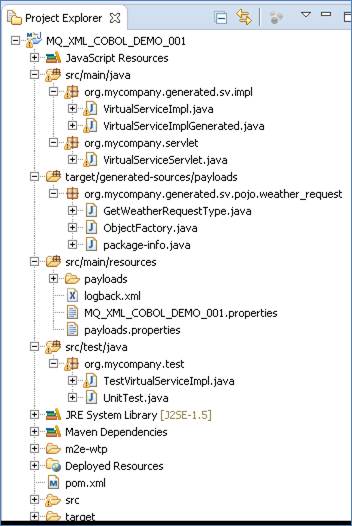
10.5.4 Running your project
Within Eclipse, right click on your project and select ‘Debug As’ -> ‘Maven build’… This will open the run configuration window.
In the Goals field, enter ‘Jetty:run’:
Click ‘Debug’ to run the project.
The console output window in Eclipse will show the startup details. Once the following lines are displayed then the service is ready to be used.
[INFO] Started Jetty Server
[INFO] Starting scanner at interval of 10 seconds.
Congratulations, you have just created and started your first MQ virtual service with a COBOL payload.
10.5.5 Invoking the service
Start the RFHUtil and you will be presented with a screen as follows:

Fill in the following:
- The queue manager name.
- The proxy input queue defined to your virtual service.
· Open the weather_request_limerick.xml data file from the delivered samples.
The RFHUtil screen should look similar to the following, swapping out what is shown for your environments details:
Click the ‘WriteQ’ button to send the request via the proxy input queue. You should see a message similar to the following if successful:
Message sent to MQ_XML_COBOL_VS_DEMO.proxy.input length=12
Switch to the ‘Data’ tab to view the request that was sent:

Back on the main tab, switch the Queue Name field to the proxy.output queue and click ‘Read Q’ to pick up the response. You should see some basic random data returned in the ‘Data’ tab similar to the following:
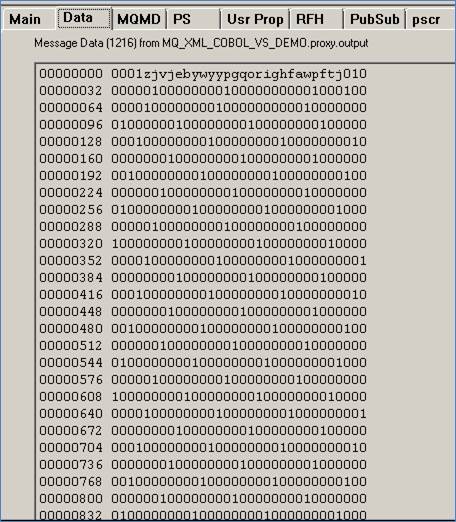
Now that we know the base service is functioning as intended, we are ready to modify the project.
10.5.6 Modifying the virtual service
While we now have a virtual service delivering data, it needs to be modified to better reflect the real world. Within your project structure you will find the VirtualServiceImpl.java (ServiceImp.java in newer projects) file which creates the default response:
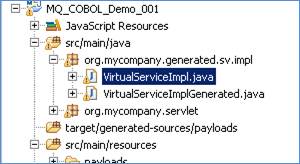
This VirtualServiceImpl.java (ServiceImp.java in newer projects) contains the logic used by the service. Newly created projects provide a base implementation which can be expanded and improved by users. To demonstrate this, we will replace the contents of the default implementation with the improved VirtualServiceImpl sample implementation provided in the MQ-XML-COBOL-VS samples directory.
To begin, terminate the service if it is still running.
Once the service is stopped, replace the contents of the Projects VirtualServiceImpl.java (ServiceImp.java in newer projects) with the contents of the sample implementation.
Save the project and run it as before.
Once the service is running, return to the RFHUtils interface.
With RFHUtil, create a request for the input queue as before.
Hit the ‘Write Q’ button to put the request on the input queue. If you then read the response from the queue using RFHUtil, you will see the generated data like the following:
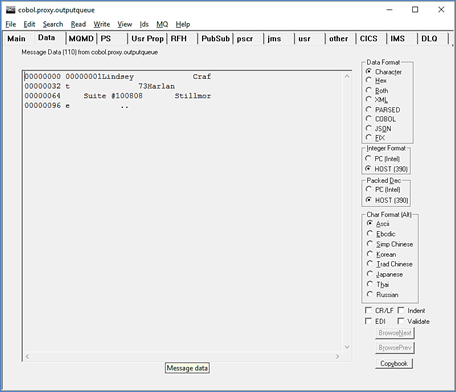
Issuing another request will result in different data:

As the service is now configured, set data specified in the implementation will be provided for accounts 1 and 2. Requests for unspecified accounts will return randomly generated data.
10.6 Tutorial to create a REST XML virtual service
This tutorial will guide you through the steps required to build a Portus EVS virtual REST service using XML payloads.
10.6.1 Prerequisites
In order to complete this tutorial, you will need:
- The sample files provided in the Portus\Samples\REST-XML-VS\ directory provided with this installation
- A client such as SoapUI to call the service
- This tutorial uses Eclipse and so an Eclipse environment will be required to complete the tutorial as is.
· The Maven M2Eclipse plugin for Eclipse will be required to run the generated project from within Eclipse. This step can alternatively be executed via the command line for users who are more familiar with Maven.
10.6.2 Create the virtual service
From the Portus EVS landing page, click on the ‘Project Management’ link and you will be presented with the following screen:

· We will leave ‘Project Groupid’ and ‘Maven Archetype Catalog’ as is for this tutorial. This is required if you wish to use the provided sample files without modification.
· Set the ‘Project Directory’ location to where you want to create the project. This can be done via the ‘Select project directory’ button or by typing directly into the directory path field.
· Once ‘New Project’ has been selected, the ‘Project Transport’ option becomes available. Select ‘REST’ from the transport dropdown list.
· Enter a new name for the project.
Once the above details have been filled in, you will have a completed layout similar to the following:
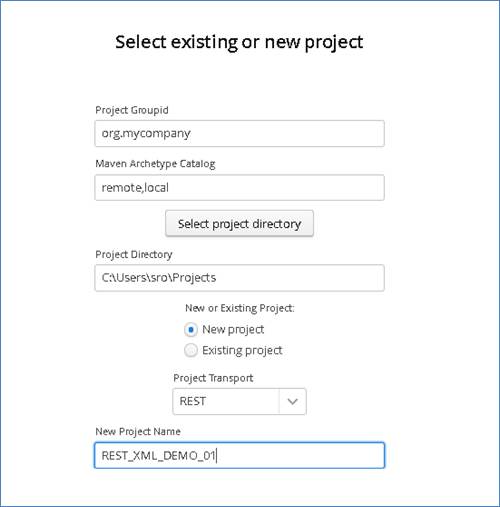
Click Next to move to the Metadata and Operations page:

Set Host or IP where the real service is running. (While this is required, it will not be used unless the real service must be called.)
Set the Port where the service is listening. (As above)

Click ‘Next’ when completed to continue to the ‘Payload Processing’ page.
In the provided REST-XML-VS sample directory, you will find a number or sample payloads that will be used in this tutorial.
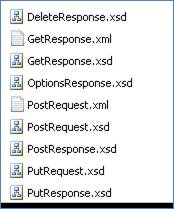
On the Payload Processing page, add each of the sample XSD files (NOT the files ending in .xml):
Click the ‘Add’ button, and select the XSD format from the dropdown menu
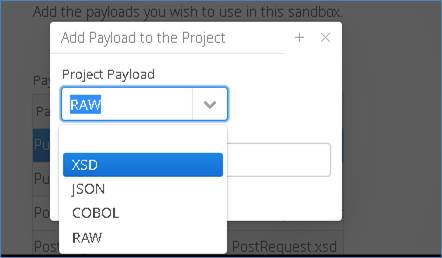
Click the upload button and select the required file
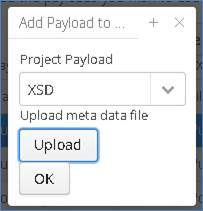
Click OK once the file has been uploaded to add it to the project
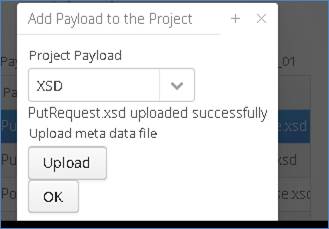
Repeat this for each of the operations.
Once you have completed this, you should have a page similar to the following:
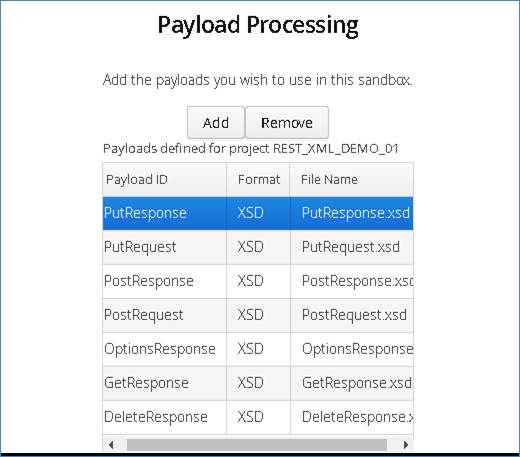
Click ‘Next’ to go to the ‘REST Method Processing’ page:
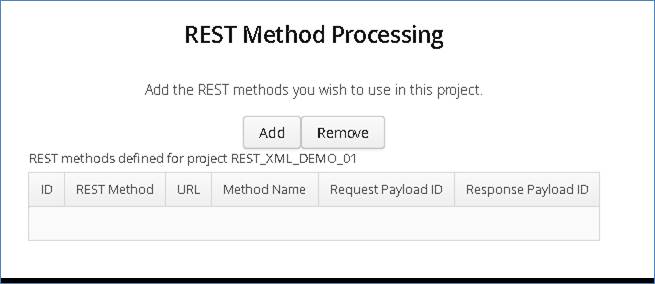
Select the Add Button to add a new Method.
Select method and related payloads from the available dropdown options:
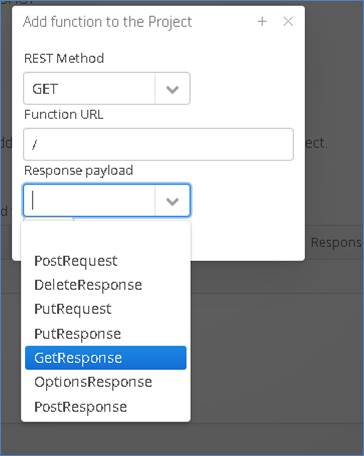
When complete, your screen should look similar to the following:
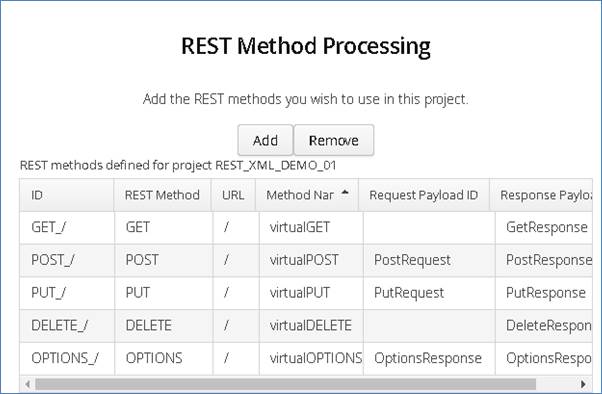
Once you have selected your format and provided the appropriate metadata, you can move on to the build page by hitting ‘Next’.
Review the Details before building. Select the ‘Build Project’ when ready to begin the project creation process.
Hit the ‘Build’ button; a log is displayed as the virtual service project is built. Please note that this may take some time depending on the speed of your machine.
Once the project build has been completed, you will be notified via a popup screen:
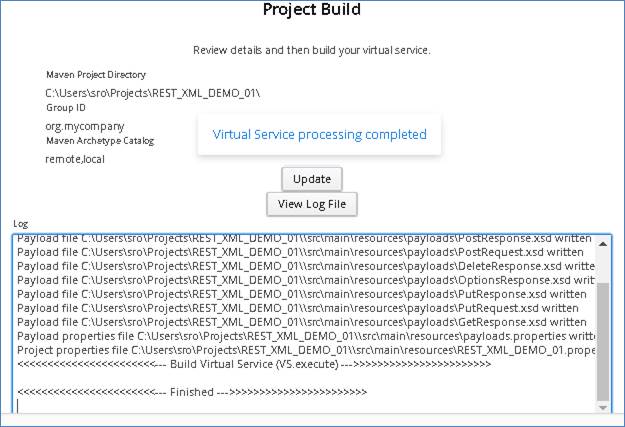
Now that the project has been created, you can import it into your Eclipse environment in order to run and modify the service.
10.6.3 Importing and running the virtual service project
Within your Eclipse environment, click on ‘File’ -> ’Import’…. And you will see the following screen:

Select ‘Existing Maven Project and then hit ‘Next’.
Browse to and select your project root directory. Select ‘Finish’ to import the project:
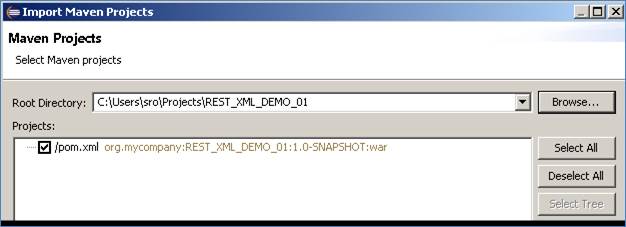
If you encounter the following warning, select ‘Finish’ to import the build:
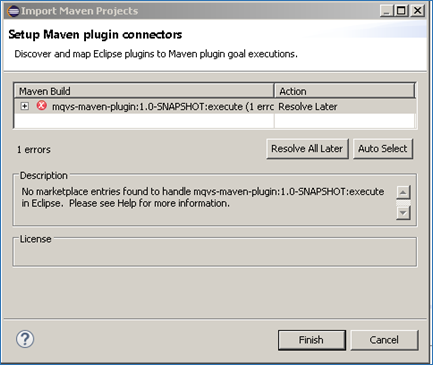
Once the build has been imported, open the pom.xml file and on the details for the error message. Select the fix provided titled: ‘Permanently mark goal execute in pom.xml as ignored in Eclipse build’. This should resolve the issue if present. Eclipse can be very picky so please ignore any other errors or warnings from Eclipse. Once completed, your project should look similar to the following:
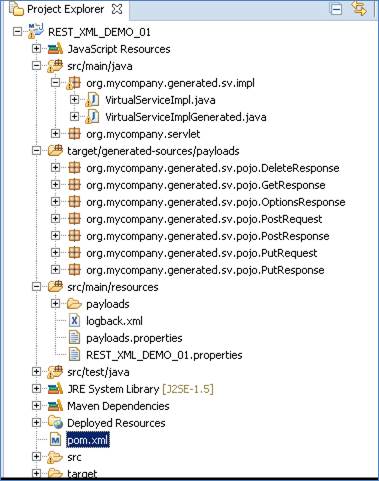
10.6.4 Running your project
Within Eclipse, right click on your project root folder and select ‘Debug As’ -> ‘Maven build’… from the context menu. This opens the ‘Edit Configuration’ screen.
Add jetty:run as the goal and select debug to run the project:
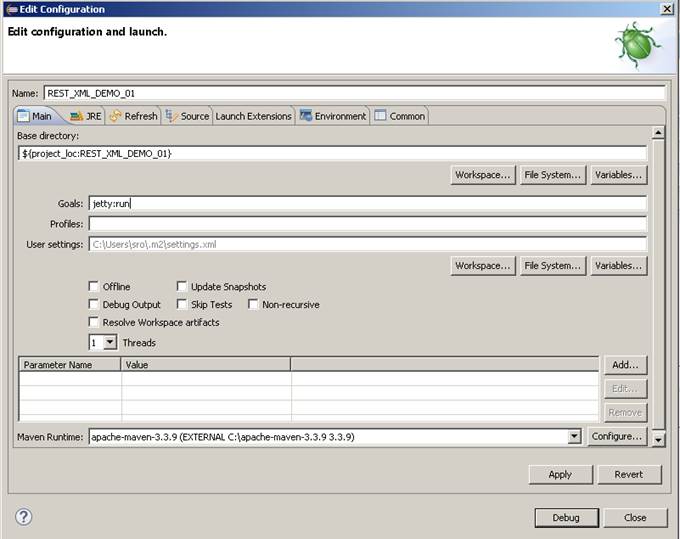
The startup output will be shown in the console window in Eclipse, once the following lines appear, the base project is running and ready to be used.
[INFO] Started Jetty Server
[INFO] Starting scanner at interval of 10 seconds.
10.6.5 Invoking the service
We are running the service in Jetty which runs on port 8080 by default, to test the service is active, we will create a new REST project in SoapUI and enter http://localhost:8080 for the service URI:
In SoapUI, right click on ‘Projects’ and select ‘New REST Project’ from the context menu:

In the ‘New REST Project’ window, enter ‘http://localhost:8080’ as the URI for the project and press ‘OK’
You should now have a new REST project open in SoapUI which looks similar to the following:

Call the service to ensure that it is accessible. Press the play button in the request window.
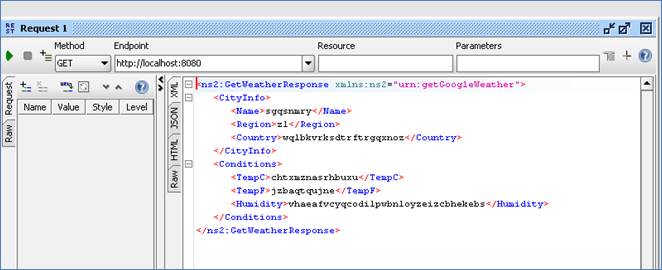
Random generated data is returned in the GetWeatherResponse . This is expected as we have not yet modified the service.
Now that we know the base service is working as expected, we can modify the project to return more realistic results.
10.6.6 Modifying the virtual service
While we now have a virtual service delivering data, it needs to be modified to better reflect the real world. Within your project structure you will find the VirtualServiceImpl.java (ServiceImp.java in newer projects) which creates the default response. Return to Eclipse and stop the service using the ‘terminate’ button above the console output window:
![]()
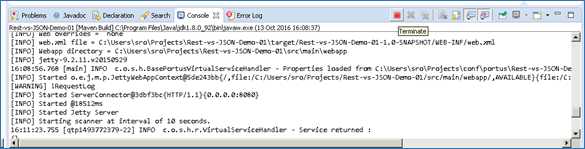
Once the service has been terminated, navigate to and open the VirtualServiceImpl.java (ServiceImp.java in newer projects) file under Package Explorer:
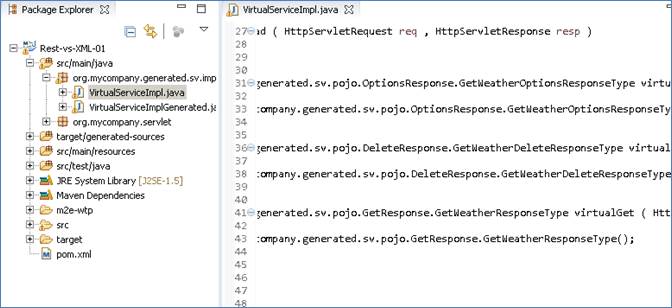
We will use the VirtualServiceImpl.java (ServiceImp.java in newer projects) sample provided in the REST-XML-VS samples directory to enhance the virtual services behaviour.
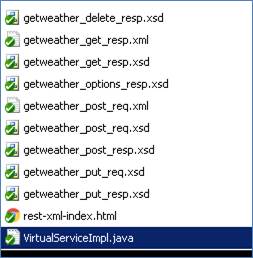
Open the VirtualServiceImpl.java (ServiceImp.java in newer projects) file in the samples directory, copy the contents and replace the contents of the VirtualServiceImpl.java (ServiceImp.java in newer projects) in our project with the sample contents:

The new implementation will allow us to request weather conditions for certain cities. Where a requested city has been specified in the new implementation, the service will return set responses. Where an unknown city is requested, the values for the ‘Temp’ fields will be generated dynamically using DataGen functions. Once the Implementation has been updated, save the project.
10.6.7 Running the improved service
Now we can run the service again with the same steps as before (right click> ‘Debug As’ -> ‘Maven Build’ with the ‘jetty:run’ goal). With the service is running we can return to the SoapUI Client and issue a new request to the modified service.
10.6.8 Calling the Modified Service
There are a few steps to take in order to send the appropriate request to our service via SoapUI. These are outlined as follows:
In the SoapUI Client, Change the Method from GET to POST.

Set the Media Type for application/xml.
Add a header with the ‘Header’ field set to: Content-Type, and the ‘Value’ field set to: application/-x-wwwform-urlencoded;charset=UTF-8
Finally, navigate to the samples folder and copy the contents of PostRequest.xml and post it into the request window:
Note: there is a schema xsd and an xml file both with the PostRequest name. Ensure you copy the contents of the xml file for the request content.
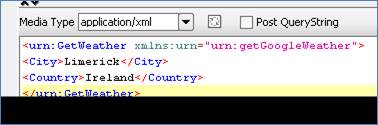
The request is now ready. To call the service, press the green play button at the top of the request window. The results returned should be similar to the following:

By comparing this result to the modified implementation, we can see that this is the expected response for the Limerick request:
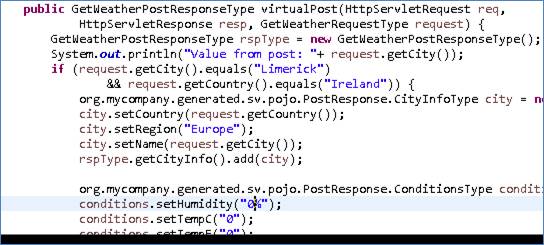
If we modify our original request to contain an unspecified city, such as Madrid, the temperature values returned will be different in each response
Modified request:
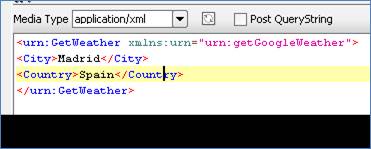
Response 1
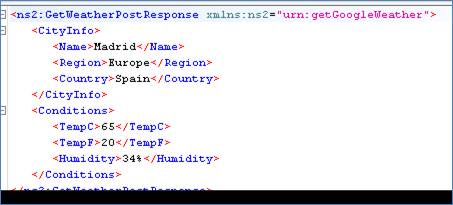
Response 2
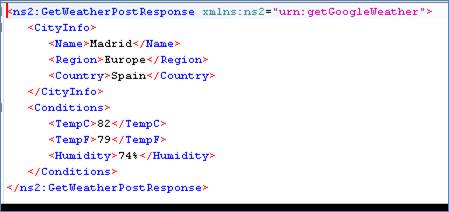
We now have a service which better reflects a real-world action which can be improved upon by modifying the VirtualServiceImpl.java (ServiceImp.java in newer projects) to add custom functionality.
10.7 Tutorial to create a REST JSON virtual service
This tutorial will guide you through the steps required to build a Portus EVS virtual REST service using JSON payloads.
10.7.1 Prerequisites
In order to complete this tutorial, you will need:
- The sample files provided in the Portus\Samples\REST-JSON-VS\ directory provided with this installation
- A client such as SoapUI to call the service
- This tutorial uses Eclipse and so an Eclipse environment will be required to complete the tutorial as is.
· The Maven M2Eclipse plugin for Eclipse will be required to run the generated project from within Eclipse. This step can alternatively be executed via the command line for users who are more familiar with Maven.
10.7.2 Create the virtual service
From the Portus EVS landing page, click on the ‘Project Management’ link and you will be presented with the following screen:
· We will leave ‘Project Groupid’ and ‘Maven Archetype Catalog’ as is for this tutorial. This is required if you wish to use the provided sample files without modification.
· Set the ‘Project Directory’ location to where you want to create the project. This can be done via the ‘Select project directory’ button or by typing directly into the directory path field.
· Once ‘New Project’ has been selected, the ‘Project Transport’ option becomes available. Select ‘REST’ from the transport dropdown list.
· Enter a new name for the project.
Once the above details have been filled in, you will have a completed layout similar to the following:
Click Next to move to the Metadata and Operations page:
Set Host or IP where the real service is running. (While this is required, it will not be used unless the real service must be called.)
Set the Port where the service is listening. (As above)
Click ‘Next’ when completed to continue to the ‘Payload Processing’ page.
In the provided REST-JSON-VS sample directory, you will find a number or sample payloads that will be used in this tutorial.
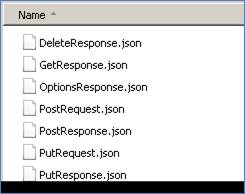
On the Payload Processing page, add each of the sample JSON files
Click the ‘Add’ button, and select the JSON format from the dropdown menu:
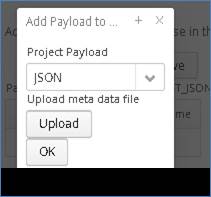
Click the upload button and select the required file:
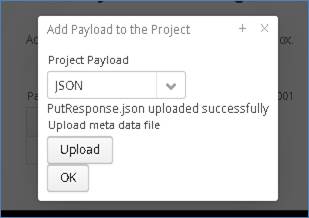
Click OK once the file has been uploaded to add it to the project.
Repeat this for each of the operations.
Once you have completed this, you should have a page similar to the following:
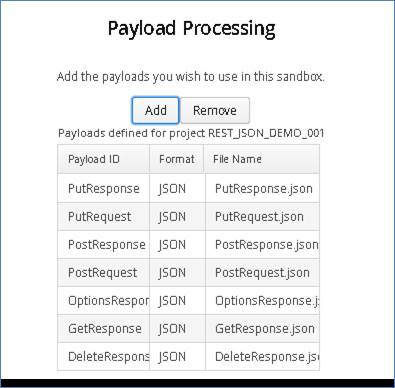
Click ‘Next’ to go to the ‘REST Method Processing’ page:
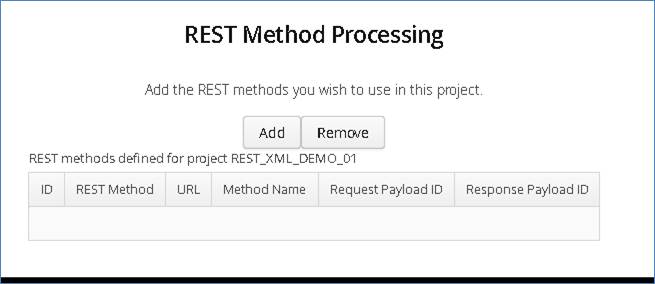
Select the Add Button to add a new Method.
Select method and related payloads from the available dropdown options:

When complete, your screen should look similar to the following:
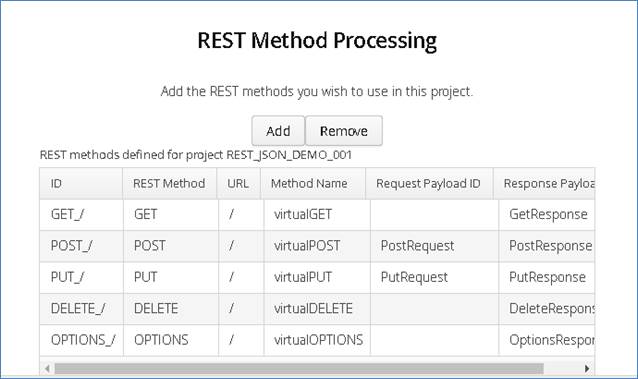
Once you have selected your format and provided the appropriate metadata, you can move on to the build page by hitting ‘Next’.
Review the Details before building. Select the ‘Build Project’ when ready to begin the project creation process.
Hit the ‘Build’ button; a log is displayed as the virtual service project is built. Please note that this may take some time depending on the speed of your machine.
Once the project build has been completed, you will be notified via a popup on screen:
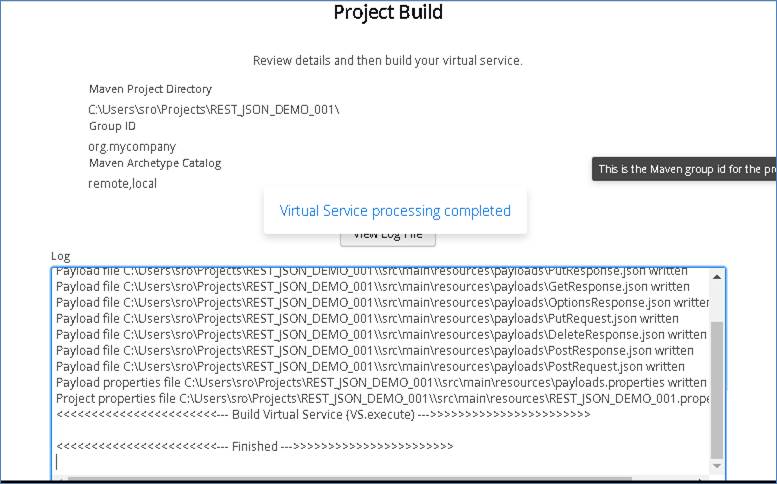
Now that the project has been created, you can import it into your Eclipse environment in order to run and modify the service.
10.7.3 Importing and running the virtual service project
Within your Eclipse environment, click on ‘File’ -> ’Import’…. And you will see the following screen:

Select ‘Existing Maven Project and then hit ‘Next’.
Browse to and select your project root directory. Select ‘Finish’ to import the project:
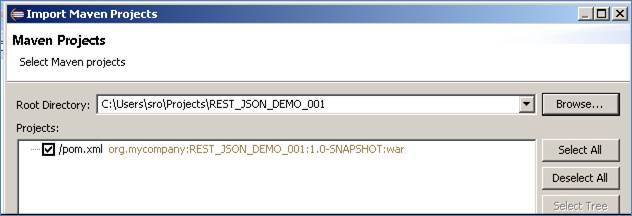
If you encounter the following warning, select ‘Finish’ to import the build:
Once the build has been imported, open the pom.xml file and on the details for the error message. Select the fix provided titled: ‘Permanently mark goal execute in pom.xml as ignored in Eclipse build’. This should resolve the issue if present. Eclipse can be very picky so please ignore any other errors or warnings from Eclipse. Once completed, your project should look similar to the following:
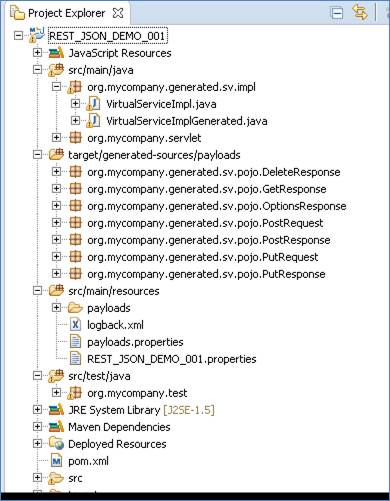
10.7.4 Running your project
Within Eclipse, right click on your project root folder and select ‘Debug As’ -> ‘Maven build’… from the context menu. This opens the ‘Edit Configuration’ screen.
Add jetty:run as the goal and select debug to run the project:
The startup output will be shown in the console window in Eclipse, once the following lines appear, the base project is running and ready to be used.
[INFO] Started Jetty Server
[INFO] Starting scanner at interval of 10 seconds.
10.7.5 Invoking the service
We are running the service in Jetty which runs on port 8080 by default, to test the service is active, we will create a new REST project in SoapUI and enter http://localhost:8080 for the service URI:
In SoapUI, right click on ‘Projects’ and select ‘New REST Project’ from the context menu:
In the ‘New REST Project’ window, enter ‘http://localhost:8080’ as the URI for the project and press ‘OK’

You should now have a new REST project open in SoapUI which looks similar to the following:

Call the service to ensure that it is accessible. Press the play button in the request window. Ensure the JSON tab is selected in the response window to view the results.
Random generated data is returned for each field . This is expected as we have not yet modified the service.
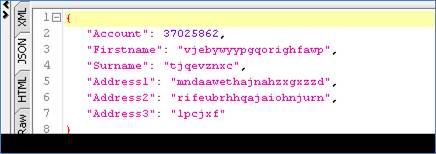
Now that we know the base service is working as expected, we can modify the project to return more realistic results.
10.7.6 Modifying the virtual service
While we now have a virtual service delivering data, it needs to be modified to better reflect the real world. Within your project structure you will find the VirtualServiceImpl.java (ServiceImp.java in newer projects) which creates the default response. Return to Eclipse and stop the service using the ‘terminate’ button above the console output window:
![]()
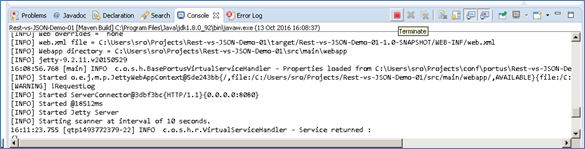
Once the service has been terminated, navigate to and open the VirtualServiceImpl.java (ServiceImp.java in newer projects) file under Package Explorer:
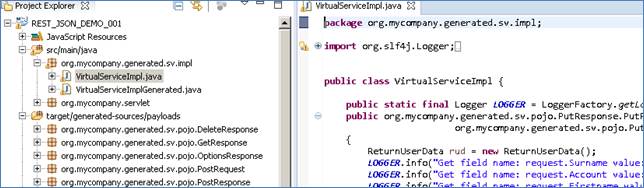
We will use the VirtualServiceImpl.java (ServiceImp.java in newer projects) sample provided in the REST-JSON-VS samples directory to enhance the virtual services behaviour.
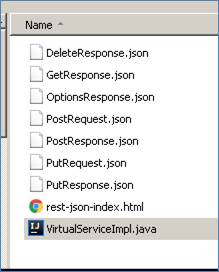
Open the VirtualServiceImpl.java (ServiceImp.java in newer projects) file in the samples directory, copy the contents and replace the contents of the VirtualServiceImpl.java (ServiceImp.java in newer projects) in our project with the sample contents:
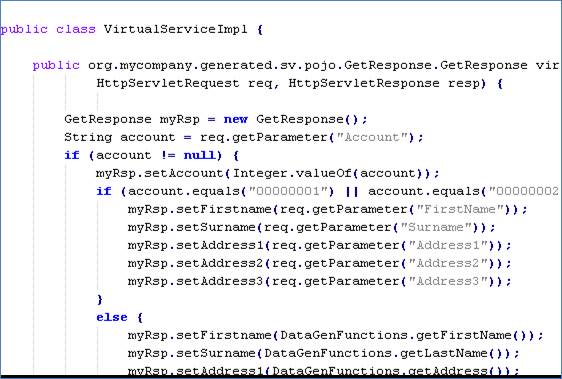
The new implementation will allow us to request account information based on account numbers. Set data will be returned for account 00000001 and 00000002, while random generated data will be returned for unknown accounts. Once the Implementation has been updated, save the project.
10.7.7 Running the improved service
Now we can run the service again with the same steps as before (right click> ‘Debug As’ -> ‘Maven Build’ with the ‘jetty:run’ goal). With the service is running we can return to the SoapUI Client and issue a new request to the modified service.
10.7.8 Calling the Modified Service
There are a few steps to take in order to send the appropriate request to our service via SoapUI. These are outlined as follows:
In the SoapUI Client, Change the Method from GET to POST.
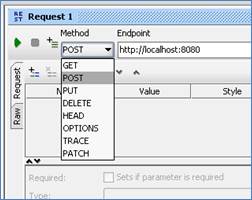
Set the Media Type for application/json.
Add a header with the ‘Header’ field set to: Content-Type, and the ‘Value’ field set to: application/-x-wwwform-urlencoded;charset=UTF-8
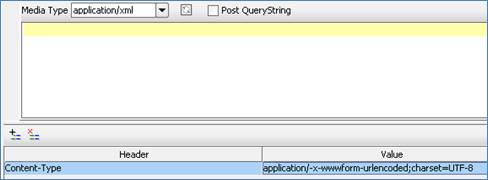
Finally, navigate to the samples folder and copy the contents of PostRequest.json and post it into the request window:
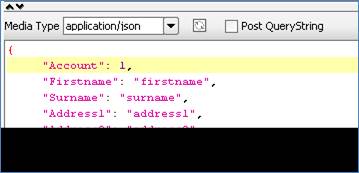
The request is now ready. To call the service, press the green play button at the top of the request window. The results returned should be similar to the following:
![]()
If we modify our original request to contain an unspecified account such as 7, the values returned will be different in each response
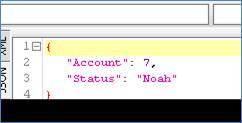
We now have a service which better reflects a real-world action which can be improved upon by modifying the VirtualServiceImpl.java (ServiceImp.java in newer projects) to add custom functionality.
10.8 Tutorial to create a JMS RAW virtual service
This tutorial will guide you through the steps required to build a Portus EVS virtual JMS service using a RAW payload.
10.8.1 Prerequisites
In order to complete this tutorial, you will need:
- The sample files provided in the Portus\Samples\JMS-RAW-VS\ directory provided with this installation.
Important note: You will need to use existing queues and configuration as per your environment. Check the queue manager for details or create new queues to use and specify during project creation.
- Access to a local or remote messaging server with JMS support – in this tutorial we will be using a remote Apache ActiveMQ server with queues defined as follows:
- JMS-RAW-VS-DEMO.proxy.input.
- JMS-RAW-VS-DEMO.proxy.output.
- JMS-RAW-VS-DEMO.service.input.
o JMS-RAW-VS-DEMO.service.output.
We will not be using service queues in this tutorial, they may be used in later tutorials.
- This tutorial uses Eclipse and so an Eclipse environment will be required to complete the tutorial as is.
· The Maven M2Eclipse plugin for Eclipse will be required to run the generated project from within Eclipse. This step can alternatively be executed via the command line for users who are more familiar with Maven.
10.8.2 Create the virtual service
From the Portus EVS landing page, click on the Project Management link and you will be presented with the following screen:
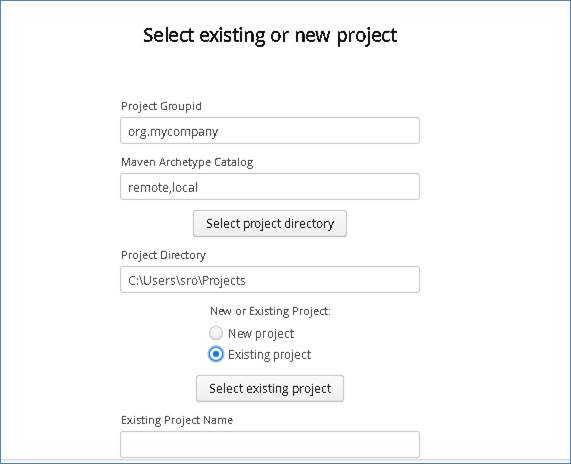
· We will leave ‘Project Groupid’ and ‘Maven Archetype Catalog’ as is for this tutorial. This is required if you wish to use the provided sample files without modification.
· Set the ‘Project Directory’ location to where you want to create the project. This can be done via the ‘Select project directory’ button or by typing directly into the directory path field.
· Once ‘New Project’ has been selected, the ‘Project Transport’ option becomes available. Select ‘JMS’ from the transport dropdown list.
· Enter a new name for the project.
Once the above details have been filled in, you will have a completed layout similar to the following:
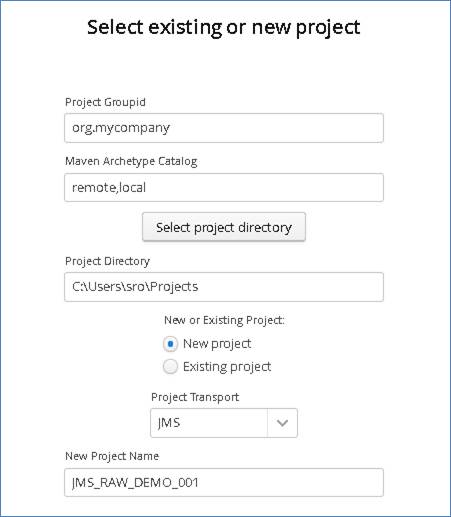
Click ‘Next to move to the next screen
Fill in the details for the JMS instance based on your environment -eg, your defined queues, port the real service is listening on, host and credentials:
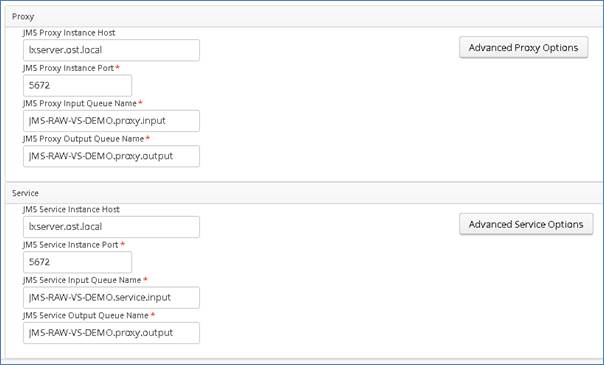
Important: Add any required credentials in the ‘Advanced Proxy’ and ‘Advanced Service’ options which can be accessed by selecting the buttons to the right of the input fields. The default credentials for ActiveMQ are admin/admin, but this will be dependent on your environment configuration.

Once your details are filled in, you can move to the next screen by pressing the ‘Next’ button.
On the next screen, you can provide your format type and payload. In this example, we will not need to add external payloads as we will be passing raw data. We still need to provide an ID and format for the request and response.
Click the ‘Add’ button.
Select the RAW format from the dropdown.
Give the request and response a Payload ID, in this example we will use ‘Request’ and ‘Response’
Click OK to add to the project.
Once you have completed this, you should see both listed on the screen like so:
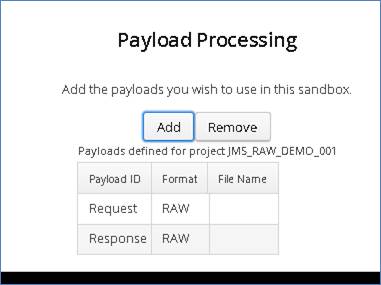
Click ‘Next’ to move on to Manage Methods Page
Here you can set the request and response payloads from the dropdown which has been populated with options based on the previous step.
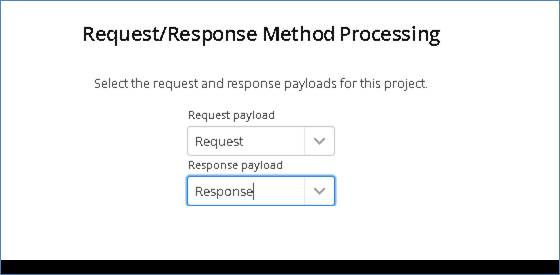
Once these have been set, click ‘Next’ to move to the build page.
Review the project details, and hit the build button when you ready to begin the project creation process.
A popup success message will be shown on screen upon completion.
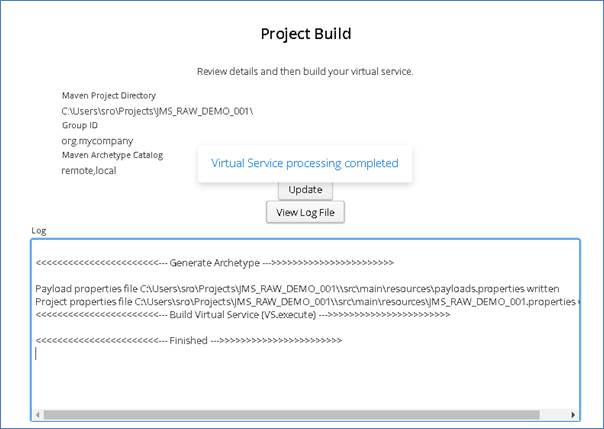
Now that the project has been created, you can import it into your Eclipse environment in order to run and modify the service.
10.8.3 Importing and running the virtual service project
Within your Eclipse environment, click on ‘File’ -> ’Import’…. And you will see the following screen:
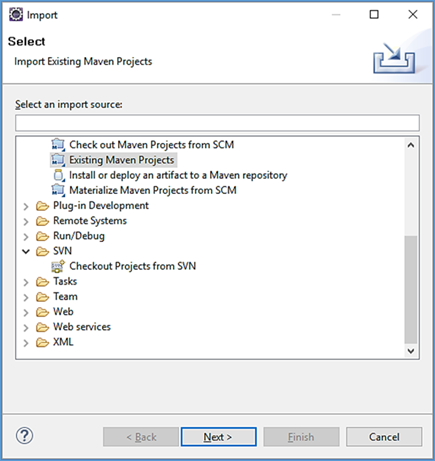
Select ‘Existing Maven Project’ and then hit ‘Next’.
Browse to and select your project root directory. Select ‘Finish’ to import the project.
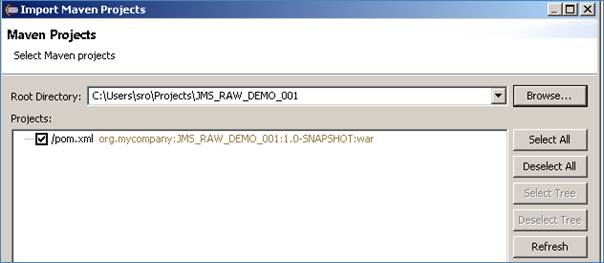
If you encounter the following warning, select ‘Finish’ to import the build:
Once the build has been imported, open the pom.xml file and on the details for the error message. Select the fix provided titled: ‘Permanently mark goal execute in pom.xml as ignored in Eclipse preferences’. This should resolve the issue.
Eclipse can be very picky so please ignore any other errors or warnings from Eclipse.
The imported project should look similar to the following:
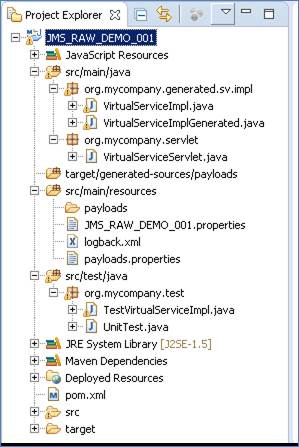
10.8.4 Running your project
Within Eclipse, right click on your project root folder and select ‘Debug As’ -> ‘Maven build’… from the context menu. This opens the Edit Configuration screen.
Add jetty:run as the goal and select debug to run the project:
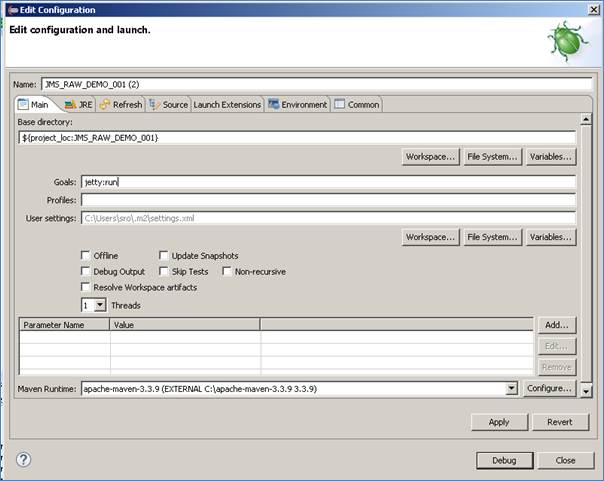
The startup output will be shown in the console window in Eclipse, once the following lines appear, the base project is running and ready to be used.
[INFO] Started Jetty Server
[INFO] Starting scanner at interval of 10 seconds.
10.8.5 Invoking the service
We can now send a message in our message manager to test that the service is running.
On our messaging server, we locate the JMS-RAW-VS-DEMO.proxy.input queue and click the send to button in order to create a new message:
![]()
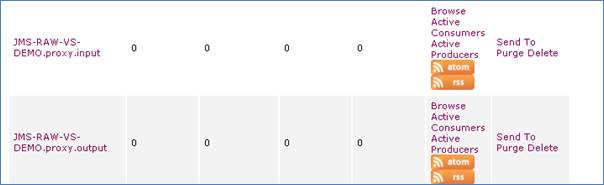
In the message body we will a simple GET request in plain text.

Once the message has been sent, it should arrive on the proxy output queue and be accessible to view.
We can see from the message count that 1 message is now sitting on the proxy output queue:

Select ‘Browse’ to access available messages. The data returned should be similar to the following, with the response containing a randomly generated word, in this case ‘badly’.
Response for parameter name response: badly
This is the expected response until we have modified
and improved our service.
10.8.6 Modifying the virtual service
While we now have a virtual service delivering data, it needs to be modified to better reflect the real world. Within your project structure you will find the VirtualServiceImpl.java (ServiceImp.java in newer projects) which creates the default response. Return to Eclipse and stop the service using the ‘terminate’ button above the console output window:
![]()
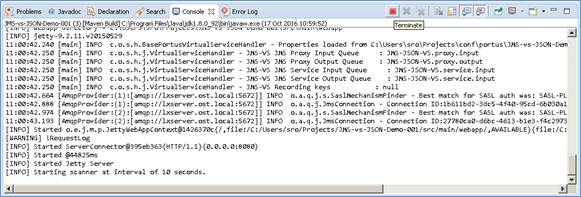
Once the service has been terminated, navigate to and open the VirtualServiceImpl.java (ServiceImp.java in newer projects) file under Package Explorer:
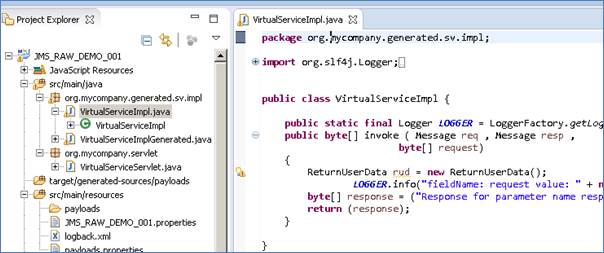
We will use the VirtualServiceImpl.java (ServiceImp.java in newer projects) sample provided in the JMS-RAW-VS samples directory to enhance the virtual services behaviour.
Open the VirtualServiceImpl.java (ServiceImp.java in newer projects) file in the samples directory, copy the contents and replace the contents of the VirtualServiceImpl.java (ServiceImp.java in newer projects) in our project with the sample contents:
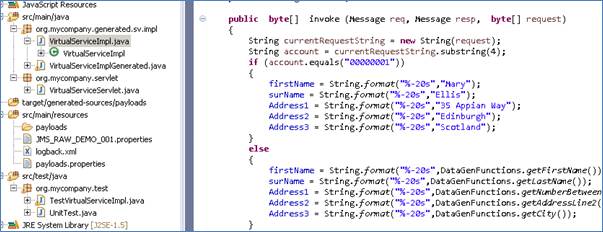
This example service will provide set values for each field in a request message when requesting account 00000001, and will return generated data for requests with unknown account numbers.
Now we can run the service again with the same steps as before (right click> ‘Debug As’ -> ‘Maven build’ with the jetty:run goal). Once the service is running we can submit a new message and should see the expected response:
For a request with the account number of 1 we see that the values returned in the response are the same values we provided in the sample implementation:
![]()
For a request with an unknown account number of 3, we see the values returned have been generated by EVS:
![]()
We now have a service which better reflects a real-world action which can be improved upon by modifying the VirtualServiceImpl.java (ServiceImp.java in newer projects) to add custom functionality.
10.9 Tutorial to create a JMS JSON virtual service
This tutorial will guide you through the steps required to build a Portus EVS virtual JMS service using a JSON payload.
10.9.1 Prerequisites
In order to complete this tutorial, you will need:
- The sample files provided in the Portus\Samples\JMS-JSON-VS\ directory provided with this installation.
Important note: You will need to use existing queues and configuration as per your environment. Check the queue manager for details or create new queues to use and specify during project creation.
- Access to a local or remote messaging server with JMS support – in this tutorial we will be using a remote Apache ActiveMQ server with queues defined as follows:
- JMS-JSON-VS.proxy.input.
- JMS-JSON-VS.proxy.output.
- JMS-JSON-VS.service.input.
o JMS-JSON-VS.service.output.
We will not be using service queues in this tutorial, they may be used in later tutorials.
- This tutorial uses Eclipse and so an Eclipse environment will be required to complete the tutorial as is.
· The Maven M2Eclipse plugin for Eclipse will be required to run the generated project from within Eclipse. This step can alternatively be executed via the command line for users who are more familiar with Maven.
10.9.2 Create the virtual service
From the Portus EVS landing page, click on the Project Management link and you will be presented with the following screen:
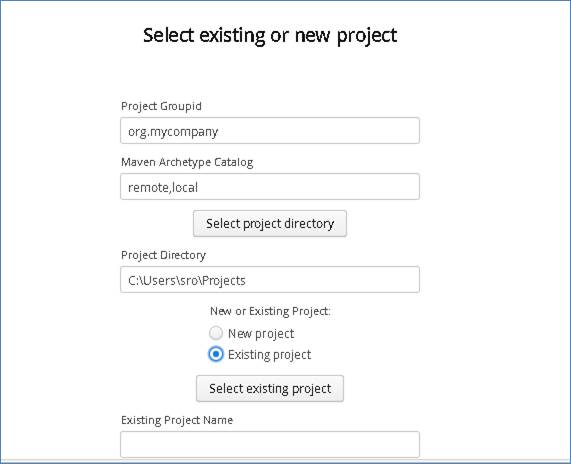
· We will leave ‘Project Groupid’ and ‘Maven Archetype Catalog’ as is for this tutorial. This is required if you wish to use the provided sample files without modification.
· Set the ‘Project Directory’ location to where you want to create the project. This can be done via the ‘Select project directory’ button or by typing directly into the directory path field.
· Once ‘New Project’ has been selected, the ‘Project Transport’ option becomes available. Select ‘JMS’ from the transport dropdown list.
· Enter a new name for the project.
Once the above details have been filled in, you will have a completed layout similar to the following:
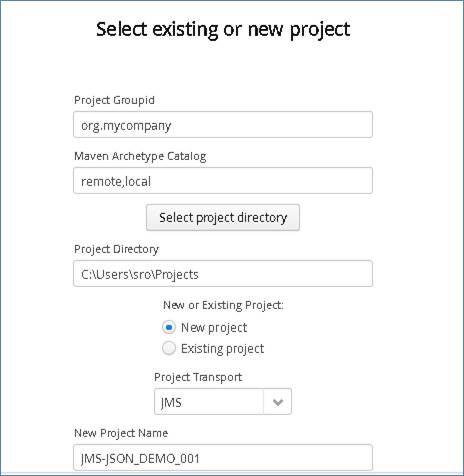
Click ‘Next to move to the next screen
Fill in the details for the JMS instance based on your environment -eg, your defined queues, port the real service is listening on, host and credentials
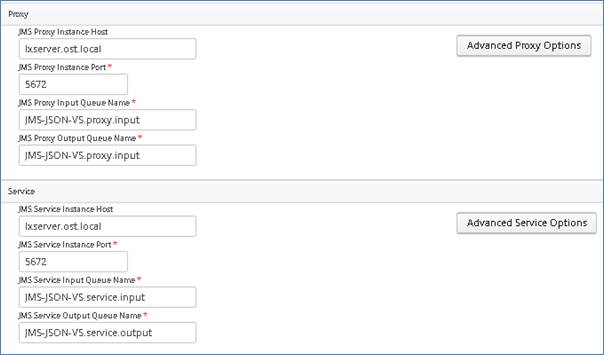
Important: Add any required credentials in the ‘Advanced Proxy’ and ‘Advanced Service’ options which can be accessed by selecting the buttons to the right of the input fields. The default credentials for ActiveMQ are admin/admin, but this will be dependent on your environment configuration.
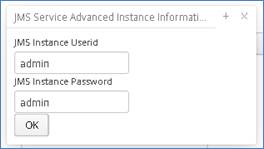
Once your details are filled in, you can move to the next screen by pressing the ‘Next’ button.
On the next screen, you can provide your format type and payload. In this example we will be using JSON as the format and using the request.json & resonse.json sample files provided in the JMS-JSON-VS samples directory.
Click the ‘Add’ button.
Select the JSON format from the dropdown.
Upload the sample request / response file.
Click OK to add to the project.
Once you have completed this, you should see both listed on the screen like so:
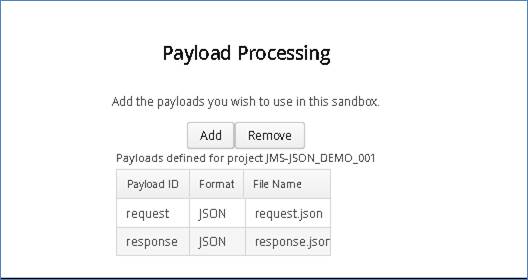
Once you have chosen your format and added your metadata files, click ‘Next’ to move on to Manage Methods Page.
Here you can set the request and response payloads based on the payload files you have provided in previous steps:
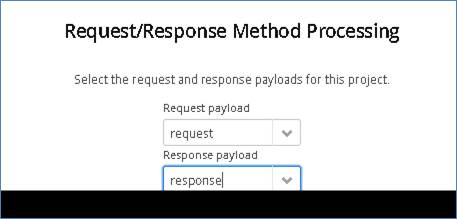
Once these have been set, click ‘Next’ to move to the build page.
Review the project details, and hit the build button when you ready to begin the project creation process.
A popup success message will be shown on screen upon completion

Now that the project has been created, you can import it into your Eclipse environment in order to run and modify the service.
10.9.3 Importing and running the virtual service project
Within your Eclipse environment, click on ‘File’ -> ’Import’…. And you will see the following screen:

Select ‘Existing Maven Project’ and then hit ‘Next’.
Browse to and select your project root directory. Select ‘Finish’ to import the project.
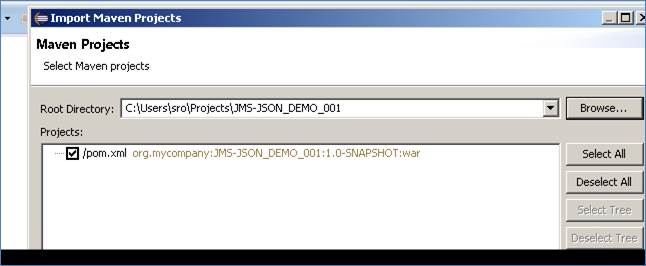
If you encounter the following warning, select ‘Finish’ to import the build:
Once the build has been imported, open the pom.xml file and on the details for the error message. Select the fix provided titled: ‘Permanently mark goal execute in pom.xml as ignored in Eclipse preferences’. This should resolve the issue.
Eclipse can be very picky so please ignore any other errors or warnings from Eclipse.
The imported project should look similar to the following:
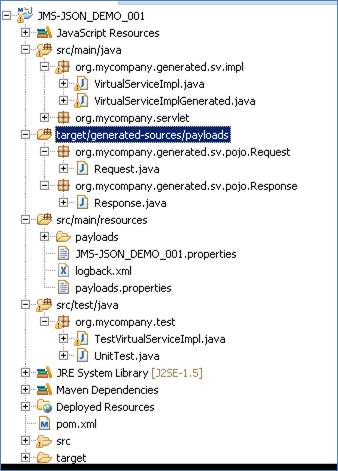
10.9.4 Running your project
Within Eclipse, right click on your project root folder and select ‘Debug As’ -> ‘Maven build’… from the context menu. This opens the Edit Configuration screen.
Add jetty:run as the goal and select debug to run the project:

The startup output will be shown in the console window in Eclipse, once the following lines appear, the base project is running and ready to be used.
[INFO] Started Jetty Server
[INFO] Starting scanner at interval of 10 seconds.
10.9.5 Invoking the service
We can now send a message in our message manager to test that the service is running.
![]() On our messaging server, we locate the JMS-JSON-VS.proxy.input and
click the send to button in order to create a new message:
On our messaging server, we locate the JMS-JSON-VS.proxy.input and
click the send to button in order to create a new message:

In the message body we will add the contents of the request.json file provided in our samples directory and send the message:
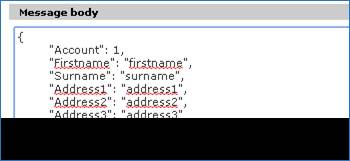
Once the message has been sent, it should arrive on the proxy output queue and be accessible to view.
We can see from the message count that 1 message is now sitting on the proxy output queue:

Select ‘Browse’ to access available messages, the data returned should be similar to the following, with each field containing random characters as a response:
{"Account":37025862,"Firstname":"vjebywy","Surname":"pgqorighfawpftjqevznxcl","Address1":"nda","Address2":"wethajn","Address3":"hz"}
This is the expected response until we have modified and improved our service.
10.9.6 Modifying the virtual service
While we now have a virtual service delivering data, it needs to be modified to better reflect the real world. Within your project structure you will find the VirtualServiceImpl.java (ServiceImp.java in newer projects) which creates the default response. Return to Eclipse and stop the service using the ‘terminate’ button above the console output window:
![]()
Once the service has been terminated, navigate to and open the VirtualServiceImpl.java (ServiceImp.java in newer projects) file under Package Explorer:
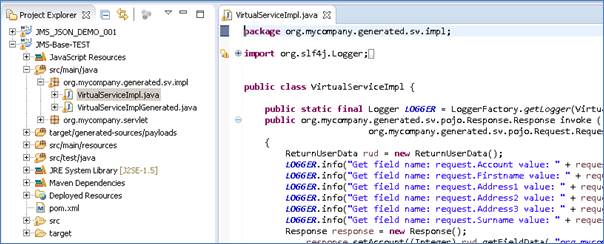
We will use the VirtualServiceImpl.java (ServiceImp.java in newer projects) sample provided in the JMS-JSON-VS samples directory to enhance the virtual services behaviour.
Open the VirtualServiceImpl.java (ServiceImp.java in newer projects) file in the samples directory, copy the contents and replace the contents of the VirtualServiceImpl.java (ServiceImp.java in newer projects) in our project with the sample contents:
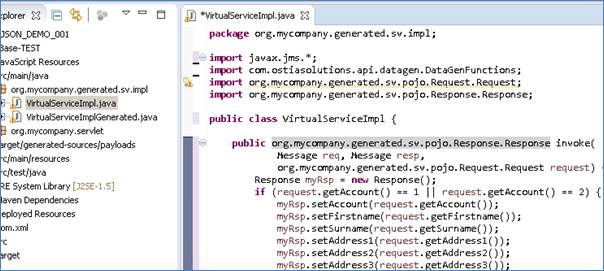
This example service will accept the provided values for each field in a request message when requesting account 00000001 or 00000002, and will return generated data for requests with unknown account numbers or null queries.
Now we can run the service again with the same steps as before (right click> ‘Debug As’ -> ‘Maven build’ with the jetty:run goal). Once the service is running we can submit a new message and should see the expected response:
For a request with the account number of 1 we see that the values returned in the response are the same values we provided:
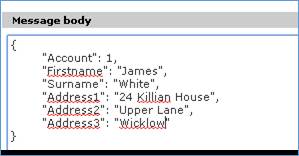

For a request with an unknown account number of 3, we see the values returned have been generated by EVS:
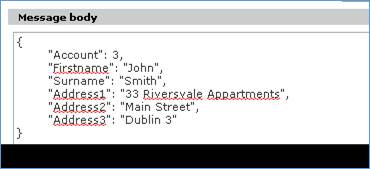

We now have a service which better reflects a real-world action which can be improved upon by modifying the VirtualServiceImpl.java (ServiceImp.java in newer projects) to add custom functionality.
10.10 Tutorial to create a virtual service using a WSDL
This tutorial will guide you through the steps required to build a Portus virtual service using a WSDL.
10.10.1 Prerequisites
In order to complete this tutorial, you will need:
- Access to a Service WSDL. Example services are provided in the WSDL-VS Samples Directory provided with this installation.
- A web service client. In this example, we will use SoapUI.
· Eclipse Luna development environment or preferred IDE complete with the Maven M2Eclipse plugin or equivalent.
10.10.2 Create the virtual service
From the Portus landing page, click on the ‘Project Management’ link. You will be presented with the following page:
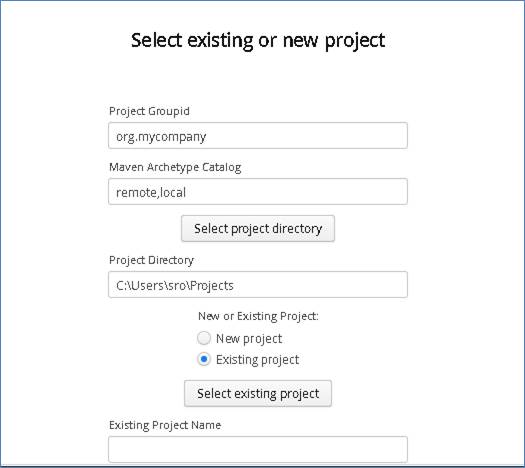
· We will leave ‘Project Groupid’ and ‘Maven Archetype Catalog’ as is for this tutorial. This is required if you wish to use the provided sample files without modification.
· Set the ‘Project Directory’ location to where you want to create the project. This can be done via the ‘Select project directory’ button or by typing directly into the directory path field.
· Once ‘New Project’ has been selected, the ‘Project Transport’ option becomes available. Select ‘MQ’ from the transport dropdown list.
· Enter a new name for the project.
Once the above details have been filled in, you will have a completed layout similar to the following:
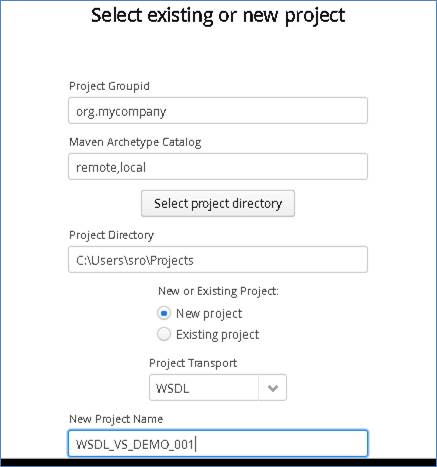
In the ‘Source’ field, enter a valid WSDL URL. In this example, we will use the provide Financial Service WSDL.
Once a WSDL has been provided, a list of available operations will be displayed in the Operations Section:
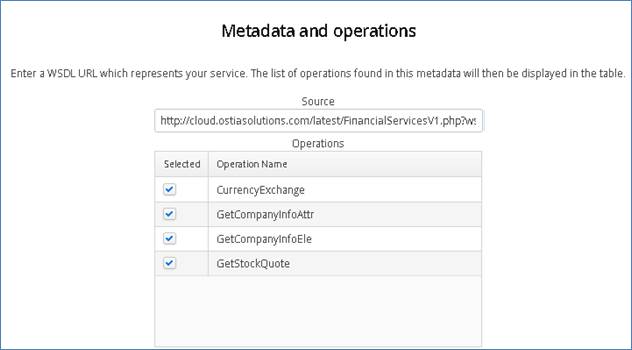
In this example, we will not be adding any payloads, so you may skip the Payload Processing page, leaving it as is.
Select the Operations you wish to use for your virtual service and hit the ‘Next’ button. You will be presented with the following Data Generation screen:

From the Data Generation screen, you can customize the data for each of the elements of your operations. On the left you will be provided with a list of operations and elements, and on the right, you can select your data generation functions to provide dynamic, randomly generated data, or enter static content. In the image below, we see a number of functions being selected to generate data for the Author element.
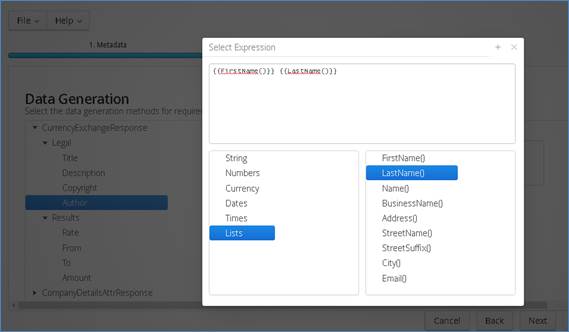
Once you have added data generation functions for your Operations, hit the ‘Next’ button. You will be presented with the Build screen
Once you have reviewed the build details, click the ‘Build’ button to create your project. Once your project has been created you will be notified via the popup on the Build screen:
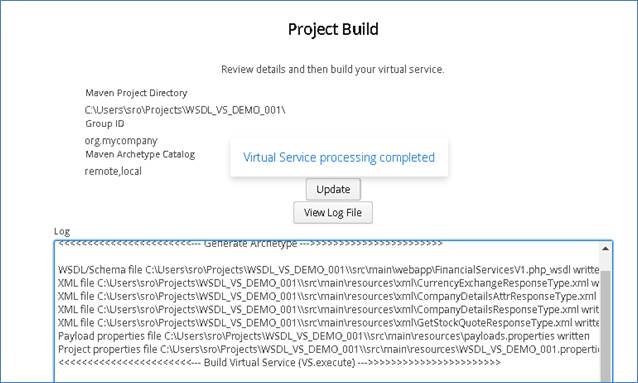
Now that your project has been created, you can import it into Eclipse as an existing Maven project:
In your Eclipse workspace, in the Package Explorer Window, right click to bring up the context menu and select ‘Import’:
From the list of options, expand the Maven folder and select ‘Existing Maven Projects’:
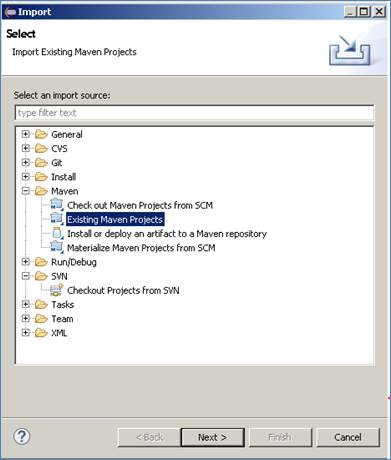
Browse to your Projects location and select the root folder and click ‘Finish’. You should be provided with a screen that looks like the following, which identifies the Project Object Model (POM):
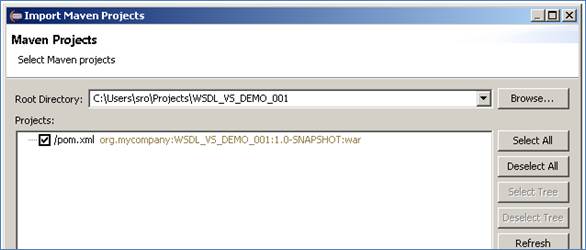
Click ‘Finish’ to import the project into Eclipse.
You should now have a project similar to the following:
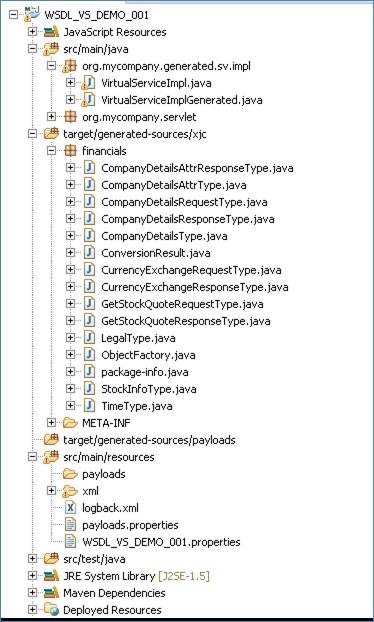
To test your project, right click on the root and select ‘Debug As’ -> ‘Maven build’…
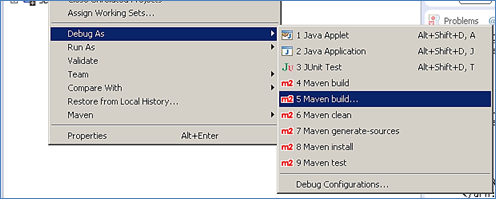
In the following window, enter jetty:run as the goal and select ’Debug’.

This will run the service in Jetty, allowing you to access the service via a browser or client. The default port for Jetty is 8080, while the service is running you should be able to access your new service using http://localhost:8080. First, we enter the address into a browser to view the WSDL:
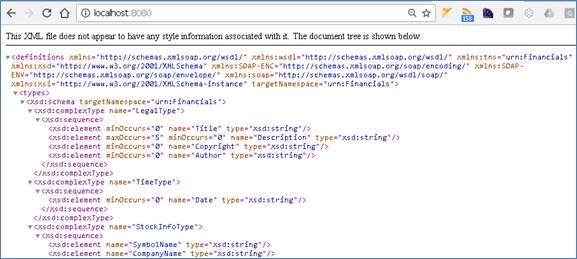
Next, using the virtual service WSDL, we will create a new SOAP project in the SoapUI client and call our service to view the results.
In SoapUI right click on the ‘Projects node’ and select ‘New SOAP Project’:
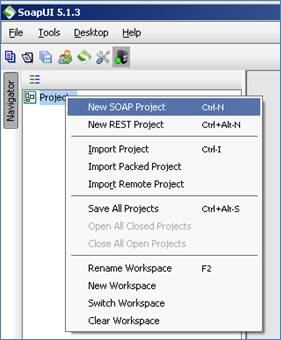
Give your project a name and enter the URI for your virtual service:
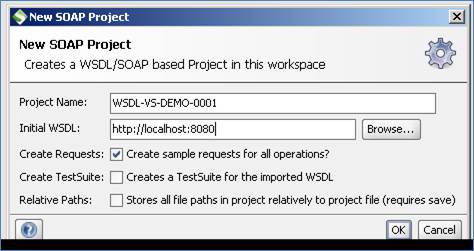
You should end up with a project that looks similar to the following:
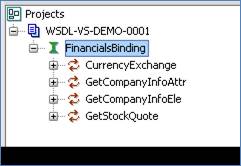
If we issue a request against the service, new data will be returned for the elements where dynamic data generation functions have been provided each time the service is called.
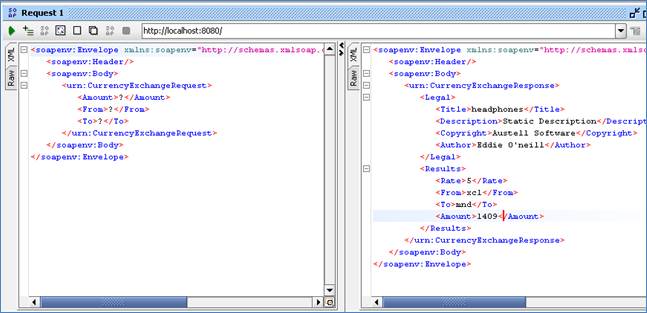
Once the basic service has been tested, we can begin to modify improve the service.
10.10.3 Modifying the virtual service
While we now have a virtual service delivering data, it needs to be modified to better reflect the real world. Within your project structure you will find the VirtualServiceImpl.java (ServiceImp.java in newer projects) which creates the default response. Return to Eclipse and stop the service using the ‘terminate’ button above the console output window:
![]()
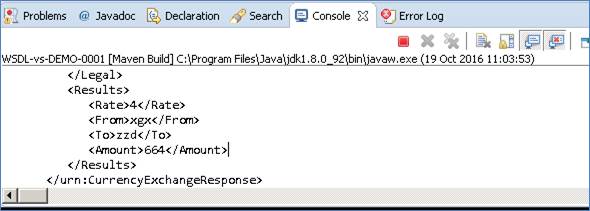
Once the service has been terminated, navigate to and open the VirtualServiceImpl.java (ServiceImp.java in newer projects) file under Package Explorer:

We will use the VirtualServiceImpl.java (ServiceImp.java in newer projects) sample provided in the WSDL-VS samples directory to enhance the virtual services behaviour.
Open the VirtualServiceImpl.java (ServiceImp.java in newer projects) file in the samples directory, copy the contents and replace the contents of the VirtualServiceImpl.java (ServiceImp.java in newer projects) in our project with the sample contents:
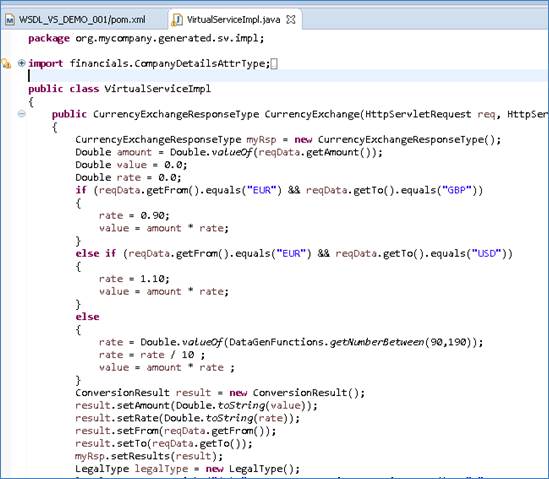
This example implementation will return more realistic results. The currency exchange now has set rates for Euro to British Pounds, or Euro to United States Dollars conversions. If the currency is not set, random generated data will be returned. Other values throughout the service have been replaced with a mix of static and generated content.
Now we can run the service again with the same steps as before (right click> ’Debug As’ -> ’Maven build’ with the jetty:run goal). Return to SoapUI and issue a new request in the same project, this time using the EUR -> GBP values for the request. We see that the expected values are returned based on our implementation changes:
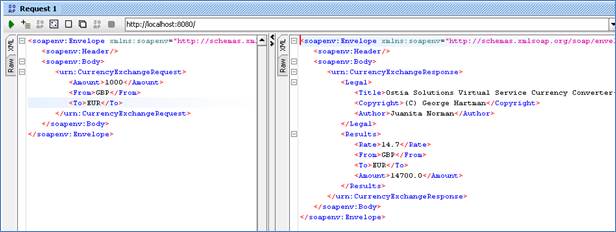
If we issue a request with unknown currency type values, we get randomly generated results where the rate will change for each request:
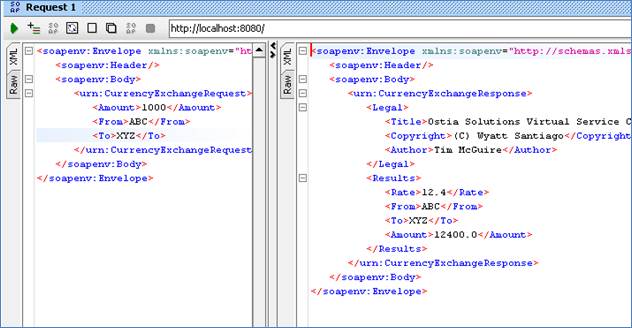
We now have a service which better reflects a real-world action which can be improved upon by modifying the VirtualServiceImpl.java (ServiceImp.java in newer projects) to add custom functionality.
10.11 Tutorial to create a SOCKETS virtual service
This tutorial will guide you through the steps required to build a Portus sockets virtual service using a byte payload.
10.11.1 Prerequisites
In order to complete this tutorial, you will need:
- The sample SocketsClient and SocketsServer executables delivered in the ./Portus/Samples/ Sockets-VS/ directory in the product installation.
- The sample virtual service implementation delivered in the ./Portus/Samples/Sockets-VS/ directory in the product installation.
· Access to ports 27014 and 27015 on the machine where the virtual service will run.
10.11.2 Create the virtual service
From the Portus landing page, click on the ‘Project Management’ Link and you will be presented with the following screen:

· We will leave ‘Project Groupid’ and ‘Maven Archetype Catalog’ as is for this tutorial. This is required if you wish to use the provided sample files without modification.
· Set the ‘Project Directory’ location to where you want to create the project. This can be done via the ‘Select project directory’ button or by typing directly into the directory path field.
· Once ‘New Project’ has been selected, the ‘Project Transport’ option becomes available. Select ‘SOCKETS from the transport dropdown list.
· Enter a new name for the project.
Once the above details have been filled in, you will have a completed layout similar to the following:
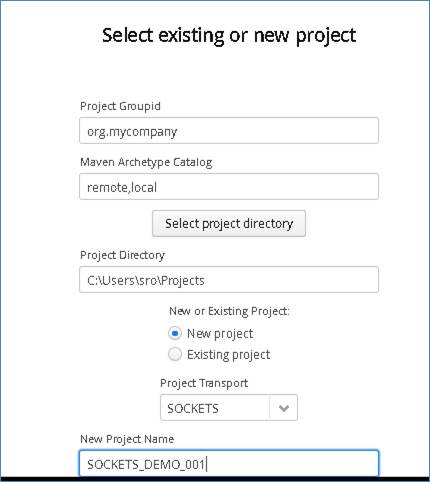
Click ‘Next’ to Continue to the Metadata and Operations page.
You will be presented with the following screen:
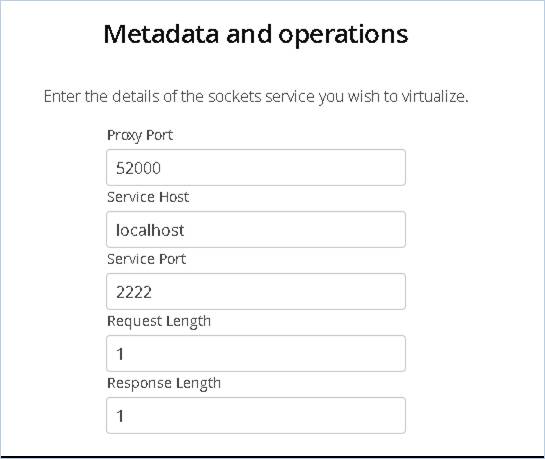
- Service Host: The host machine where the real service is listening
- Proxy Port: The port for the service to which requests will be sent
- Service Port: The port on which the real service is listening
- Request length: Length of the Request
- Response Length: Length of the Response
Fill in the fields with the values shown in the following screenshot:
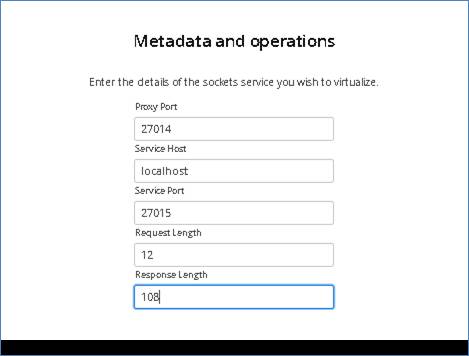
Click Next to Continue.
No payloads are required; however, we must provide the payload ID and type.
On the payloads page, select the ‘Add’ button.
Select ‘RAW as the project Payload and give the Payload ID of ‘request’:
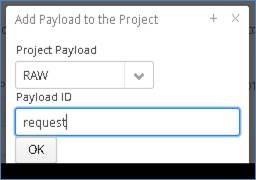
Select ‘OK’ to add this to the project.
Repeat this process, this time, entering ‘response’ for the Payload ID
Once complete, you should see both Payloads listed on screen:
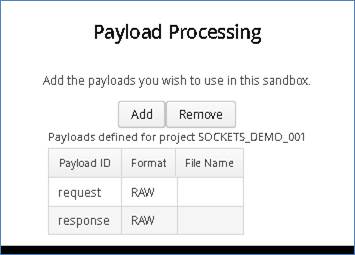
Click ‘Next’ to move to the Method Processing page.
On this page, set the request and response payloads defined in the previous step to use for this project by selecting from the available options in the dropdown for each field:
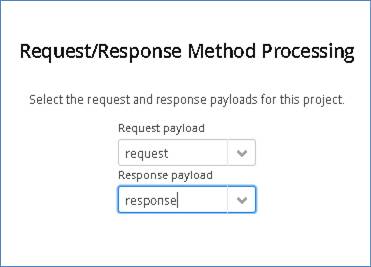
Click ‘Next’ to continue to the build page.
You can set the log output to basic or verbose via the ‘File’ Dropdown on this page depending on your preference (output is set to basic by default).
Review the project details, and select ‘Build Project’ when you are ready to begin the project creation process. This may take some time depending on your hardware and environment.
The log window will show build progress and a completion popup message will be shown on success:
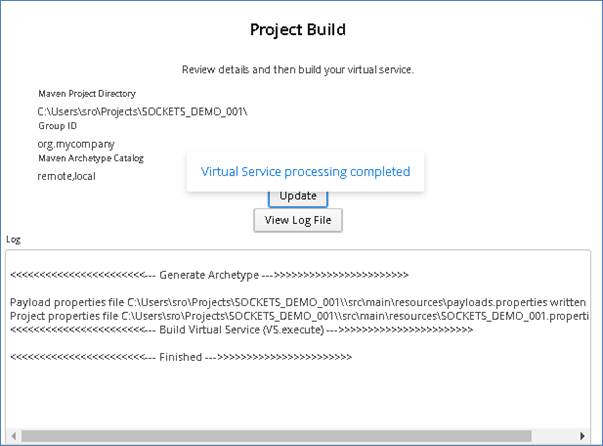
Once the project has been build, we can import it into our Eclipse environment to run, test and modify.
10.11.3 Importing and running the virtual service project
Within your Eclipse environment, click on ‘File’ -> ‘Import’…. And you will see the following screen.
Select ‘Existing Maven Project’ and then hit ‘Next’.
Select the project we have just generated in the next screen:
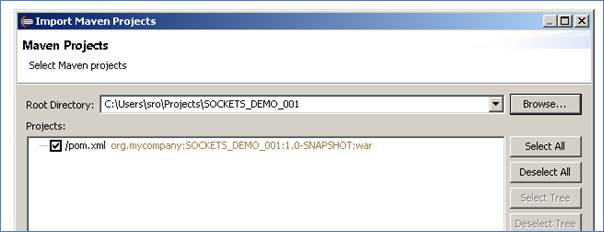
Once imported, you should see a project layout similar to the following:
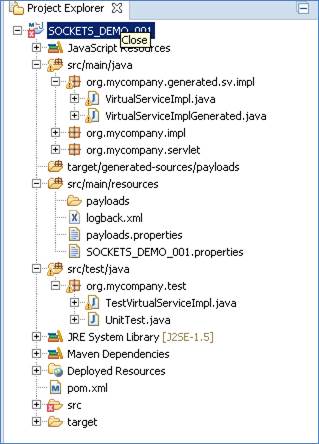
To test your project, right click on the root and select ‘Debug As’ -> ‘Maven build’…

In the following window, enter jetty:run as the goal and select ‘Debug’.
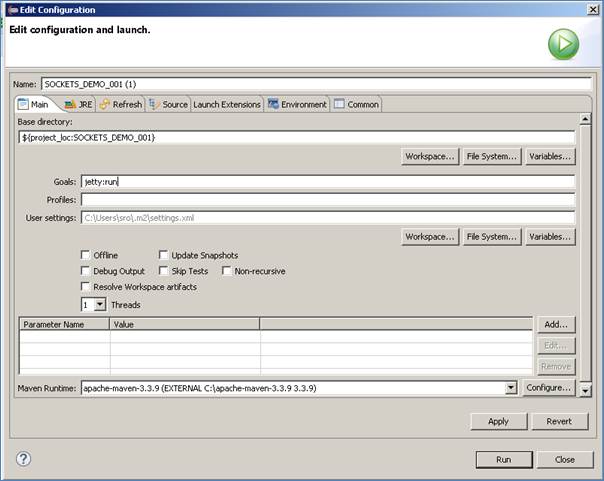
10.11.4 Invoking the virtual service
With the service running, run the SocketClient.exe from the delivered samples directory (Portus\Samples\Sockets-VS\) and you will see output similar to the following:
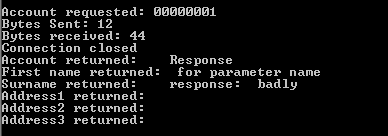
As can be seen, the default response is a randomly generated word, in this case ‘badly’.
Now that we know the base service is working as expected, it’s time to modify the project to produce more realistic results.
10.11.5 Modifying the virtual service
While we now have a virtual service delivering data, it needs to be modified to better reflect the real world. Within your project structure you will find the VirtualServiceImpl.java (ServiceImp.java in newer projects) file which creates the default response:
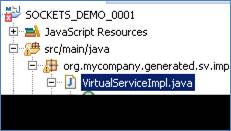
This VirtualServiceImpl.java (ServiceImp.java in newer projects) contains the logic used by the service. Newly created projects provide a base implementation which can be expanded and improved by users. To demonstrate this, we will replace the contents of the default implementation with the improved sample implementation provided in the SOCKETS-VS samples directory.
To begin, terminate the service in eclipse if it is still running.
Once the service is stopped, replace the contents of the Projects VirtualServiceImpl.java (ServiceImp.java in newer projects) with the contents of the sample implementation.
Save the project and run it as before.
Once the service is running, return to the command line and run the SocketClient.exe again.
This time, you should see more realistic data as can be seen in the following screenshot:
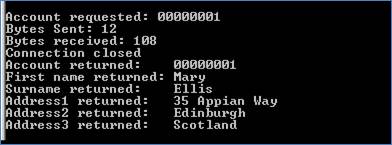
We now have a service which better reflects a real-world action which can be improved upon by modifying the VirtualServiceImpl.java (ServiceImp.java in newer projects) to add custom functionality.
10.12 Tutorial to create XML records with XML Data Generation
This tutorial will guide you through the steps required to generate XML records based on a schema.
From the Portus landing page, click on the link to ‘XSD Data Generation’ and you will be presented with the following screen:
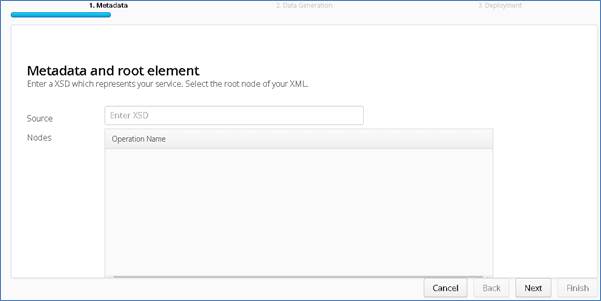
In the ‘Source’ field, enter the schema you wish to use to generate your records. The ‘Source’ field requires the full file path for your schema. In this tutorial we will use the sample schema provided in the resources pack, so our file path will be: file:///C:/Users/admin/Ostia%20Solutions/apache-tomcat-8.0.36/webapps/Portus/Samples/XML-Generation/SampleSchema.xsd.
Once you have provided your schema in the ‘Source’ field, hit the ‘Enter’ key to parse the schema and return the available nodes:
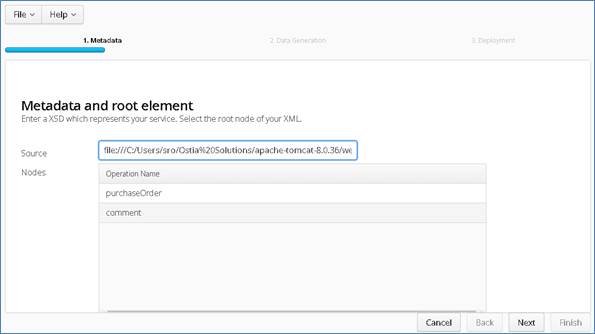
Select the node you wish to use for record generation and hit the ‘Next’ button, you will be presented with the following screen:
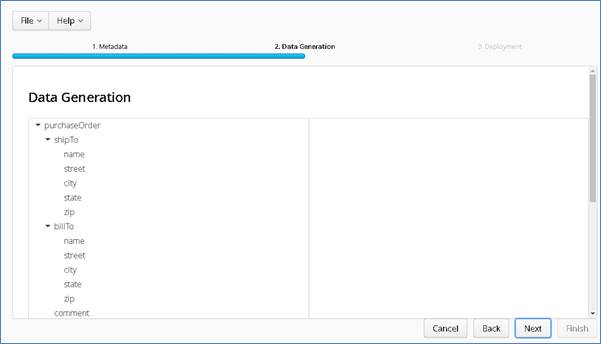
All of the elements of the are displayed in the left window, selecting an element on the left will bring up the data generation options in the right window.
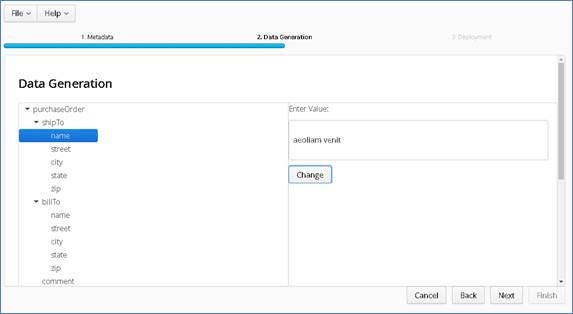
Each element has been filled with static dummy text by default, selecting the ’Change’ option will provide a list of data generation functions to choose from :
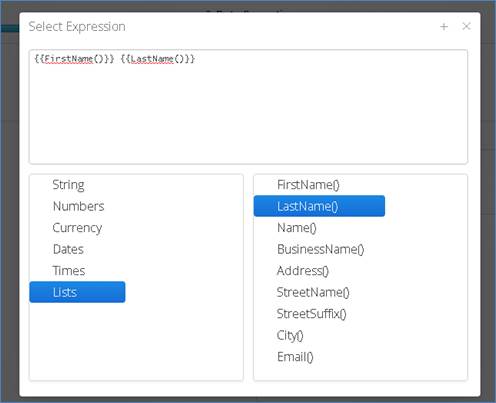
First, remove the static text from the top window, next select a category from the right window. This will bring up a list of available functions for that category in the left window. Double clicking on a function will add it to your element. You can also mix a number of functions and static text for a single element if desired.
Once you have filled in the functions for the desired fields, select the ‘Next’ button to move on to the final generation stage. Select the number of messages you require and select ‘Publish Test Data’ button to create your records.
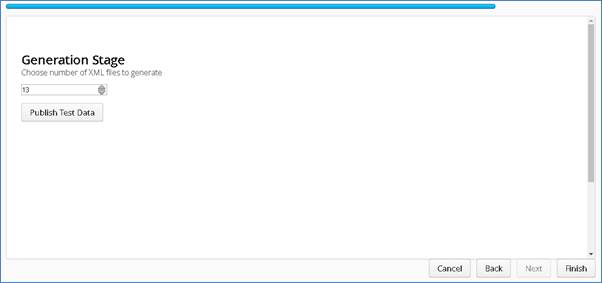
The generated records will be provided in a .zip archive. Extract the archive to view your files.
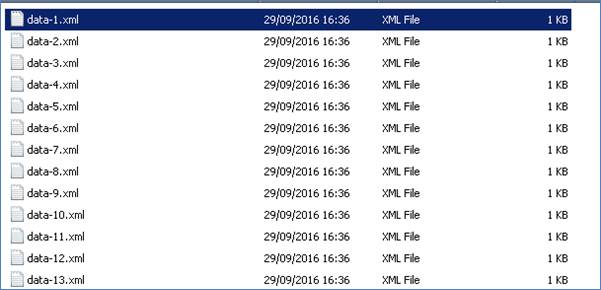
Each file will contain different dynamically generated data for elements where data generation functions were added, and the same static data where static data was added or left unchanged.
11 Portus EVS Tutorials – Depreciated Apps
The following tutorials are for the now depreciated individual applications currently still packaged with EVS. Development has been discontinued for these applications. All of their functionality and more can be accessed through the Project Management GUI Unified interface. Note that these individual applications may be removed in future releases of EVS.
11.1 Tutorial to create a MQ COBOL virtual service
This tutorial will guide you through the steps required to build a Portus virtual service using a COBOL payload.
11.1.1 Prerequisites
In order to complete this tutorial, you will need:
· The sample COBOL request and response copybooks delivered in the ./Portus/Samples/MQ-COBOL-VS/ directory in the product installation.
· The sample COBOL request data delivered in the ./Portus/Samples/MQ-COBOL-VS/ directory in the product installation.
· Access to an MQ Queue Manager with 4 queues defined.
Important note:
You will need to use names for existing queues in your environment or create new queues and specify them by name during project creation. Host, Manager Name and credentials will also be dependent on your environment setup and configuration for MQ.
o For the purpose of the tutorial, we will be using a local queue manager called ‘JP.LOCAL’
o For the purpose of the tutorial, we will be using the following names:
§ Proxy Input Queue: cobol.proxy.inputqueue.
§ Proxy Output Queue: cobol.proxy.outputqueue.
§ Service Input Queue: cobol.service.inputqueue.
§ Service Output Queue: cobol.service.outputqueue.
o Notes:
o In this tutorial, a local queue manager is used, however, a remote queue manager may also be used once the appropriate configuration settings are available.
o The two service queue names are not used in this tutorial but are included here for completeness. They are used in a later tutorial which follows up on this one.
· Access to a utility that will enable you to place data on and take data off a queue. We will use the RFHUtil utility available for free from IBM here.
· This tutorial uses Eclipse and thus an Eclipse environment will be required to complete the tutorial.
11.1.2 Create the virtual service
From the Portus landing page, click on the link to create a MQ virtual service and you will be presented with the following screen:
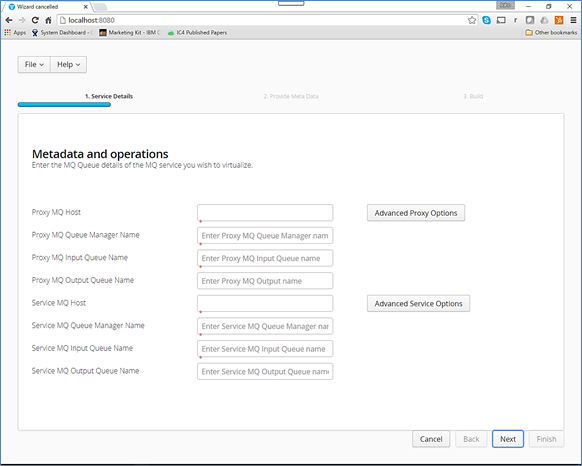
Fill in the proxy and service MQ details using the MQ names and MQ manager configuration details appropriate for your environment, as can be seen in the next screenshot:
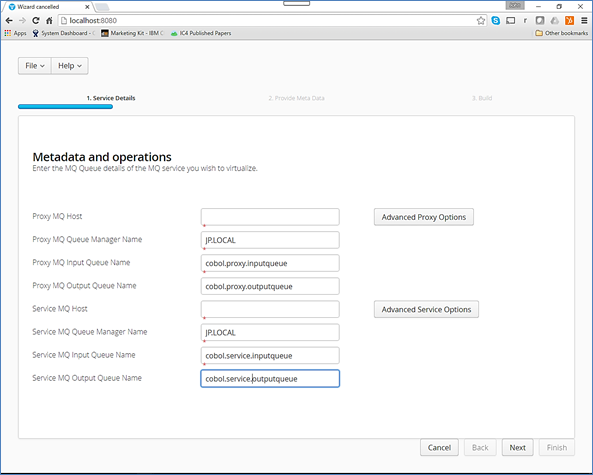
Note that if you are using a remote queue manager, you will need to fill in the Host details for both proxy and service MQ details and the advanced options should also be reviewed.
Hit the ‘Next’ button and you will be presented with the following screen:
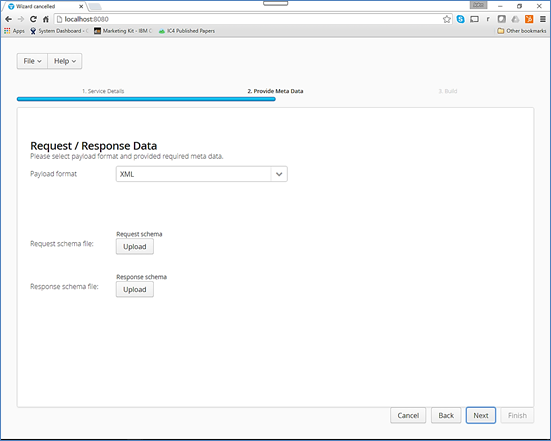
Do the following:
· Select ‘COBOL’ payload from the ‘Payload Format’ drop down.
· Upload ‘Request.cpy’ from the samples directory.
· Upload ‘Response.cpy from the samples directory.
You should have a screen that looks similar to the following:
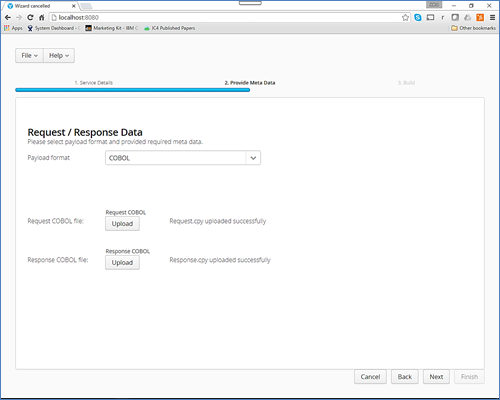
Hit the ‘Next’ button and you will be presented with a screen similar to the following:
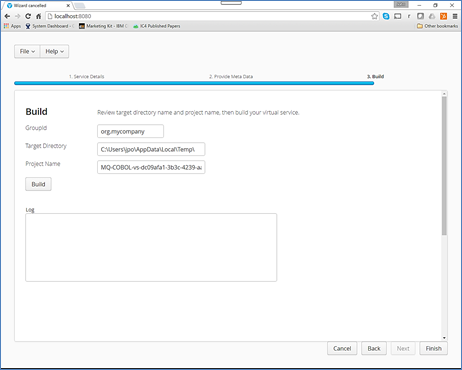
Enter the following details:
Note: To use the unmodified sample implementations, keep the group id as the default org.mycompany.
· Change the GroupId to that used by your organization or team. (Convention is that this is the WWW domain name of the company reversed. We use a company called mycompany. we have used org.mycompany for the tutorial in order to use the sample implementations.
· Review the project directory to which the project will be written.
· Review the project name.
You should have a screen that looks like the following:

Hit the ‘Build’ button and watch the log as the virtual service project is built. Please note that this may take some time depending on the speed of your machine.
When it is completed, you should see a screen like the following:
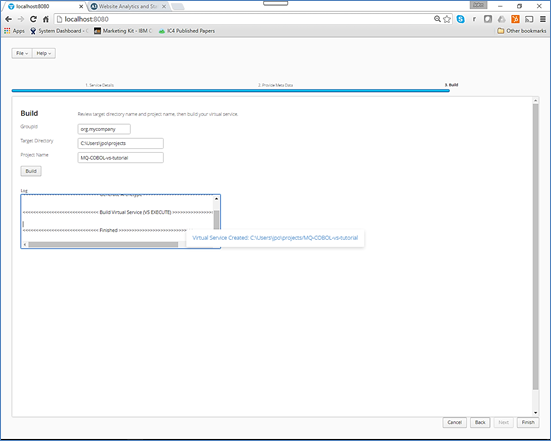
11.1.3 Importing and running the virtual service project
Within your Eclipse environment, click on ‘File’ -> ‘Import’…. And you will see the following screen.

Select ‘Existing Maven Project’ and then hit ‘Next’.
Select the project we have just generated in the next screen:
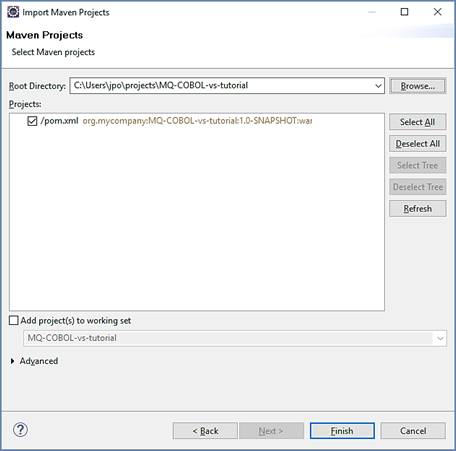
Click ‘Finish’ and the project will be imported to your Eclipse environment. Note, Eclipse can be very picky so please just ignore any errors or warnings from Eclipse. Once completed, your project should look like the following:
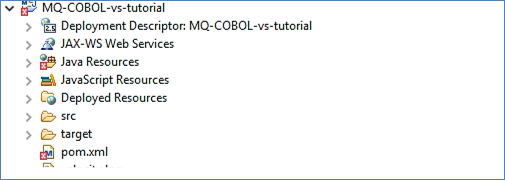
11.1.4 Running your project
Within Eclipse, right click on your project and select ‘Debug As’ -> ‘Maven build’… and you will see the following screen:
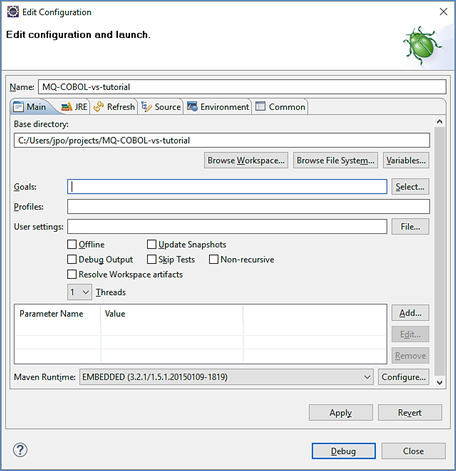
Enter ‘jetty:run’ as the goal and click on the ‘Debug’ button. You will eventually see output similar to the following in the console:
[INFO] --- maven-compiler-plugin:2.5.1:testCompile (default-testCompile) @ MQ-COBOL-vs-tutorial ---
[INFO] Nothing to compile - all classes are up to date
[INFO]
[INFO] <<< jetty-maven-plugin:9.2.11.v20150529:run (default-cli) @ MQ-COBOL-vs-tutorial <<<
[INFO]
[INFO] --- jetty-maven-plugin:9.2.11.v20150529:run (default-cli) @ MQ-COBOL-vs-tutorial ---
2016-08-05 16:53:49.368:INFO::main: Logging initialized @12136ms
[INFO] Configuring Jetty for project: MQ-COBOL-vs-tutorial
[INFO] webAppSourceDirectory not set. Trying src\main\webapp
[INFO] Reload Mechanic: automatic
[INFO] Classes = C:\Users\jpo\projects\MQ-COBOL-vs-tutorial\target\classes
[INFO] Context path = /
[INFO] Tmp directory = C:\Users\jpo\projects\MQ-COBOL-vs-tutorial\target\tmp
[INFO] Web defaults = org/eclipse/jetty/webapp/webdefault.xml
[INFO] Web overrides = none
[INFO] web.xml file = C:\Users\jpo\projects\MQ-COBOL-vs-tutorial\target/MQ-COBOL-vs-tutorial-1.0-SNAPSHOT/WEB-INF/web.xml
[INFO] Webapp directory = C:\Users\jpo\projects\MQ-COBOL-vs-tutorial\src\main\webapp
2016-08-05 16:53:49.856:INFO:oejs.Server:main: jetty-9.2.11.v20150529
16:53:52.496 [main] INFO c.o.s.h.BasePortusVirtualServiceHandler - Properties file not found in standard configuration directory, checking project classpath
16:53:52.500 [main] INFO c.o.s.h.BasePortusVirtualServiceHandler - Properties loaded from project classpath
16:53:52.507 [main] INFO c.o.s.h.BasePortusVirtualServiceHandler - VS MQ-COBOL-vs-tutorial properties written to ../conf/portus/MQ-COBOL-vs-tutorial.properties
16:53:52.517 [main] INFO c.o.s.h.m.VirtualServiceHandler - MQ-VS MQ Proxy Queue Manager : JP.LOCAL
16:53:52.517 [main] INFO c.o.s.h.m.VirtualServiceHandler - MQ-VS MQ Proxy Input Queue : cobol.proxy.inputqueue
16:53:52.517 [main] INFO c.o.s.h.m.VirtualServiceHandler - MQ-VS MQ Proxy Output Queue : cobol.proxy.outputqueue
16:53:52.517 [main] INFO c.o.s.h.m.VirtualServiceHandler - MQ-VS MQ Service Queue Manager : JP.LOCAL
16:53:52.517 [main] INFO c.o.s.h.m.VirtualServiceHandler - MQ-VS MQ Service Input Queue : cobol.service.inputqueue
16:53:52.517 [main] INFO c.o.s.h.m.VirtualServiceHandler - MQ-VS MQ Service Output Queue : cobol.service.outputqueue
16:53:52.517 [main] INFO c.o.s.h.m.VirtualServiceHandler - MQ-VS Recording keys : null
2016-08-05 16:53:55.047:INFO:oejsh.ContextHandler:main: Started o.e.j.m.p.JettyWebAppContext@63a9c661{/,file:/C:/Users/jpo/projects/MQ-COBOL-vs-tutorial/src/main/webapp/,AVAILABLE}{file:/C:/Users/jpo/projects/MQ-COBOL-vs-tutorial/src/main/webapp/}
2016-08-05 16:53:55.048:WARN:oejsh.RequestLogHandler:main: !RequestLog
2016-08-05 16:53:55.160:INFO:oejs.ServerConnector:main: Started ServerConnector@3cf4dec7{HTTP/1.1}{0.0.0.0:8080}
2016-08-05 16:53:55.161:INFO:oejs.Server:main: Started @17930ms
[INFO] Started Jetty Server
[INFO] Starting scanner at interval of 10 seconds.
Congratulations, you have just created and started your first MQ virtual service with a COBOL payload.
11.1.5 Invoking the service
Start the RFHUtil and you will be presented with a screen as follows:
Fill in the following:
· The queue manager name.
· The proxy input queue defined to your virtual service. In our case we use cobol.proxy.inputqueue.
· Open the request1.data file from the delivered samples.
The RFHUtil screen should look like this:
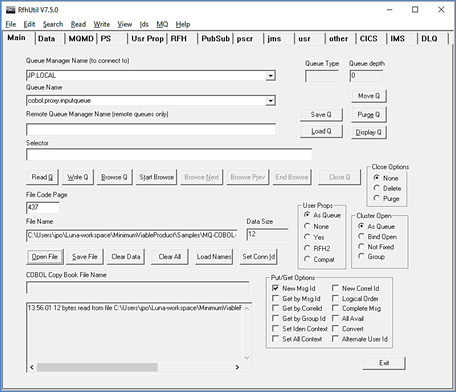
The data can be seen by clicking the ‘Data’ tabs as follows:
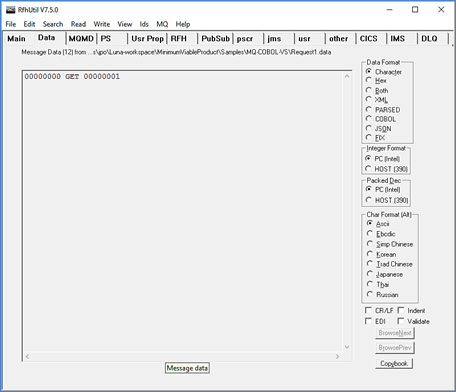
Hit the ‘Write Q’ button on the Main screen and you should see the following message:
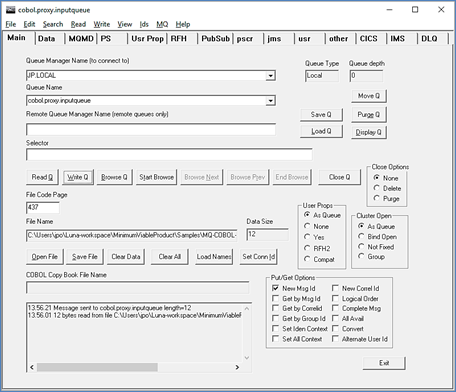
Now change the queue name to your proxy output queue. In our case we use cobol.proxy.outputqueue. Then hit the ‘Read Q’ button and you will see the following:
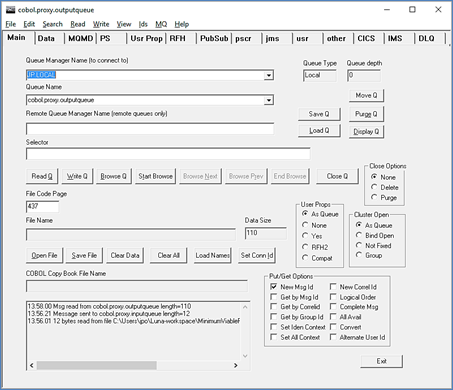
Now hit the ‘Data’ tab and you will see the data returned:
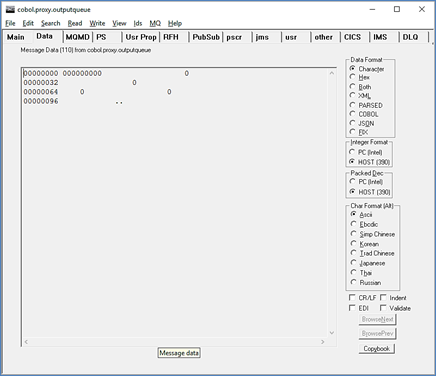
This is the default response from the virtual service which is to set each field to 0.
11.1.6 Modifying the virtual service
While we now have a virtual service delivering data, it needs to be modified to better reflect the real world. Within your project structure you will find the VirtualServiceImpl.java (ServiceImp.java in newer projects) file which creates the default response:
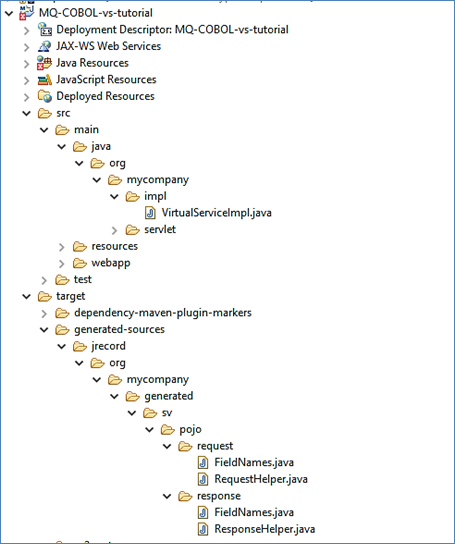
We are going to take the RequestHelper.java and ResponseHelper.java sources and modify the VirtualServiceImpl.java (ServiceImp.java in newer projects) source to create a more functional response as can be seen below. This source is also in the delivered example VirtualServiceImpl.java (ServiceImp.java in newer projects) file:
package org.mycompany.impl;
import com.ibm.mq.MQMessage;
import com.ostiasolutions.SV.payloads.cobol.CobolRequestMessage;
import com.ostiasolutions.SV.payloads.cobol.CobolResponseMessage;
import com.ostiasolutions.api.datagen.DataGenFunctions;
import net.sf.JRecord.Details.AbstractLine;
public class VirtualServiceImpl
{
public void invoke(MQMessage inMsg , MQMessage outMsg , CobolRequestMessage req, CobolResponseMessage rsp) throws Exception
{
AbstractLine line = null;
// Create Response
line = rsp.getBuilder().newLine();
//
// Set the account field to the incoming account value
//
line.getFieldValue("Account").set(req.getPayload().getFieldValue("Account").asInt());
//
// Use data generation functions to create the rest of the record
//
line.getFieldValue("FirstName").set(DataGenFunctions.getFirstName());
line.getFieldValue("Surname").set(DataGenFunctions.getLastName());
line.getFieldValue("Address1").set(DataGenFunctions.getNumberBetween(1, 100) + DataGenFunctions.getStreetName());
line.getFieldValue("Address2").set(DataGenFunctions.getAddressLine2());
line.getFieldValue("Address3").set(DataGenFunctions.getCity());
rsp.getWriter().write(line);
rsp.getWriter().close();
return;
}
}
With RFHUtil, create a request for the input queue as before:
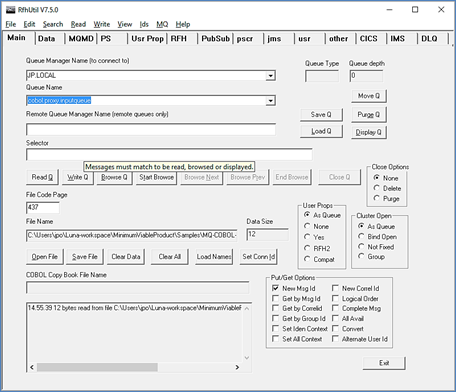
Hit the ‘Write Q’ button to put the request on the input queue. If you then read the response from the queue using RFHUtil, you will see the generated data like the following:

Issuing another request will result in different data:
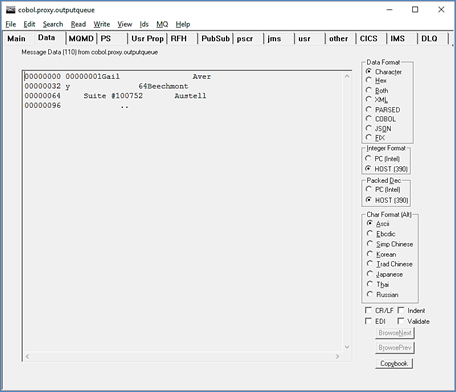
As the service is configured, random data will be returned regardless of the key provided. If consistent data is required, turn on recording for the service marking the Account field as the recording key. In this way, when a record is generated for Account 1, it will be recorded and thus further request for Account 1 will return the same values.
11.2 Tutorial to create a sockets virtual service
This tutorial will guide you through the steps required to build a Portus sockets virtual service using a byte payload.
11.2.1 Prerequisites
In order to complete this tutorial, you will need:
· The sample socketsclient and socketsserver executables delivered in the ./Portus/Samples/ Sockets-VS/ directory in the product installation.
· The sample virtual service implementation delivered in the ./Portus/Samples/MQ-Sockets-VS/ directory in the product installation.
· Access to ports 27014 and 27015 on the machine where the virtual service will run.
11.2.2 Create the virtual service
From the Portus landing page, click on the link to create a sockets virtual service and you will be presented with the following screen:
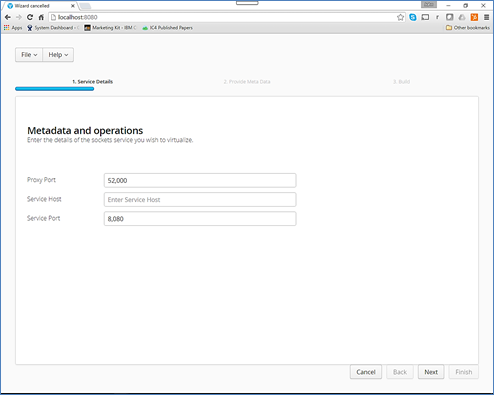
Fill in the proxy port and the service host and port details as can be seen in the next screenshot:
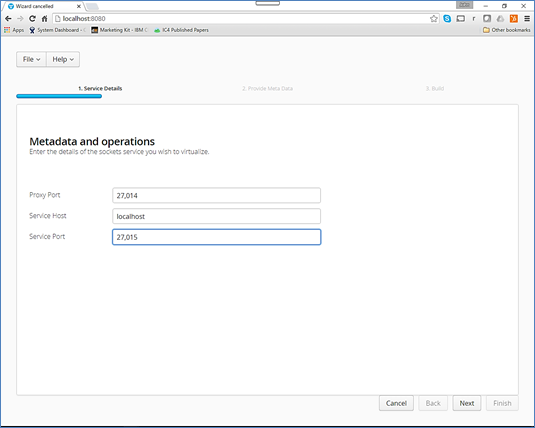
Hit the ‘Next’ button and you will be presented with the following screen:
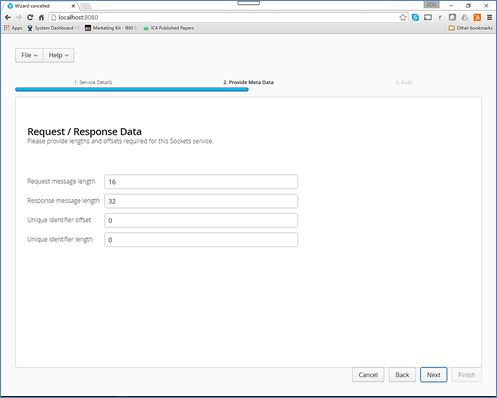
Fill in the metadata fields as seen from the next screenshot:
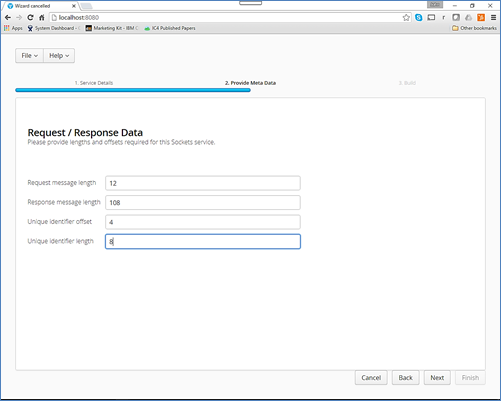
Hit the ‘Next’ button and you will be presented with a screen like the following:
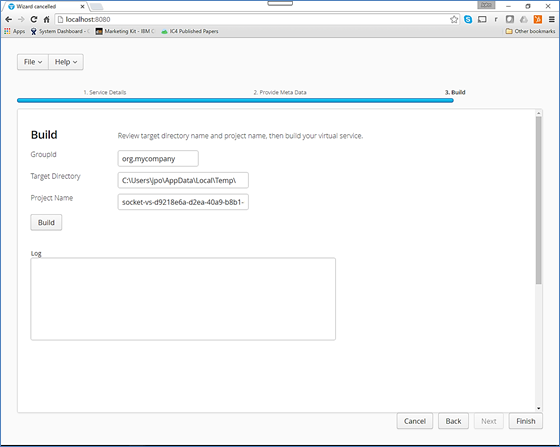
Enter the following details:
Note: To use the unmodified sample implementations, keep the group id as the default org.mycompany.
· Change the GroupId to that used by your organization or team. (Convention is that this is the WWW domain name of the company reversed. We use a company called mycompany. We have used org.mycompany for the tutorial in order to use the unmodified sample implementation.
· Review the project directory to which the project will be written.
· Review the project name.
You should have a screen that looks like the following:
Hit the ‘Build’ button and watch the log as the virtual service project is built. Please note that this may take some time depending on the speed of your machine.
When it is completed, you should see a screen like the following:
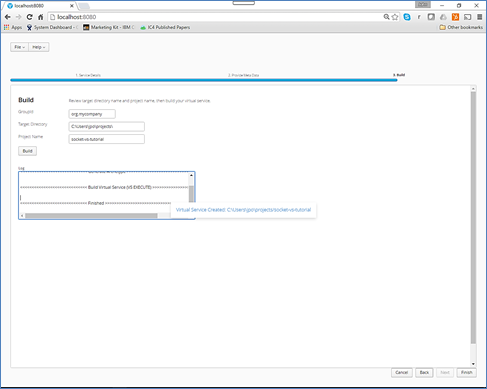
11.2.3 Importing and running the virtual service project
Within your Eclipse environment, click on ‘File’ -> ‘Import’…. And you will see the following screen:
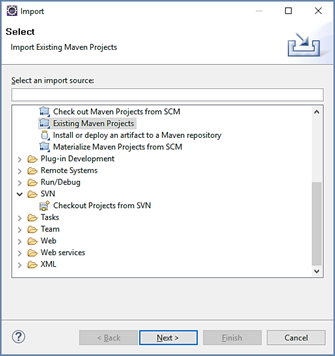
Select ‘Existing Maven Project and then hit ‘Next’. Select the project we have just generated in the next screen:
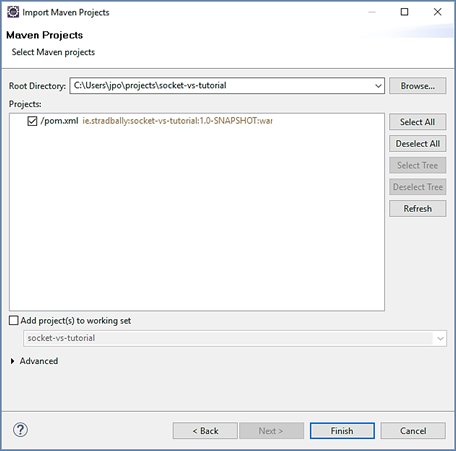
Click ‘Finish’ and the project will be imported to your Eclipse environment. Note, Eclipse can be very picky so please just ignore any errors or warnings from Eclipse. Once completed, your project should look like the following:
|
|
|
|
11.2.4 Running your project
Within Eclipse, right click on your project and select ‘Debug As’ -> ‘Maven build’… and you will see the following screen:
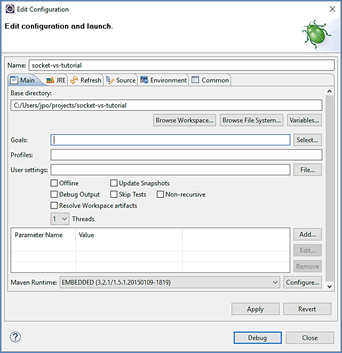
Enter ‘jetty:run’ as the goal and click on the ‘Debug’ button. You will eventually see the following in the console:
[INFO] --- maven-resources-plugin:2.6:resources (default-resources) @ socket-vs-tutorial ---
[INFO] Using 'UTF-8' encoding to copy filtered resources.
[INFO] Copying 2 resources
[INFO]
[INFO] --- maven-compiler-plugin:2.5.1:compile (default-compile) @ socket-vs-tutorial ---
[INFO] Nothing to compile - all classes are up to date
[INFO]
[INFO] --- maven-resources-plugin:2.6:testResources (default-testResources) @ socket-vs-tutorial ---
[INFO] Using 'UTF-8' encoding to copy filtered resources.
[INFO] skip non existing resourceDirectory C:\Users\jpo\projects\socket-vs-tutorial\src\test\resources
[INFO]
[INFO] --- maven-compiler-plugin:2.5.1:testCompile (default-testCompile) @ socket-vs-tutorial ---
[INFO] No sources to compile
[INFO]
[INFO] <<< jetty-maven-plugin:9.2.11.v20150529:run (default-cli) @ socket-vs-tutorial <<<
[INFO]
[INFO] --- jetty-maven-plugin:9.2.11.v20150529:run (default-cli) @ socket-vs-tutorial ---
2016-08-05 17:37:11.841:INFO::main: Logging initialized @16743ms
[INFO] Configuring Jetty for project: socket-vs-tutorial
[INFO] webAppSourceDirectory not set. Trying src\main\webapp
[INFO] Reload Mechanic: automatic
[INFO] Classes = C:\Users\jpo\projects\socket-vs-tutorial\target\classes
[INFO] Context path = /
[INFO] Tmp directory = C:\Users\jpo\projects\socket-vs-tutorial\target\tmp
[INFO] Web defaults = org/eclipse/jetty/webapp/webdefault.xml
[INFO] Web overrides = none
[INFO] web.xml file = C:\Users\jpo\projects\socket-vs-tutorial\target/socket-vs-tutorial-1.0-SNAPSHOT/WEB-INF/web.xml
[INFO] Webapp directory = C:\Users\jpo\projects\socket-vs-tutorial\src\main\webapp
2016-08-05 17:37:12.048:INFO:oejs.Server:main: jetty-9.2.11.v20150529
17:37:14.644 [main] INFO c.o.s.h.BasePortusVirtualServiceHandler - Properties loaded from C:\Users\jpo\projects\conf\portus\socket-vs-tutorial.properties
17:37:14.660 [main] INFO c.o.s.h.s.VirtualServiceHandler - socket VS proxy port : 27014
17:37:14.660 [main] INFO c.o.s.h.s.VirtualServiceHandler - socket VS service host : localhost
17:37:14.660 [main] INFO c.o.s.h.s.VirtualServiceHandler - socket VS service port : 27015
17:37:14.661 [main] INFO c.o.s.h.s.VirtualServiceHandler - socket VS recording keys :
17:37:14.662 [main] INFO c.o.s.h.s.VirtualServiceHandler - Listener thread started
2016-08-05 17:37:14.662:INFO:oejsh.ContextHandler:main: Started o.e.j.m.p.JettyWebAppContext@4364863{/,file:/C:/Users/jpo/projects/socket-vs-tutorial/src/main/webapp/,AVAILABLE}{file:/C:/Users/jpo/projects/socket-vs-tutorial/src/main/webapp/}
2016-08-05 17:37:14.664:WARN:oejsh.RequestLogHandler:main: !RequestLog
17:37:14.668 [Thread-11] INFO c.o.s.h.s.ListnerThreadService - listener thread: Listening on port: 27014
2016-08-05 17:37:14.814:INFO:oejs.ServerConnector:main: Started ServerConnector@6aae0e6f{HTTP/1.1}{0.0.0.0:8080}
2016-08-05 17:37:14.815:INFO:oejs.Server:main: Started @19716ms
[INFO] Started Jetty Server
[INFO] Starting scanner at interval of 10 seconds.
Congratulations, you have just created and started your first MQ virtual service with a COBOL payload.
11.2.5 Invoking the virtual service
With the service running, run the SocketClient.exe from the delivered samples directory and you will see the following:
C:\Users\jpo\Luna-workspace\MinimumViableProduct\Samples\Sockets-VS>SocketClient.exe
Host: localhost
Account requested: 00000001
Bytes Sent: 12
Bytes received: 32
Connection closed
Account returned: GET 0000
First name returned: 0001zjvjebywyypgqori
Surname returned: ghfa
Address1 returned:
Address2 returned:
Address3 returned:
C:\Users\jpo\Luna-workspace\MinimumViableProduct\Samples\Sockets-VS>
As can be seen, the default response is simply generated data.
11.2.6 Modifying the virtual service
The basic implementation must be modified to return meaningful data. Consider the following enhancement of the virtual service implementation using the member VirtualServiceImpl.java (ServiceImp.java in newer projects) which is delivered in the samples directory.
Using the ClientSocket.exe it’s possible to specify the number of requests to issues as follows:
C:\Users\jpo\Luna-workspace\MinimumViableProduct\Samples\Sockets-VS>SocketClient.exe localhost 3
Host: localhost
Account requested: 00000001
Bytes Sent: 12
Bytes received: 108
Connection closed
Account returned: 00000001
First name returned: Gail
Surname returned: Avery
Address1 returned: 64 Beechmont
Address2 returned: Suite #100752
Address3 returned: Austell
Account requested: 00000002
Bytes Sent: 12
Bytes received: 108
Connection closed
Account returned: 00000002
First name returned: Leslie
Surname returned: Bass
Address1 returned: 58 Memory
Address2 returned: Apt #10053
Address3 returned: Cumming
Account requested: 00000003
Bytes Sent: 12
Bytes received: 108
Connection closed
Account returned: 00000003
First name returned: Angel
Surname returned: Woodward
Address1 returned: 16 Lithopolis
Address2 returned: Suite #100971
Address3 returned: Louisville
C:\Users\jpo\Luna-workspace\MinimumViableProduct\Samples\Sockets-VS>
The above illustrates the key capability that enables the virtual service implementation to generate extensive amounts of test data for your applications under test.
11.3 Tutorial to create a virtual service using a WSDL
This tutorial will guide you through the steps required to build a Portus virtual service using a WSDL.
11.3.1 Prerequisites
In order to complete this tutorial, you will need:
· Access to a Service WSDL. Example services are provided in the WSDL-VS Samples Directory provided with this installation.
· A web service client. In this example we will use SoapUI.
· Eclipse Luna development environment or preferred IDE complete with the Maven M2Eclipse plugin or equivalent.
11.3.2 Create the virtual service
From the Portus landing page, click on ‘WSDL Virtualization Link’. You will be presented with the following page:
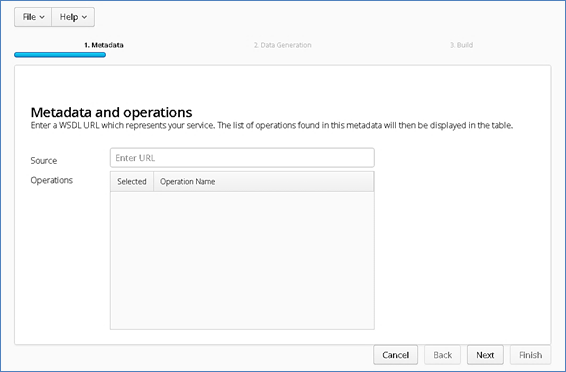
In the ‘Source’ field, enter a valid WSDL URL. In this example we will use the provide Financial Service WSDL.
Once a WSDL has been provided, a list of available operations will be displayed in the Operations Section:
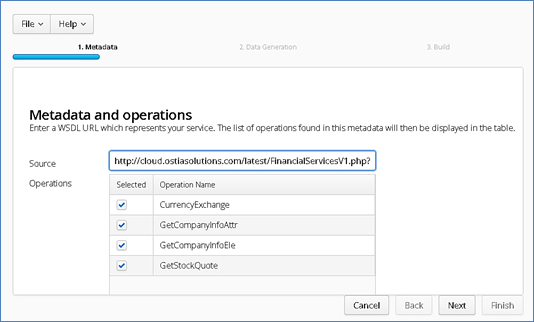
Select the Operations you wish to use for your virtual service and hit the ‘Next’ button. You will be presented with the following Data Generation screen:

From the Data Generation screen, you can customize the data for each of the elements of your operations. On the left you will be provided with a list of operations and elements, and on the right you can select your data generation functions to provide dynamic, randomly generated data, or enter static content. In the image below, we see a number of functions being selected to generate data for the Author element.
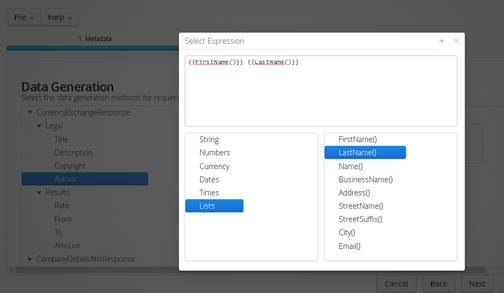
Once you have added data generation functions for your Operations, hit the ‘Next’ button. You will be presented with the Build screen. From here you can set the details for your build such as the Group ID of the Maven project, the target directory to which your project will be written, and the Project Name.
Once you have modified the build details, click the ‘Build’ button to create your project. Once your project has been created you will be notified via the popup on the Build screen:
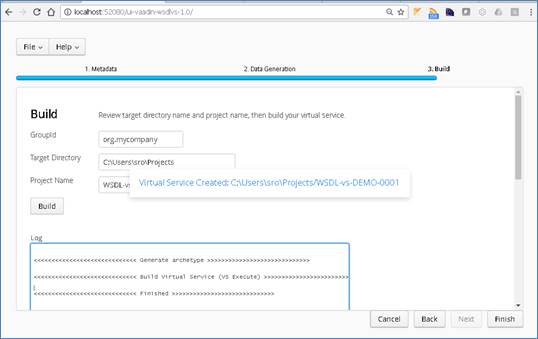
Now that your project has been created, you can import it into Eclipse as an existing Maven project:
In your Eclipse workspace, in the Package Explorer Window, right click to bring up the context menu and select ‘Import’:
From the list of options, expand the Maven folder and select ‘Existing Maven Projects’:
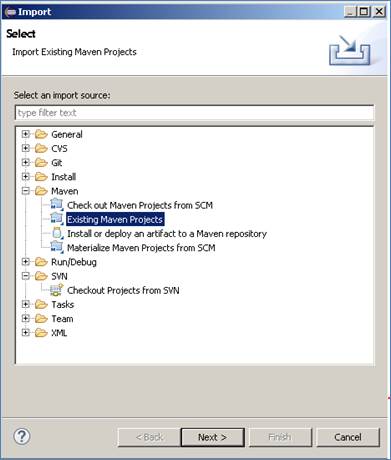
Browse to your Projects location and select the root folder and click ‘Finish’. You should be provided with a screen that looks like the following, which identifies the Project Object Model (POM).
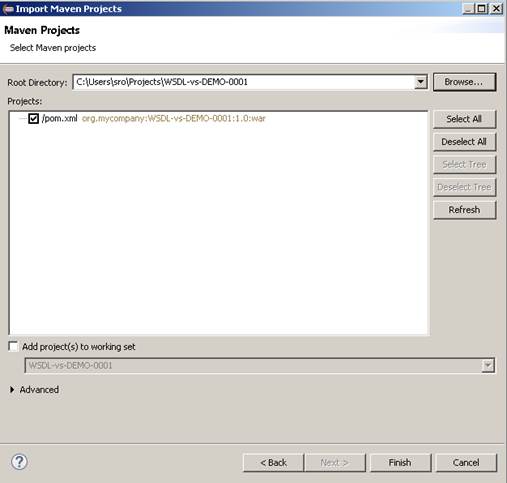
Click ‘Finish’ to import the project into Eclipse.
You should now have a project similar to the following:
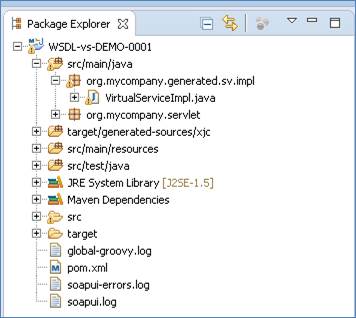
To test your project, right click on the root and select ‘Debug As’ -> ‘Maven build’…

In the following window, enter jetty:run as the goal and select ’Debug’.
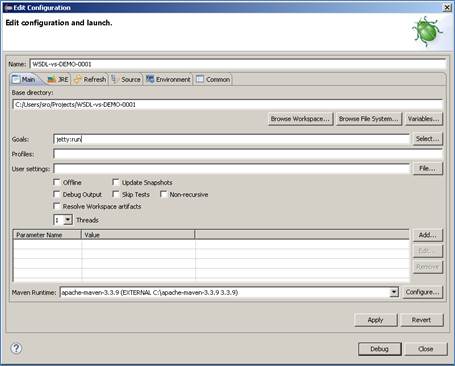
This will run the service in Jetty, allowing you to access the service via a browser or client. The default port for Jetty is 8080, while the service is running you should be able to access your new service using http://localhost:8080. First we enter the address into a browser to view the WSDL:
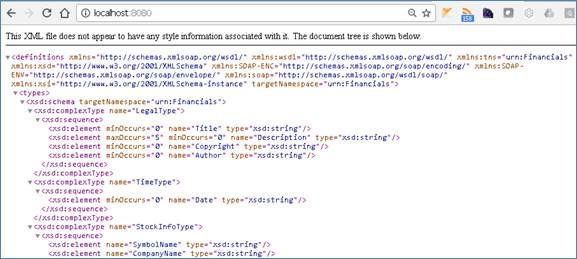
Next, using the virtual service WSDL, we will create a new SOAP project in the SoapUI client and call our service to view the results.
In SoapUI right click on the ‘Projects node’ and select ‘New SOAP Project’:
Give your project a name and enter the URI for your virtual service:
You should end up with a project that looks similar to the following:
If we issue a request against the service, new data will be returned for the elements where dynamic data generation functions have been provided each time the service is called.
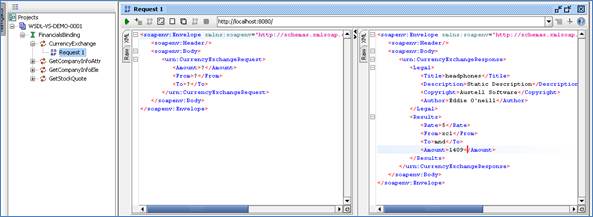
Once the basic service has been tested, we can begin to modify improve the service.
11.3.3 Modifying the virtual service
While we now have a virtual service delivering data, it needs to be modified to better reflect the real world. Within your project structure you will find the VirtualServiceImpl.java (ServiceImp.java in newer projects) which creates the default response. Return to Eclipse and stop the service using the ‘terminate’ button above the console output window:
![]()
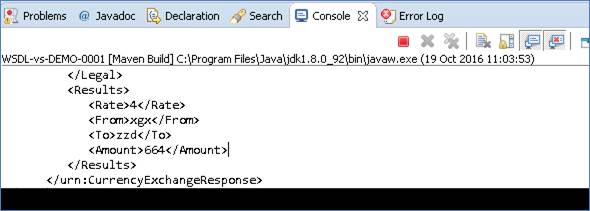
Once the service has been terminated, navigate to and open the VirtualServiceImpl.java (ServiceImp.java in newer projects) file under Package Explorer:
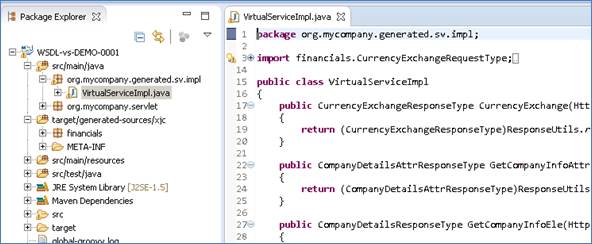
We will use the VirtualServiceImpl.java (ServiceImp.java in newer projects) sample provided in the WSDL-VS samples directory to enhance the virtual services behaviour.
Open the VirtualServiceImpl.java (ServiceImp.java in newer projects) file in the samples directory, copy the contents and replace the contents of the VirtualServiceImpl.java (ServiceImp.java in newer projects) in our project with the sample contents:
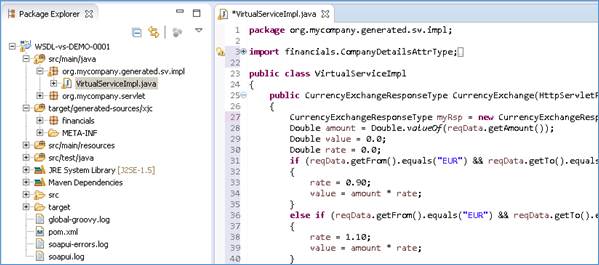
This example implementation will return more realistic results. The currency exchange now has set rates for Euro to British Pounds, or Euro to United States Dollars conversions. If the currency is not set, random generated data will be returned. Other values throughout the service have been replaced with a mix of static and generated content.
Now we can run the service again with the same steps as before (right click> ’Debug As’ -> ’Maven build’ with the jetty:run goal). Return to SoapUI and issue a new request in the same project, this time using the EUR -> GBP values for the request. We see that the expected values are returned based on our implementation changes:
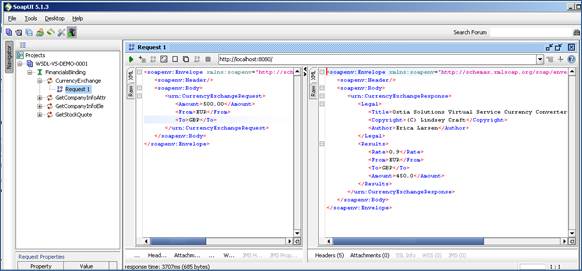
If we issue a request with unknown currency type values, we get randomly generated results where the rate will change for each request:
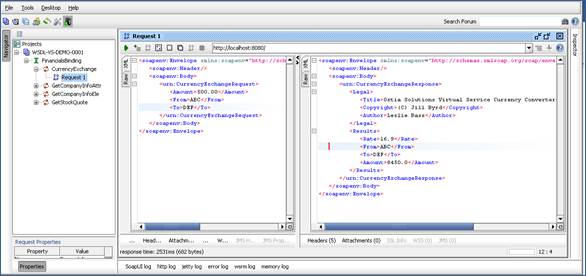
We now have a service which better reflects a real world action which can be improved upon by modifying the VirtualServiceImpl.java (ServiceImp.java in newer projects) to add custom functionality.
11.4 Tutorial to create a REST JSON virtual service
This tutorial will guide you through the steps required to build a Portus EVS virtual REST service using a JSON payload.
11.4.1 Prerequisites
In order to complete this tutorial, you will need:
· The sample files provided in the Portus\Samples\REST-JSON-VS\ directory provided with this installation.
· A browser or client such as SoapUI – in this tutorial we will be using both.
· This tutorial uses Eclipse and so an Eclipse environment will be required to complete the tutorial as is.
· The Maven M2Eclipse plugin for Eclipse will be required to run the generated project from within Eclipse. This step can alternatively be executed via the command line for users who are more familiar with Maven.
11.4.2 Create the virtual service
From the Portus EVS landing page, click on the link to create a REST virtual service and you will be presented with the following screen:
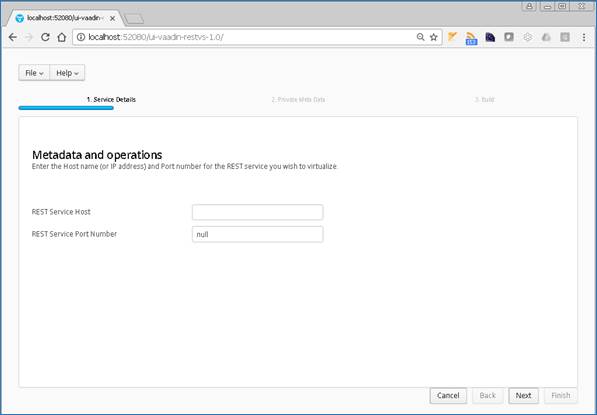
Enter the Hostname or IP address and the Service Port Number. In this example, we will be using the local machine (localhost) and port number 8575. Once the details have been entered, click ‘Next’ to proceed to the metadata page.
Here you can select the format and corresponding metadata for your virtual service. In this example, we will be creating a JSON REST service and using the samples provided in the Portus\Samples\REST-JSON-VS directory.
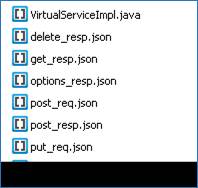
Your screen should now look similar to the following:
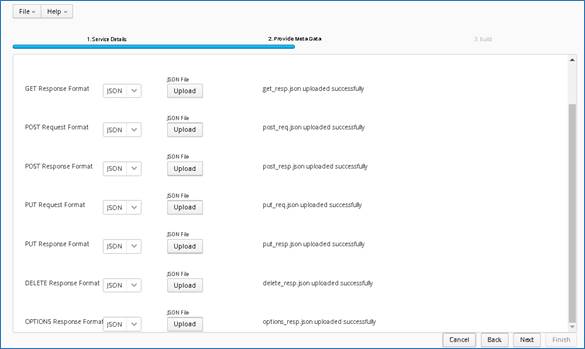
Once you have selected your format and provided the appropriate metadata, you can move on to the build page by hitting ‘Next’. On the build shown below, you can enter the details for your project.
Note: To use the unmodified sample implementations, keep the group id as the default org.mycompany.
Review GroupId (convention is that this is the WWW domain name of the company reversed. We use a company called mycompany so we have used org.mycompany for the tutorial).
Review the target location: the directory to which the project will be written.
Review the project name. This will contain a long unique string of characters by default, you can change this to ensure your project has a more meaningful name. For this tutorial, we include the format type, purpose and build number.
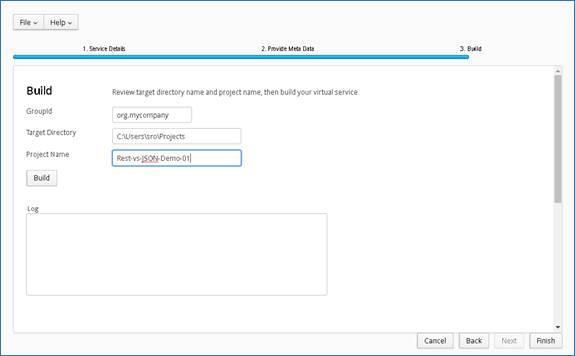
Hit the ‘Build’ button; a log is displayed as the virtual service project is built. Please note that this may take some time depending on the speed of your machine.
Once the project build has been completed, you will be notified via a popup screen:
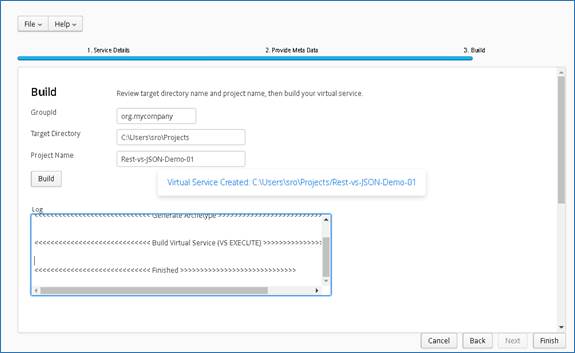
Now that the project has been created, you can import it into your Eclipse environment in order to run and modify the service.
11.4.3 Importing and running the virtual service project
Within your Eclipse environment, click on ‘File’ -> ’Import’…. And you will see the following screen:

Select ‘Existing Maven Project and then hit ‘Next’.
Browse to and select your project root directory. Select ‘Finish’ to import the project:
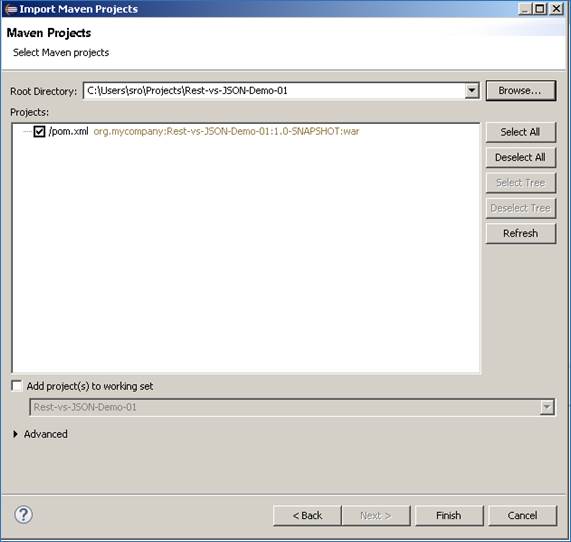
If you encounter the following warning, select ‘Finish’ to import the build:
Once the build has been imported, open the pom.xml file and on the details for the error message. Select the fix provided titled: ‘Permanently mark goal execute in pom.xml as ignored in Eclipse build’. This should resolve the issue.

Eclipse can be very picky so please ignore any other errors or warnings from Eclipse. Once completed, your project should look like the following:
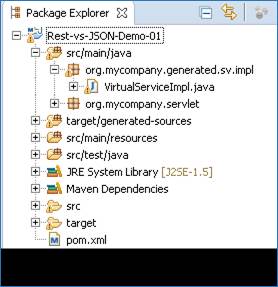
11.4.4 Running your project
Within Eclipse, right click on your project root folder and select ‘Debug As’ -> ‘Maven build’… from the context menu. This opens the ‘Edit Configuration’ screen.
Add jetty:run as the goal and select debug to run the project:
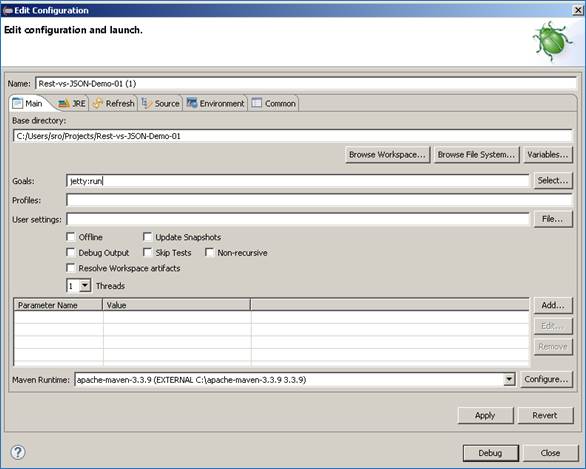
The startup output will be shown in the console window in Eclipse, once the following lines appear, the base project is running and ready to be used.
[INFO] Started Jetty Server
[INFO] Starting scanner at interval of 10 seconds.
11.4.5 Invoking the service
We are running the service in Jetty which runs on port 8080 by default, to quickly test the service is active, we will open a browser and enter http://localhost:8080. We see a set of empty JSON brackets. This is the expected response as we have not expanded our service or made any queries yet.
Now that we know the service is working, we can improve the service with our sample data.
11.4.6 Modifying the virtual service
While we now have a virtual service delivering data, it needs to be modified to better reflect the real world. Within your project structure you will find the VirtualServiceImpl.java (ServiceImp.java in newer projects) which creates the default response. Return to Eclipse and stop the service using the ‘terminate’ button above the console output window:
![]()
Once the service has been terminated, navigate to and open the VirtualServiceImpl.java (ServiceImp.java in newer projects) file under Package Explorer:
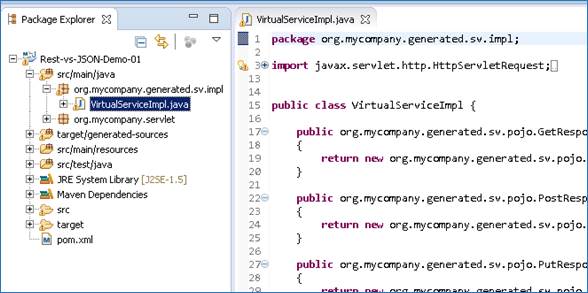
We will use the VirtualServiceImpl.java (ServiceImp.java in newer projects) sample provided in the REST-JSON-VS samples directory to enhance the virtual services behaviour.
Open the VirtualServiceImpl.java (ServiceImp.java in newer projects) file in the samples directory, copy the contents and replace the contents of the VirtualServiceImpl.java (ServiceImp.java in newer projects) in our project with the sample contents:
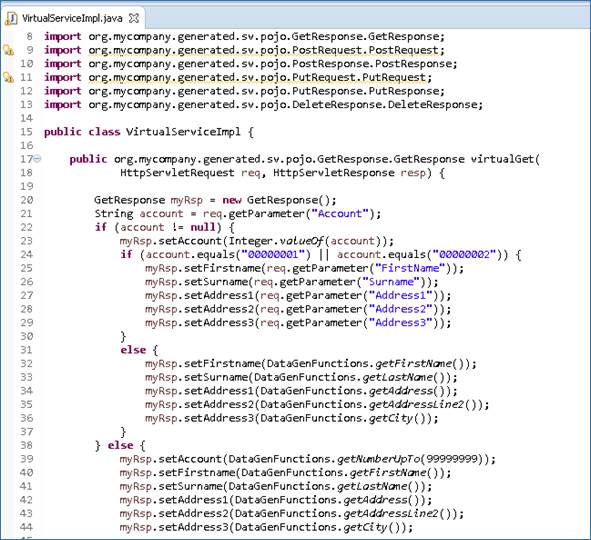
This example service will accept input parameters when requesting account 00000001 or 00000002, and will return generated data for requests with unknown account numbers or null queries.
11.4.7 Running the improved service
Now we can run the service again with the same steps as before (right click> ‘Debug As’ -> ‘Maven build’ with the jetty:run goal). Once the service is running we can return to our browser http://localhost:8080 and should see the expected generated response:

We can begin to issue queries directly from the browser or use a client. We will start by issuing GET request for account 00000001 with provided parameters.
We can see that the parameters we provided have been returned in the response as we issued this request against account 00000001. If we change the account number to an unknown such 00000007, the data returned is generated and the input parameters are ignored.
Account 00000001 returns provided values:
![]()
Account 00000007 returns generated values:
![]()
11.4.8 Using the service with a Client
Now we will open our service in a client and look at some other operations.
In the SoapUI client, right click on the Projects node and select ‘New REST Project’
In the URI field for the ‘New REST Project’ window, enter your service URI and hit ‘OK’ to load the project:
You should see a screen similar to the following:
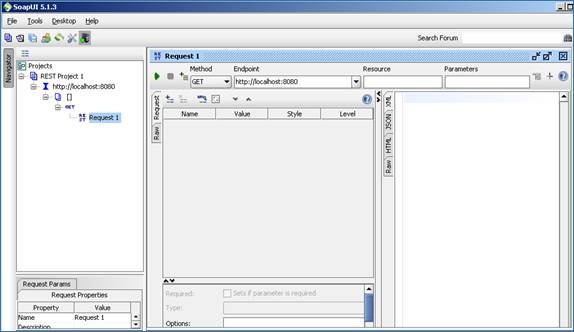
The dropdown under ‘Method’ allows us to select our operation type, we will select a ‘POST’ operation and provide JSON data in a format available in our post_req.json file from the samples directory.
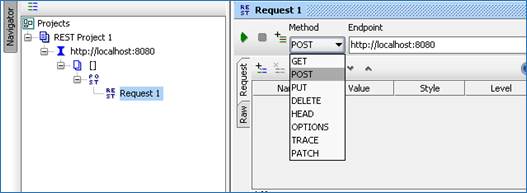
Select the ‘Post’ operation, and in window shown below, paste the contents of the post_req.json file from the samples directory:
![]()
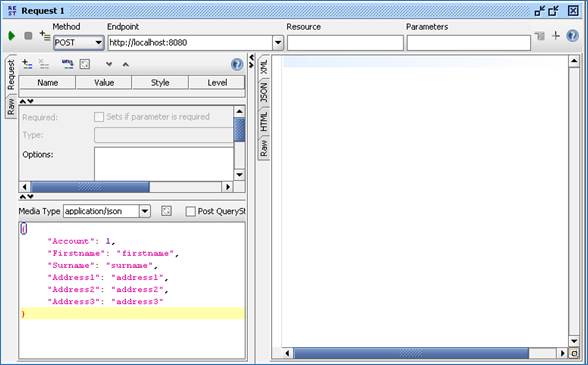
Similar to the GET operation, our implementation will return the FirstName data provided by the user if account is equal to 1 or 2, otherwise the service will return generated FirstName data. This is to simulate the success/failure response for a new or updated record.
Below is an example of a submitted POST and the response data, in this example we issue the post using account 1 and so our specified data is returned:
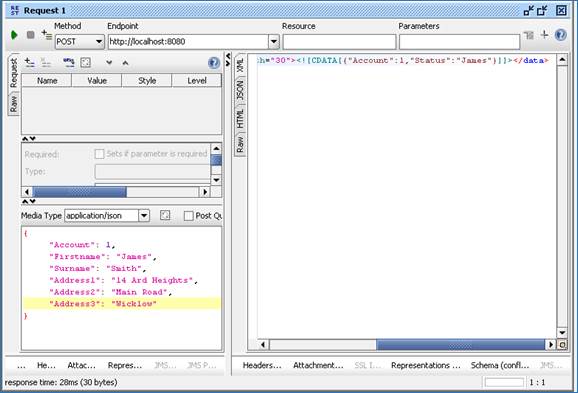
Below we have selected the delete operation and added a parameter for account 005 in the parameters field.
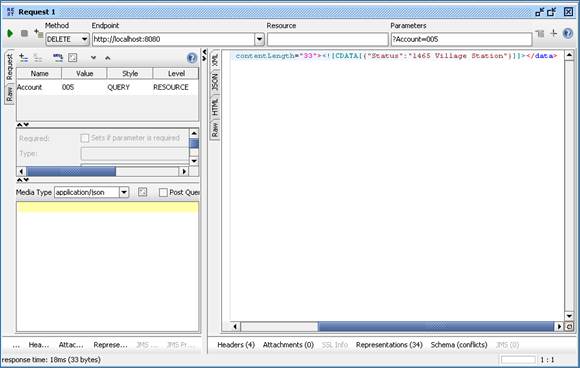
We now have a service which better reflects a real world action which can be improved upon by modifying the VirtualServiceImpl.java (ServiceImp.java in newer projects) to add custom functionality.
11.5 Tutorial to create a JMS JSON virtual service
This tutorial will guide you through the steps required to build a Portus EVS virtual JMS service using a JSON payload.
11.5.1 Prerequisites
In order to complete this tutorial, you will need:
· The sample files provided in the Portus\Samples\JMS-JSON-VS\ directory provided with this installation.
Important note: You will need to use existing queues and configuration as per your environment. Check the queue manager for details or create new queues to use and specify during project creation.
· Access to a local or remote messaging server with JMS support – in this tutorial we will be using a remote Apache ActiveMQ server with queues defined as follows:
o JMS-JSON-VS.proxy.input.
o JMS-JSON-VS.proxy.output.
o JMS-JSON-VS.service.input.
o JMS-JSON-VS.service.output.
We will not be using service queues in this tutorial, they may be used in later tutorials.
· This tutorial uses Eclipse and so an Eclipse environment will be required to complete the tutorial as is.
· The Maven M2Eclipse plugin for Eclipse will be required to run the generated project from within Eclipse. This step can alternatively be executed via the command line for users who are more familiar with Maven.
11.5.2 Create the virtual service
From the Portus EVS landing page, click on the link to create a JMS virtual service and you will be presented with the following screen:
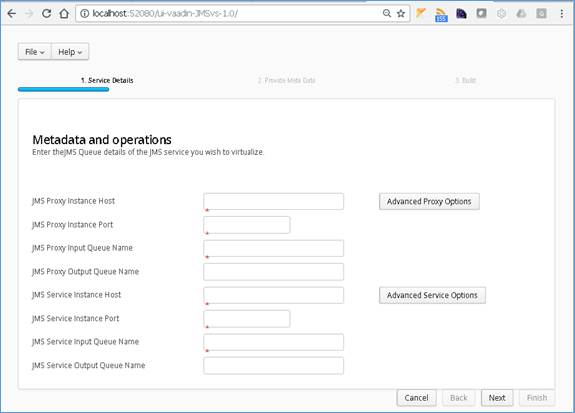
Fill in the required fields and add credentials if required.
Important:
Add any required credentials in the ‘Advanced Proxy’ and ‘Advanced Service’ options which can be accessed by selecting the buttons to the right of the input fields. The default credentials for ActiveMQ are admin/admin, but this will be dependent on your environment configuration.
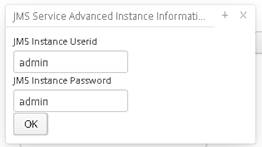
Once you have filled in your details you will have a screen similar to the following with your own details in place of the ones shown here:
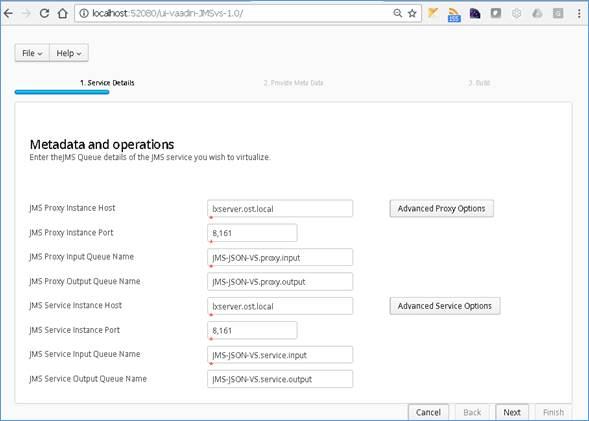
Once your details are filled in, you can move to the next screen by pressing the ‘Next’ button.
On the next screen you can provide your format type and metadata. In this example we will be using JSON as the format and using the request.json & resonse.json sample files provided in the JMS-JSON-VS samples directory.
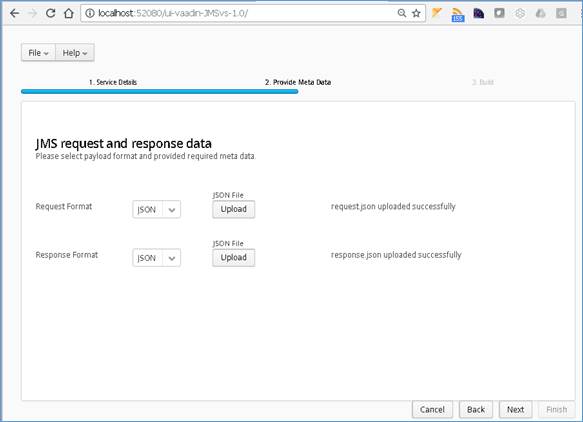
Once you have chosen your format and added your metadata files, click ‘Next’ to move on to the Build page.
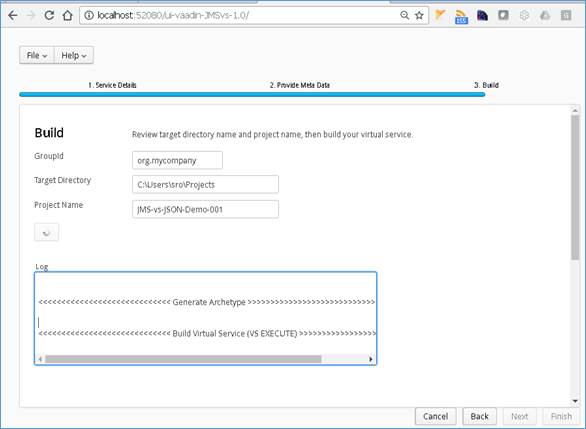
Hit the ‘Build’ button; a log is displayed as the virtual service project is built. Please note that this may take some time depending on the speed of your machine.
Once the project build has been completed, you will be notified via a popup screen.
Now that the project has been created, you can import it into your Eclipse environment in order to run and modify the service.
11.5.3 Importing and running the virtual service project
Within your Eclipse environment, click on ‘File’ -> ’Import’…. And you will see the following screen:
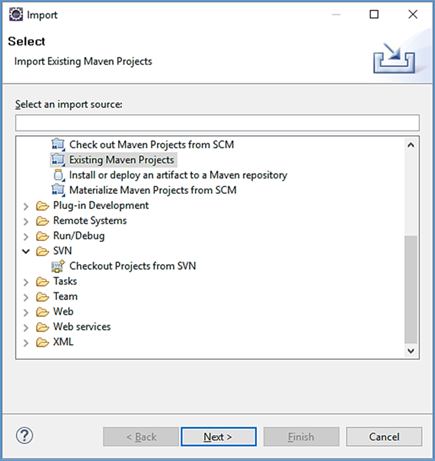
Select ‘Existing Maven Project’ and then hit ‘Next’.
Browse to and select your project root directory. Select ‘Finish’ to import the project.
If you encounter the following warning, select ‘Finish’ to import the build:
Once the build has been imported, open the pom.xml file and on the details for the error message. Select the fix provided titled: ‘Permanently mark goal execute in pom.xml as ignored in Eclipse build’. This should resolve the issue.

Eclipse can be very picky so please ignore any other errors or warnings from Eclipse.
The imported project should look similar to the following:
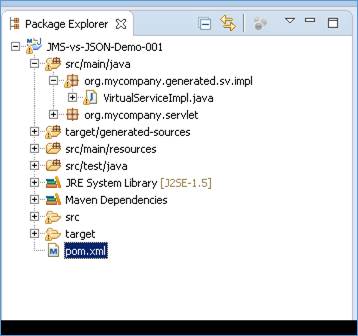
11.5.4 Running your project
Within Eclipse, right click on your project root folder and select ‘Debug As’ -> ‘Maven build’… from the context menu. This opens the Edit Configuration screen.
Add jetty:run as the goal and select debug to run the project:
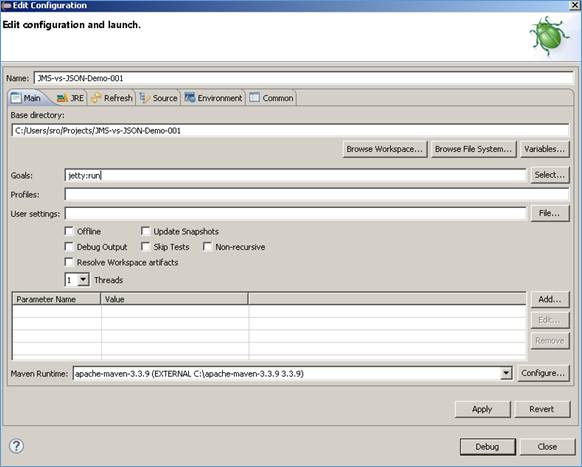
The startup output will be shown in the console window in Eclipse, once the following lines appear, the base project is running and ready to be used.
[INFO] Started Jetty Server
[INFO] Starting scanner at interval of 10 seconds.
11.5.5 Invoking the service
We can now send a message in our message manager to test that the service is running.
![]() On our messaging server ,we locate the
JMS-JSON-VS.proxy.input and click the send to button in order to create a new
message:
On our messaging server ,we locate the
JMS-JSON-VS.proxy.input and click the send to button in order to create a new
message:

In the message body we will add the contents of the request.json file provided in our samples directory and send the message:
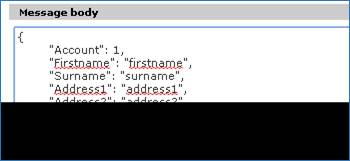
Once the message has been sent, it should arrive on the proxy output queue and be accessible to view.
We can see from the message count that 1 message is now sitting on the proxy output queue:

Select ‘Browse’ to access available messages:
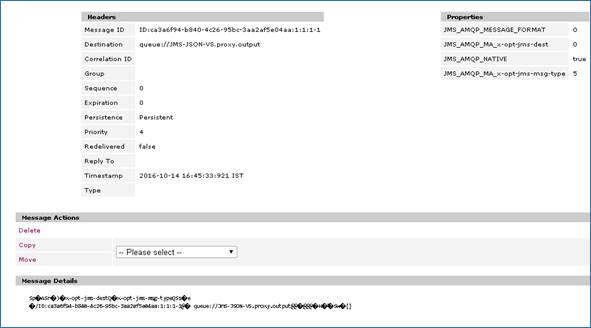
We can see there is one message available. The message details show some header information followed by some empty JSON brackets. This is the expected response until we have modified and improved our service.
11.5.6 Modifying the virtual service
While we now have a virtual service delivering data, it needs to be modified to better reflect the real world. Within your project structure you will find the VirtualServiceImpl.java (ServiceImp.java in newer projects) which creates the default response. Return to Eclipse and stop the service using the ‘terminate’ button above the console output window:
![]()

Once the service has been terminated, navigate to and open the VirtualServiceImpl.java (ServiceImp.java in newer projects) file under Package Explorer:
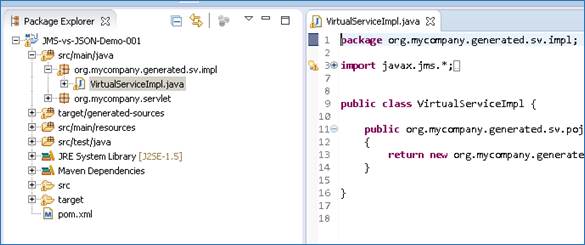
We will use the VirtualServiceImpl.java (ServiceImp.java in newer projects) sample provided in the JMS-JSON-VS samples directory to enhance the virtual services behaviour.
Open the VirtualServiceImpl.java (ServiceImp.java in newer projects) file in the samples directory, copy the contents and replace the contents of the VirtualServiceImpl.java (ServiceImp.java in newer projects) in our project with the sample contents:
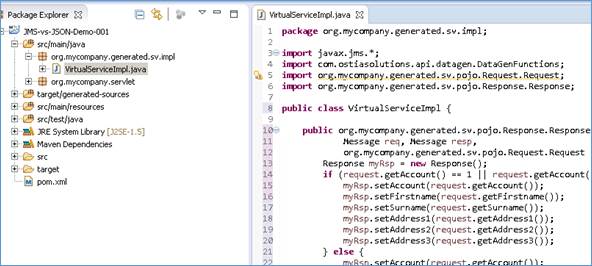
This example service will accept input parameters when requesting account 00000001 or 00000002, and will return generated data for requests with unknown account numbers or null queries.
Now we can run the service again with the same steps as before (right click> ‘Debug As’ -> ‘Maven build’ with the jetty:run goal). Once the service is running we can submit a new message and should see the expected response:
For a request with the account number of 1 we see that the values returned in the response are the same values we provided:
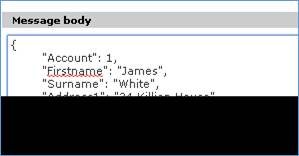

For a request with an unknown account number of 3, we see the values returned have been generated by EVS:
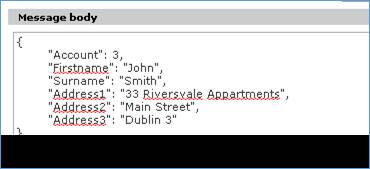
![]()
We now have a service which better reflects a real world action which can be improved upon by modifying the VirtualServiceImpl.java (ServiceImp.java in newer projects) to add custom functionality.
11.6 Tutorial to create a JMS Raw virtual service
This tutorial will guide you through the steps required to build a Portus EVS virtual JMS service using a Raw payload.
11.6.1 Prerequisites
In order to complete this tutorial, you will need:
· The sample files provided in the Portus\Samples\JMS-RAW-VS\ directory provided with this installation.
Important note: You will need to use existing queues and configuration as per your environment. Check the queue manager for details or create new queues to use and specify during project creation.
· Access to a local or remote messaging server with JMS support – in this tutorial we will be using a remote Apache ActiveMQ server with queues defined as follows:
o JMS-RAW-VS.proxy.input.
o JMS-RAW-VS.proxy.output.
o JMS-RAW-VS.service.input.
o JMS-RAW-VS.service.outpu.t
We will not be using service queues in this tutorial, they may be used in later tutorials.
· This tutorial uses Eclipse and so an Eclipse environment will be required to complete the tutorial.
· The Maven M2Eclipse plugin for Eclipse will be required to run the generated project from within Eclipse. This step can alternatively be executed via the command line for users who are more familiar with Maven.
11.6.2 Create the virtual service
From the Portus EVS landing page, click on the link to create a JMS virtual service and you will be presented with the following screen:

Fill in the required fields and add credentials if required.
Important:
Add any required credentials in the ‘Advanced Proxy’ and Advanced Service’ options which can be accessed by selecting the buttons to the right of the input fields. The default credentials for ActiveMQ are admin/admin.
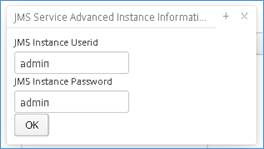
Once you have filled in your details you will have a screen similar to the following with your own details in place of the ones shown here:
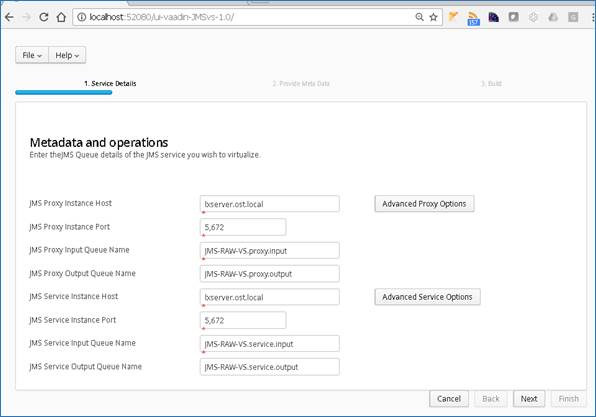
Once your details are filled in, you can move to the next screen by pressing the ‘Next’ button.
On the next screen you can provide your format type. In this example we will be using the RAW format type, for this type we will not need to upload metadata, instead we will use the samples provided to add a message directly in the ActiveMQ web console.
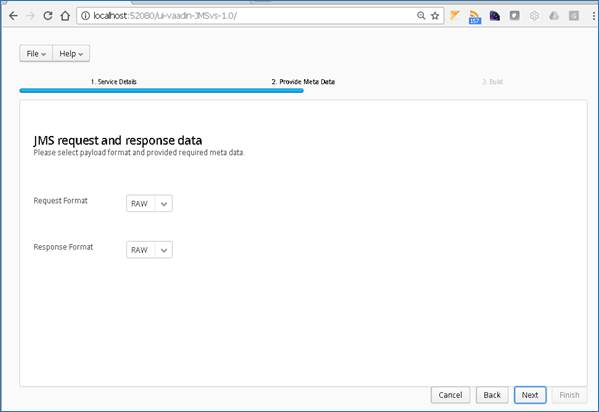
Set your Format type for request and response to ‘RAW’ and hit the ‘Next’ button to proceed.
On the Build page, review the project details:
Review GroupId (convention is that this is the WWW domain name of the company reversed. We use a company called mycompany so we have used org.mycompany for the tutorial).
Note:
If you are following the tutorial exactly, you will need to leave the GroupId
as the default provided or modify your VirtualServiceImpl.java (ServiceImp.java
in newer projects) references to the group id to match your changes.
Review the target location: the directory to which the project will be written.
Review the project name: This will contain a long unique string of characters by default, you can change this to ensure your project has a more meaningful name. For this tutorial we include the format type, purpose and build number.
Hit the ‘Build’ button; a log is displayed as the virtual service project is built. Please note that this may take some time depending on the speed of your machine.
Once the project build has been completed, you will be notified via a popup screen.
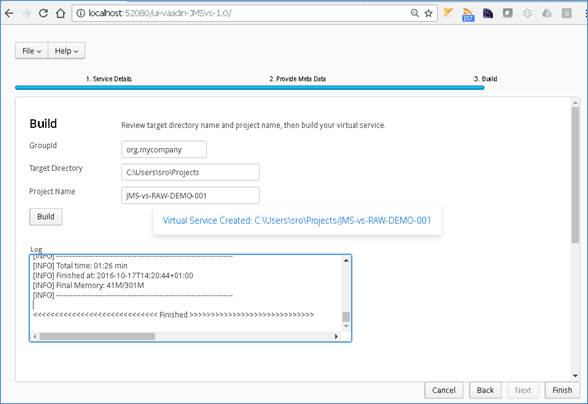
Now that the project has been created, you can import it into your Eclipse environment in order to run and modify the service.
11.6.3 Importing and running the virtual service project
Within your Eclipse environment, click on ‘File’ -> ’Import’…. And you will see the following screen:

Select ‘Existing Maven Project and then hit ‘Next’.
Browse to and select your project root directory. Select ‘Finish’ to import the project.
If you encounter the following warning, select ‘Finish’ to import the build:
Once the build has been imported, open the pom.xml file and on the details for the error message. Select the fix provided titled: ‘Permanently mark goal execute in pom.xml as ignored in Eclipse build’. This should resolve the issue.

Eclipse can be very picky so please ignore any other errors or warnings from Eclipse. Once completed, your project should look like the following:
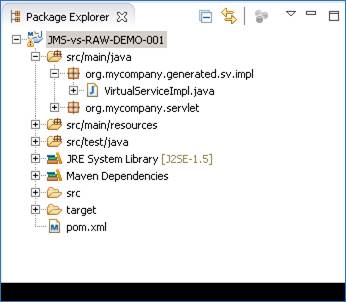
11.6.4 Running your project
Within Eclipse, right click on your project root folder and select ‘Debug As’ -> ‘Maven build’… from the context menu. This opens the Edit Configuration screen.
Add jetty:run as the goal and select debug to run the project:
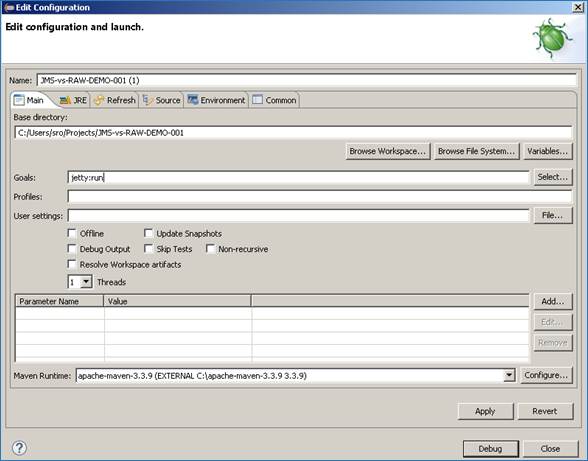
The startup output will be shown in the console window in Eclipse, once the following lines appear, the base project is running and ready to be used.
[INFO] Started Jetty Server
[INFO] Starting scanner at interval of 10 seconds.
11.6.5 Invoking the service
The default implementation of the generated service will simply return some static text and a randomly generated word. This will let us quickly test that the service is up and running.

With the service running, we can open our ActiveMQ console and test the service by sending a message. On our proxy input queue, we will send a message which will be picked up by the service and arrive on the proxy output queue.
Click the ‘Send To’ button for your proxy input queue.
![]()

In the message body add a simple message.
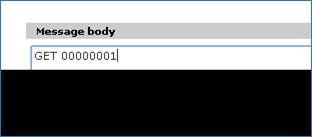
Returning to our queue list and refreshing the page, we can see there is one message now sitting on the proxy output queue:

As expected, this message is returned the static text “Response from POST:” and a generated word:

11.6.6 Modifying the virtual service
![]() While we now have a virtual service delivering
data, it needs to be modified to better reflect the real world. Within your
project structure you will find the VirtualServiceImpl.java (ServiceImp.java in
newer projects) which creates the default response. Return to Eclipse and stop
the service using the ‘terminate’ button above the console output window:
While we now have a virtual service delivering
data, it needs to be modified to better reflect the real world. Within your
project structure you will find the VirtualServiceImpl.java (ServiceImp.java in
newer projects) which creates the default response. Return to Eclipse and stop
the service using the ‘terminate’ button above the console output window:
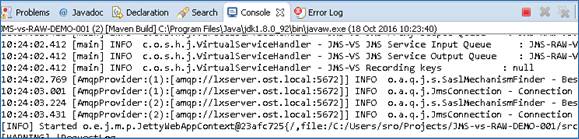
Once the service has been terminated, navigate to and open the VirtualServiceImpl.java (ServiceImp.java in newer projects) file under Package Explorer:

We will use the VirtualServiceImpl.java (ServiceImp.java in newer projects) sample provided in the JMS-RAW-VS samples directory to enhance the virtual services behaviour.
Open the VirtualServiceImpl.java (ServiceImp.java in newer projects) file in the samples directory, copy the contents and replace the contents of the VirtualServiceImpl.java (ServiceImp.java in newer projects) in our project with the sample contents:
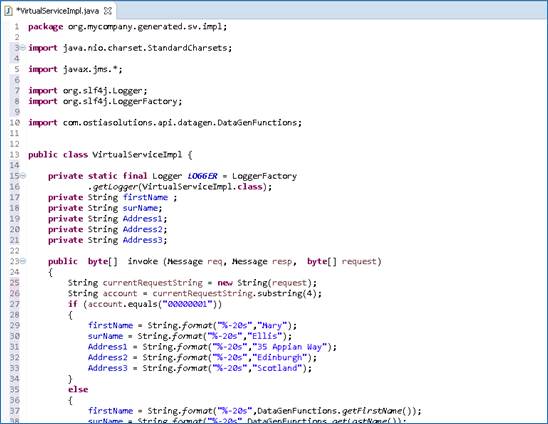
This example implementation will return the set values specified in the code for account 00000001 or return generated values for unknown account numbers.
Now we can run the service again with the same steps as before (right click > ‘Debug As’ -> ‘Maven build’ with the jetty:run goal). Once the service is running we can submit a new message and should see the expected response:
Message requesting account 00000001
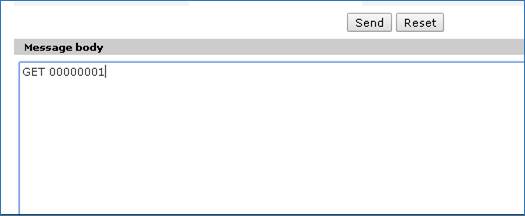
Returns values specified:
![]()
Message requesting account unknown account 00000006:
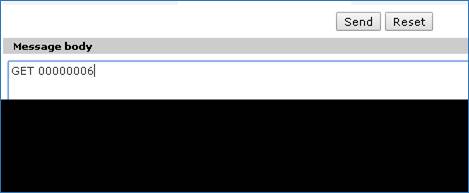
Returns generated values:
![]()
We now have a service which better reflects a real world action which can be improved upon my modifying the VirtualServiceImpl.java (ServiceImp.java in newer projects) to add custom functionality.
11.7 Tutorial to create a MQ JSON virtual service
This tutorial will guide you through the steps required to build a Portus virtual service using an JSON payload.
11.7.1 Prerequisites
In order to complete this tutorial, you will need:
· The sample JSON request and response JSON files, the request1.data and requestx.data files and the VirtualServiceImpl.java (ServiceImp.java in newer projects) provided in the ./Portus/Samples/MQ-JSON-VS/ directory in the product installation.
Important note: You will need to use existing queues and configuration as per your environment. Check the queue manager for details or create new queues to use and specify during project creation.
· Access to a MQ Queue Manager with queues defined as follows:
o For the purpose of the tutorial, we will be using a remote queue manager called ‘MQ.PORTUS
o For the purpose of the tutorial, we will be using the following names:
§ Proxy Input Queue: LXSERVER.SRO.PROXY.INPUT.
§ Proxy Output Queue: LXSERVER.SRO.PROXY.OUTPUT.
§ Service Input Queue: LXSERVER.SRO.INPUT.
§ Service Output Queue: LXSERVER.SRO.OUTPUT.
Notes:
In this tutorial, a remote manager is used, however, a local queue manager may also be used once the appropriate configuration settings are provided.
The two service queue names are not used in this tutorial but are included here for completeness.
· Access to a utility that will enable you to place data on and take data off a queue. We will use the RFHUtil utility available for free from IBM here.
· This tutorial uses Eclipse and so an Eclipse environment will be required to complete the tutorial as is.
· The Maven M2Eclipse plugin for Eclipse will be required to run the generated project from within Eclipse. This step can alternatively be executed via the command line for users who are more familiar with Maven.
11.7.2 Create the virtual service
From the Portus EVS landing page, click on the link to create a MQ virtual service and you will be presented with the following screen:

Fill in the proxy and service MQ details as required.
Important:
If using a remote queue, or modified Port/ Server Connection details, please add any required credentials in the ‘Advanced Proxy’ and ‘Advanced Service’ options which can be accessed by selecting the buttons to the right of the input fields – these settings will be dependent on your environment configuration.
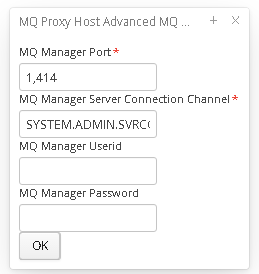
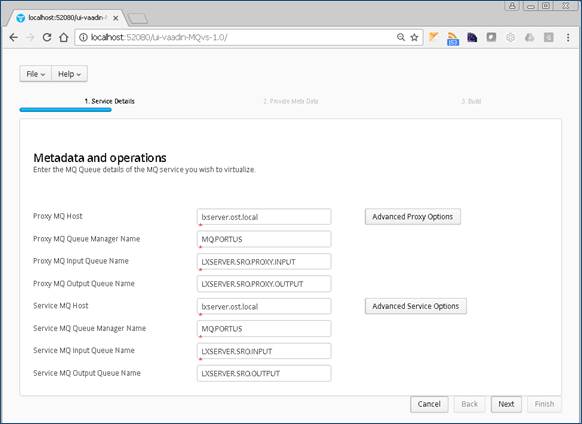
Once your Queue details have been filled in, hit the next button to move on to the metadata selection page, here you can choose your Payload format and required metadata. For this tutorial we will be selecting JSON and providing the request.json and response.json files provided in the samples directory.
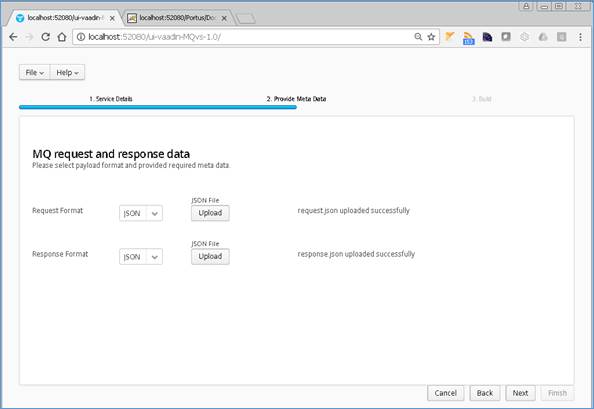
Once you have selected your format and provided the appropriate metadata, you can move on to the build page by hitting ‘Next’. On the build page shown below, you can enter the details for your project.
Review GroupId (Convention is that this is the WWW domain name of the company reversed. We use a company called mycompany so we have used org.mycompany for the tutorial).
Note:
If you are following the tutorial exactly, you will need to leave the GroupId
as the default provided or modify your VirtualServiceImpl.java (ServiceImp.java
in newer projects) references to the group id to match your changes.
Review the target location: the directory to which the project will be written.
Review the project name. This will contain a long unique string of characters by default, you can change this to ensure your project has a more meaningful name. For this tutorial, we include the format type, purpose and build number.
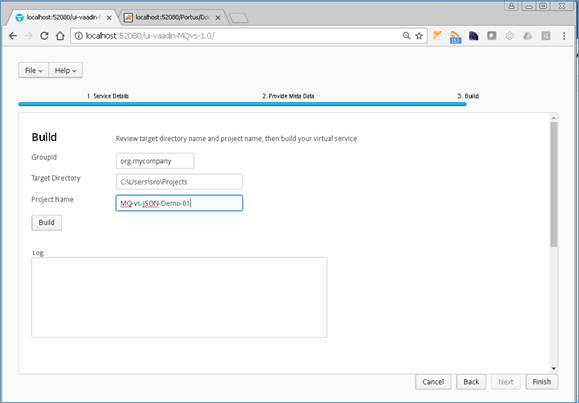
Hit the ‘Build’ button; a log is displayed as the virtual service project is built. Please note that this may take some time depending on the speed of your machine.
Once the project build has been completed, you will be notified via a popup screen:
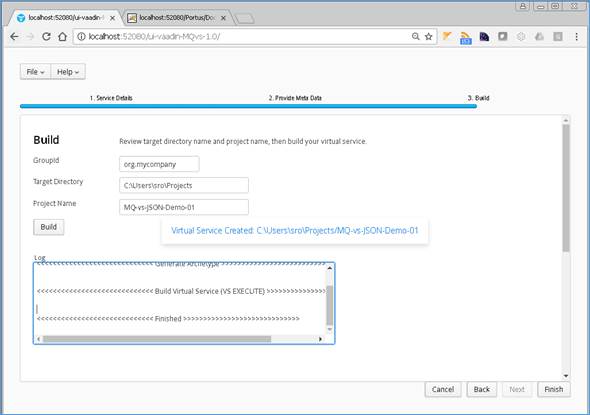
Now that the project has been created, you can import it into your Eclipse environment in order to run and modify the service.
11.7.3 Importing and running the virtual service project
Within your Eclipse environment, click on ‘File’ -> ‘Import’…. And you will see the following screen.

Select ‘Existing Maven Project and then hit ‘Next’.
Browse to and select your project root directory. Select ‘Finish’ to import the project:
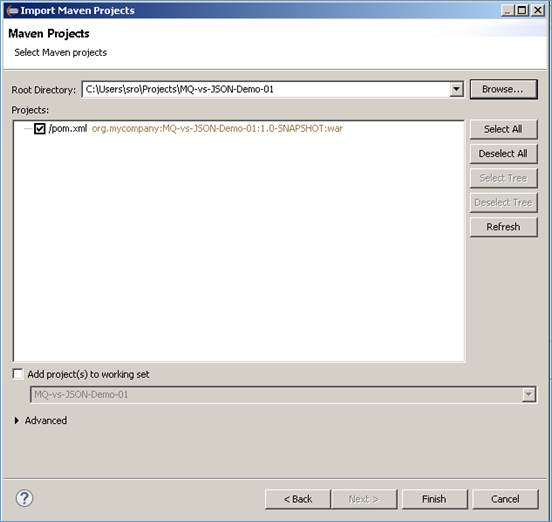
If you encounter the following warning, select ‘Finish’ to import the build:
Once the build has been imported, open the pom.xml file and on the details for the error message. Select the fix provided titled: ‘Permanently mark goal execute in pom.xml as ignored in Eclipse build’. This should resolve the issue.

Eclipse can be very picky so please ignore any other errors or warnings from Eclipse. Once completed, your project should look like the following:
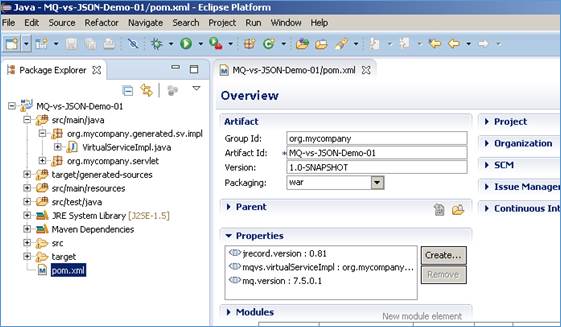
11.7.4 Running your project
Within Eclipse, right click on your project root folder and select ‘Debug As’ -> ‘Maven build’… from the context menu. This opens the Edit Configuration screen.
Add jetty:run as the goal and select Debug to run the project:
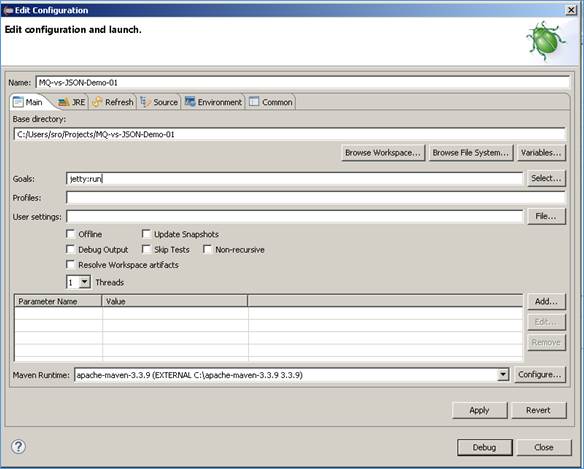
The startup output will be shown in the console window in Eclipse, once the following lines appear, the base project is running and ready to be used.
[INFO] Started Jetty Server
[INFO] Starting scanner at interval of 10 seconds.
11.7.5 Invoking the service
Start the RFHUtil application and you will be presented with a screen as follows:
Fill in the following:
· The queue manager name.
· The proxy input queue defined to your virtual service. In our case we use LXSERVER.SRO.PROXY.INPUT.
· Open the request1.json file in RFHUtil from the delivered samples.
The RFHUtil screen should look something like this:
The request data can be seen by clicking the ‘Data’ tabs as follows:
Ensure you have selected the proxy input queue and then hit the ‘Write Q’ button on the Main screen. You should see a message sent notification in the output window:
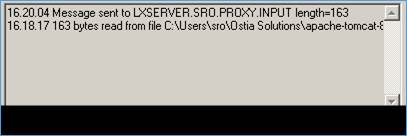
Now change the queue name to your proxy output queue. Then hit the ‘Read Q’ button and you will see the following:
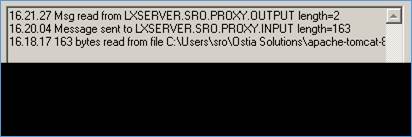
Now hit the ‘Data’ tab and you will see the data returned:
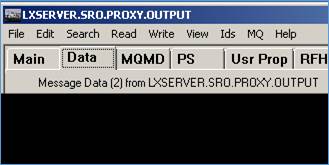
This is the default response from the virtual service which is expected until the service is enhanced.
11.7.6 Modifying the virtual service
While we now have a virtual service delivering data, it needs to be modified to better reflect the real world. Within your project structure you will find the VirtualServiceImpl.java (ServiceImp.java in newer projects) which creates the default response. Return to Eclipse and stop the service using the terminate button above the console output window:
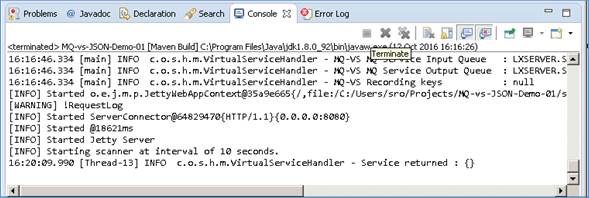
Once the service has been terminated, navigate to and open the VirtualServiceImpl.java (ServiceImp.java in newer projects) file under Package Explorer:
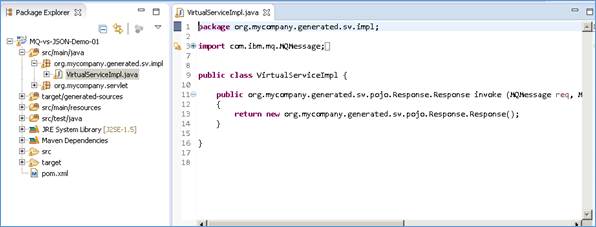
We will use the VirtualServiceImpl.java (ServiceImp.java in newer projects) sample provided in the MQ-XML-VS samples directory to enhance the virtual services behaviour.
Open the VirtualServiceImpl.java (ServiceImp.java in newer projects) file in the samples directory, copy the contents and replace the contents of the VirtualServiceImpl.java (ServiceImp.java in newer projects) in our project with the sample contents:
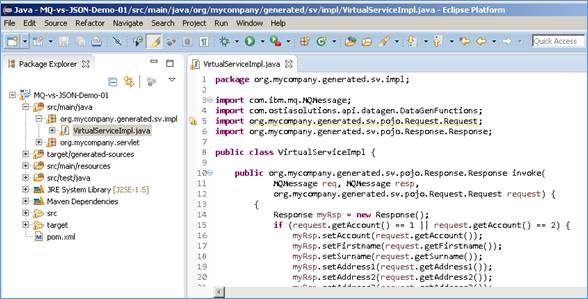
The expanded project returns the set data from response.json if the requested account number is equal to 1 or 2, otherwise if the account requested is not specified in the request, generated data will be returned instead.
For this tutorial we have two request files. request1.data asks for account 1 which is specified in our implementation, and requestx.data asks for account 4 which is not specified in the implementation.
Now we can run the modified service with the same steps as before (right click> ’Debug As’ -> ‘Maven build’ with the jetty:run goal) and when we repeat the steps to write to the proxy input queue and read from the output queue using the request1.data, we should see the set data from response1:
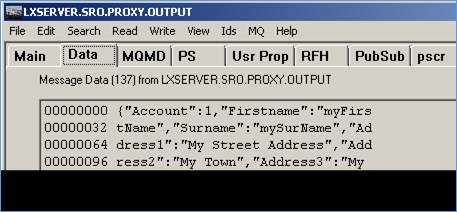
Likewise, when we repeat the steps to write to the proxy input queue and read from the output queue using requestx.data, we should see the generated data response:
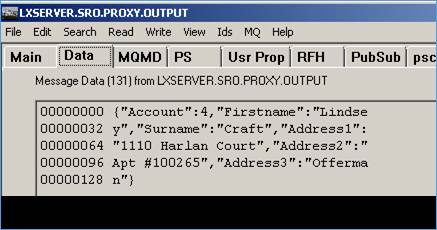
We now have a service which better reflects a real world action which can be improved upon by modifying the VirtualServiceImpl.java (ServiceImp.java in newer projects) to add custom functionality.
11.8 Tutorial to create a MQ Raw virtual service
This tutorial will guide you through the steps required to build a Portus EVS virtual MQ service using a Raw payload.
11.8.1 Prerequisites
In order to complete this tutorial, you will need:
· The sample files provided in the Portus\Samples\MQ-RAW-VS\ directory provided with this installation.
Important note: You will need to use existing queues and configuration as per your environment. Check the queue manager for details or create new queues to use and specify during project creation
· Access to a local or remote MQ messaging server – in this tutorial we will be using IBM MQ with queues defined as follows:
o MQ_RAW_VS.proxy.input
o MQ_RAW_VS.proxy.output.
o MQ_RAW_VS.service.input.
o MQ_RAW_VS.service.output.
We will not be using service queues in this tutorial, they may be used in later tutorials.
· This tutorial uses Eclipse and so an Eclipse environment will be required to complete the tutorial.
· The Maven M2Eclipse plugin for Eclipse will be required to run the generated project from within Eclipse. This step can alternatively be executed via the command line for users who are more familiar with Maven.
11.8.2 Create the virtual service
From the Portus EVS
landing page, click on the link to create a MQ virtual service and you will be
presented with the following screen: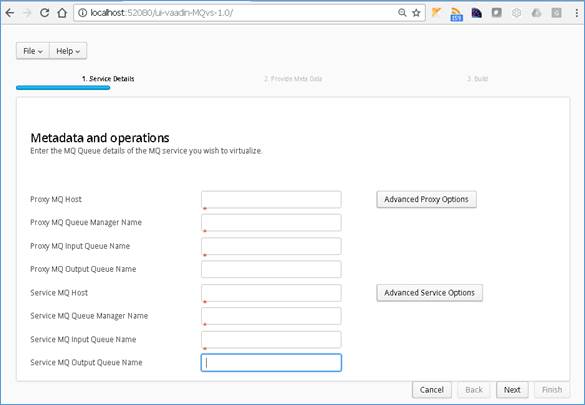
Fill in the required fields and add credentials if required.
Fill in the proxy and service MQ details as required.
Important note: If using a remote queue, or modified Port/ Server Connection details, please add any required credentials in the ‘Advanced Proxy’ and ‘Advanced Service’ options which can be accessed by selecting the buttons to the right of the input fields. These settings will be dependent on your environment.
Once you have filled in your details you will have a screen similar to the following with your own details in place of the ones shown here:
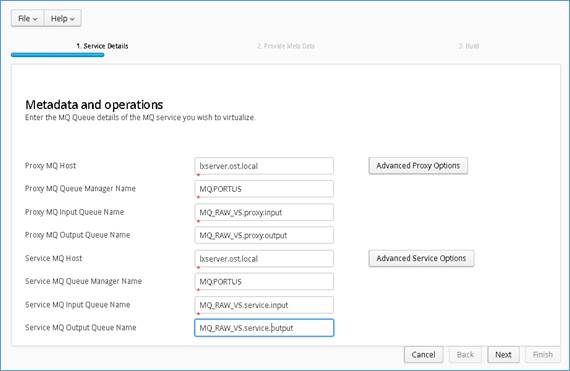
Once your Queue details have been filled in, move on to the metadata selection page, here you can choose your Payload format and required metadata. In this example, we will be using the Raw format type so we will not require the metadata.
Set your format type for request and response to ‘RAW’ and hit the ‘Next’ button to proceed.
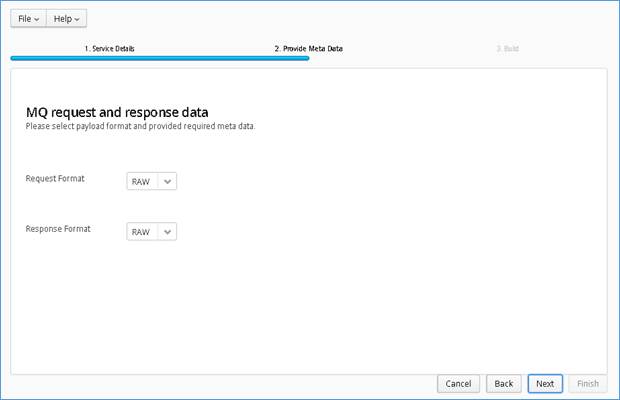
On the Build page, review the project details:
Review GroupId (convention is that this is the WWW domain name of the company reversed. We use a company called mycompany so we have used org.mycompany for the tutorial).
Note:
If you are following the tutorial exactly, you will need to leave the GroupId as
the default provided or modify your VirtualServiceImpl.java (ServiceImp.java in
newer projects) references to the group id to match your changes.
Review the target location: the directory to which the project will be written.
Review the project name: This will contain a long unique string of characters by default, you can change this to ensure your project has a more meaningful name. For this tutorial we include the format type, purpose and build number.
Hit the ‘Build’ button; a log is displayed as the virtual service project is built. Please note that this may take some time depending on the speed of your machine.
Once the project build has been completed, you will be notified via a popup screen.
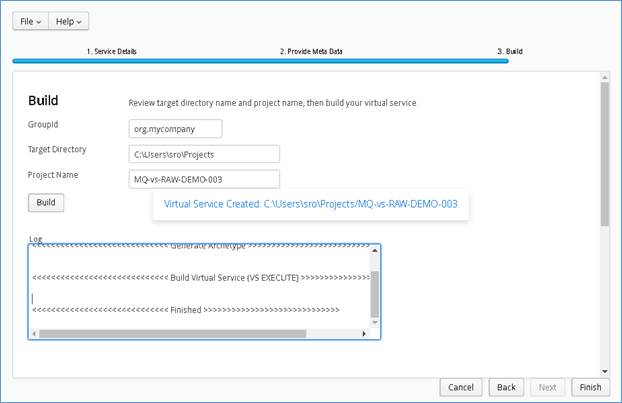
Now that the project has been created, you can import it into your Eclipse environment in order to run and modify the service.
11.8.3 Importing and running the virtual service project
Within your Eclipse environment, click on ‘File’ -> ’Import’…. And you will see the following screen:
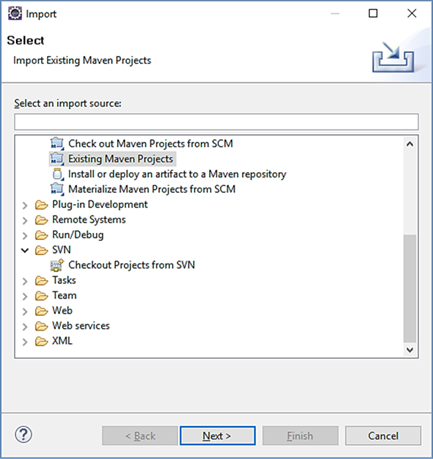
Select ‘Existing Maven Project’ and then hit ‘Next’.
Browse to and select your project root directory. Select ‘Finish’ to import the project:
If you encounter the following warning, select ‘Finish’ to import the build:
Once the build has been imported, open the pom.xml file and on the details for the error message. Select the fix provided titled: ‘Permanently mark goal execute in pom.xml as ignored in Eclipse build’. This should resolve the issue.
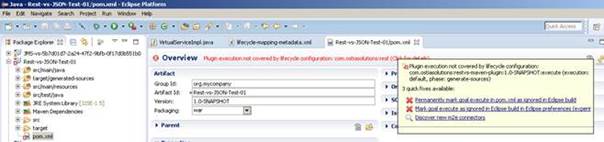
Eclipse can be very picky so please ignore any other errors or warnings from Eclipse. Once completed, your project should look like the following:

11.8.4 Running your project
Within Eclipse, right click on your project root folder and select ‘Debug As’-> ‘Maven Build’… from the context menu. This opens the Edit Configuration screen.
Add jetty:run as the goal and select debug to run the project:
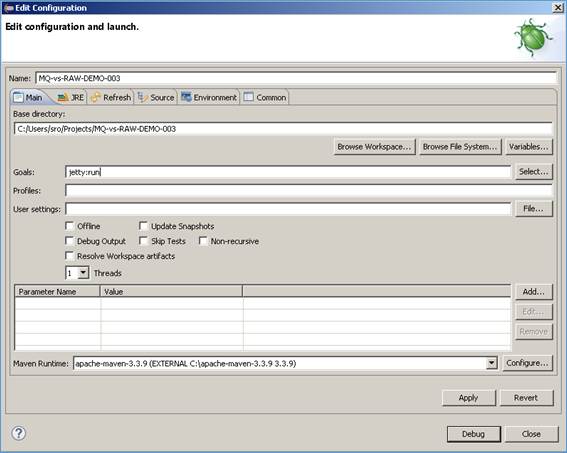
The startup output will be shown in the console window in Eclipse, once the following lines appear, the base project is running and ready to be used.
[INFO] Started Jetty Server
[INFO] Starting scanner at interval of 10 seconds.
11.8.5 Invoking the service
The default implementation of the generated service will simply return some static text and a randomly generated word. This will let us quickly test that the service is up and running.

With the service running, we can open the WebSphere MQ explorer and add a test message to the proxy.input queue. If the service is running successfully, we should find the response sitting on the proxy.output queue.
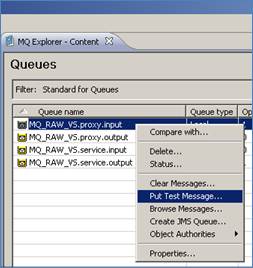
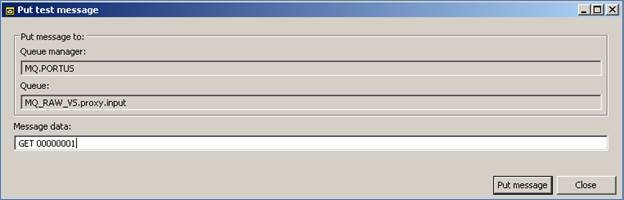
Returning to our queue list and refreshing the page, we can see there is one message now sitting on the proxy output queue:

As expected, this message is returned with the static text ‘Response from POST:’ and a generated word.
11.8.6 Modifying the virtual service
![]() While we now have a virtual service delivering
data, it needs to be modified to better reflect the real world. Within your
project structure you will find the VirtualServiceImpl.java (ServiceImp.java in
newer projects) which creates the default response. Return to Eclipse and stop
the service using the ‘Terminate’ button above the console output window:
While we now have a virtual service delivering
data, it needs to be modified to better reflect the real world. Within your
project structure you will find the VirtualServiceImpl.java (ServiceImp.java in
newer projects) which creates the default response. Return to Eclipse and stop
the service using the ‘Terminate’ button above the console output window:

Once the service has been terminated, navigate to and open the VirtualServiceImpl.java (ServiceImp.java in newer projects) file under Package Explorer:
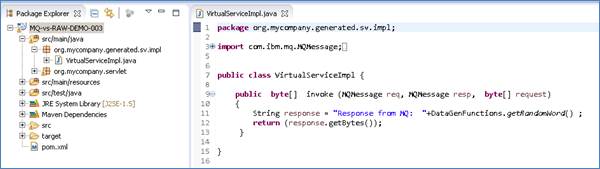
We will use the VirtualServiceImpl.java (ServiceImp.java in newer projects) sample provided in the MQ-RAW-VS samples directory to enhance the virtual services behaviour.
Open the VirtualServiceImpl.java (ServiceImp.java in newer projects) file in the samples directory, copy the contents and replace the contents of the VirtualServiceImpl.java (ServiceImp.java in newer projects) in our project with the sample contents:

This example implementation will return the set values specified in the code for account 00000001 or return generated values for unknown account numbers.
Now we can run the service again with the same steps as before (right click>Debug as>Maven build with the jetty:run goal). Once the service is running we can submit a new message and should see the expected response:
Message requesting account 00000001 returns data specified in the implementation:
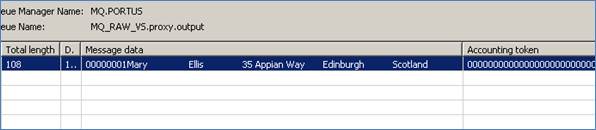
Message requesting account unknown account 00000006 returns generated data:

We now have a service which better reflects a real world action which can be improved upon by modifying the VirtualServiceImpl.java (ServiceImp.java in newer projects) to add custom functionality.
11.9 Tutorial to create a MQ XML virtual service
This tutorial will guide you through the steps required to build a Portus EVS virtual service using an XML payload.
11.9.1 Prerequisites
In order to complete this tutorial, you will need:
· The sample XML request and response weather xsd schemas, GetWeather request and response xml files and the VirtualServiceImpl.java (ServiceImp.java in newer projects) provided in the ./Portus/Samples/MQ-XML-VS/ directory in the product installation.
Important note: You will need to use existing queues and configuration as per your environment. Check the queue manager for details or create new queues to use and specify during project creation
· Access to a MQ Queue Manager with queues defined as follows:
o For the purpose of the tutorial, we will be using a remote queue manager called ‘MQ.PORTUS
o For the purpose of the tutorial, we will be using the following names:
§ Proxy Input Queue: LXSERVER.SRO.PROXY.INPUT
§ Proxy Output Queue: LXSERVER.SRO.PROXY.OUTPUT
§ Service Input Queue: LXSERVER.SRO.INPUT
§ Service Output Queue: LXSERVER.SRO.OUTPUT
Note:
In this tutorial, a remote manager is used, however, a local queue manager may also be used once the appropriate configuration settings are provided.
The two service queue names are not used in this tutorial but are included here for completeness.
· Access to a utility that will enable you to place data on and take data off a queue. We will use the RFHUtil utility available for free from IBM here.
· This tutorial uses Eclipse and therefore an Eclipse environment will be required to complete the tutorial.
· The M2E plugin for Eclipse will be required to run the generated project from within Eclipse. This step can alternatively be executed via the command line for users who are more familiar with Maven.
11.9.2 Create the virtual service
From the Portus EVS landing page, click on the link to create a MQ virtual service and you will be presented with the following screen:
Fill in the proxy and service MQ details as required. If using a remote queue, or modified Port/ Server Connection details, please add any required credentials in the advanced proxy and service sections which can be accessed by selecting the buttons to the right of the input fields. These details will be dependent on your environment configuration.
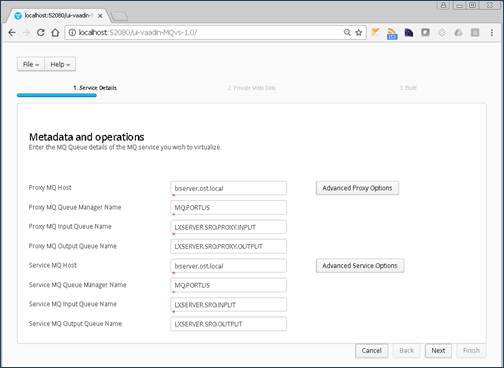
Once your Queue details have been filled in, hit the ‘Next’ button to move on to the metadata selection page, here you can choose your Payload format and required metadata. For this tutorial, we will be selecting XML and providing the weather_request.xsd & weather_response.xsd provided in the samples directory.
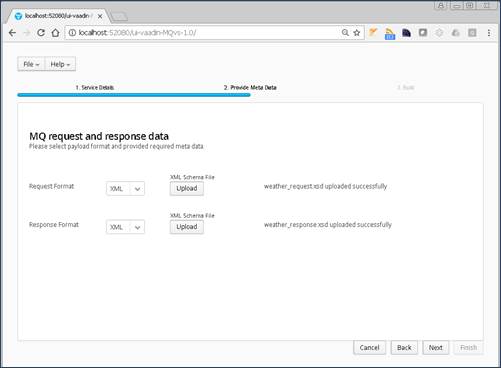
Once you have selected your format and provided the appropriate metadata, you can move on to the build page by hitting ‘Next’. On the build shown below, you can enter the details for your project.
Review GroupId (convention is that this is the WWW domain name of the company reversed. We use a company called mycompany so we have used org.mycompany for the tutorial).
Note:
If you are following the tutorial exactly, you will need to leave the GroupId
as the default provided or modify your VirtualServiceImpl.java (ServiceImp.java
in newer projects) references to the group id to match your changes.
Review the target location: the directory to which the project will be written.
Review the project name. This will contain a long unique string of characters by default, you can change this to ensure your project has a more meaningful name. For this tutorial we include the format type, purpose and build number.

Hit the ‘Build’ button; a log is displayed as the virtual service project is built. Please note that this may take some time depending on the speed of your machine.
Once the project build has been completed, you will be notified via a popup on screen:
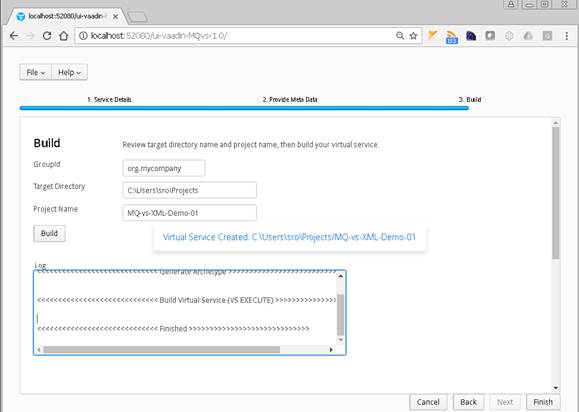
Now that the project has been created, you can import it into your Eclipse environment in order to run and modify the service.
11.9.3 Importing and running the virtual service project
Within your Eclipse environment, click on ‘File’ -> ’Import’…. And you will see the following screen:
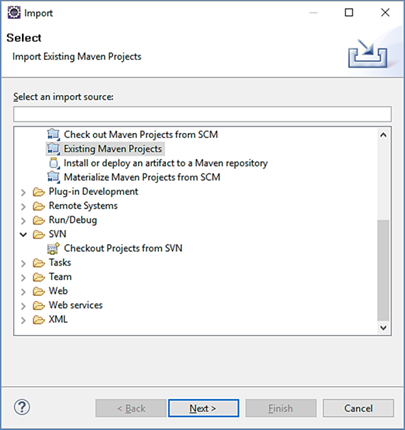
Select ‘Existing Maven Projects’ and then hit ‘Next’.
Browse to and select your project root directory. Select finish to import the project:

If you encounter the following warning, select ‘Finish’ to import the build:
Once the build has been imported, open the pom.xml file and on the details for the error message. Select the fix provided titled: ‘Permanently mark goal execute in pom.xml as ignored in Eclipse build’. This should resolve the issue.
Eclipse can be very picky so please ignore any other errors or warnings from Eclipse. Once completed, your project should look like the following:
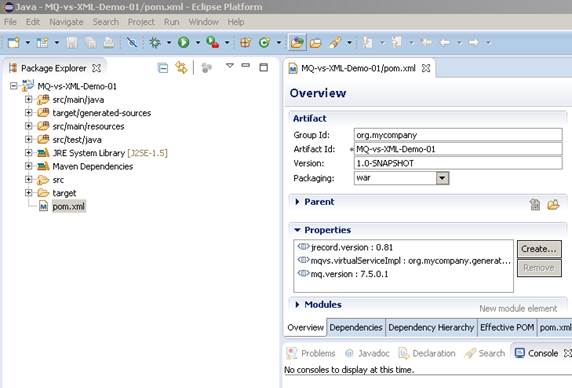
11.9.4 Running your project
Within Eclipse, right click on your project root folder and select ‘Debug As’ -> ‘Maven build’… from the context menu. This opens the Edit Configuration screen.
Add jetty:run as the goal and select debug to run the project:
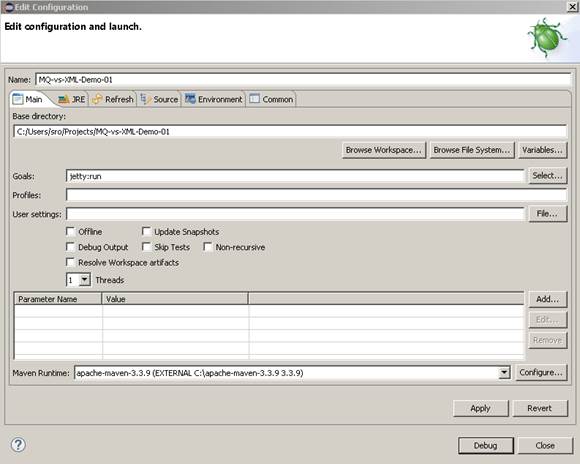
The startup output will be shown in the console window in Eclipse, once the following lines appear, the base project is running and ready to be used:
[INFO] Started Jetty Server
[INFO] Starting scanner at interval of 10 seconds.
11.9.5 Invoking the service
Start the RFHUtil application and you will be presented with a screen as follows:
Fill in the following:
· The queue manager name.
· The proxy input queue defined to your virtual service. In our case we use LXSERVER.SRO.PROXY.INPUT.
· Open the GetWeatherRequest.xml file in RFHUtil from the delivered samples.
The RFHUtil screen should look something like this:
The request data can be seen by clicking the ‘Data’ tabs as follows:
Ensure you have selected the proxy input queue and then hit the ‘Write Q’ button on the Main screen. You should see a message sent notification in the output window:
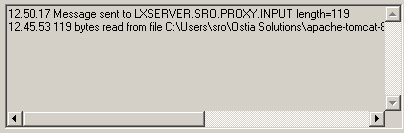
Now change the queue name to your proxy output queue. Then hit the ‘Read Q’ button and you will see the following:

Now hit the ‘Data’ tab and you will see the data returned:
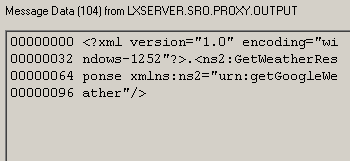
This is the default response from the virtual service which is expected until the service is enhanced.
11.9.6 Modifying the virtual service
![]() While we now have a virtual service delivering
data, it needs to be modified to better reflect the real world. Within your
project structure you will find the VirtualServiceImpl.java (ServiceImp.java in
newer projects) which creates the default response. Return to Eclipse and stop
the service using the ‘terminate’ button above the console output window:
While we now have a virtual service delivering
data, it needs to be modified to better reflect the real world. Within your
project structure you will find the VirtualServiceImpl.java (ServiceImp.java in
newer projects) which creates the default response. Return to Eclipse and stop
the service using the ‘terminate’ button above the console output window:
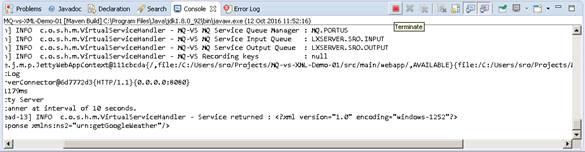
Once the service has been terminated, navigate to and open the VirtualServiceImpl.java (ServiceImp.java in newer projects) file under Package Explorer:
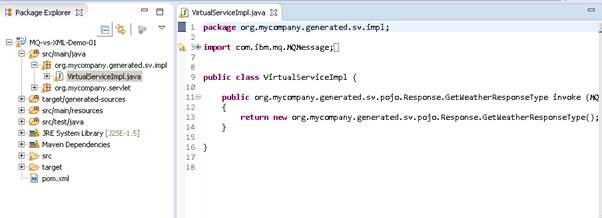
We will use the VirtualServiceImpl.java (ServiceImp.java in newer projects) sample provided in the MQ-XML-VS samples directory to enhance the virtual services behaviour.
Open the VirtualServiceImpl.java (ServiceImp.java in newer projects) file in the samples directory, copy the contents and replace the contents of the VirtualServiceImpl.java (ServiceImp.java in newer projects) in our project with the sample contents:
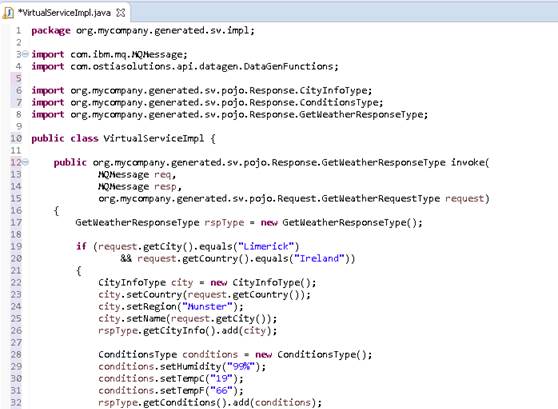
This expanded service returns set weather data for response keywords ‘Limerick’ ‘Ireland’ and ‘Paris’ ‘France’. If the city is not specified in the implementation, the service will return the requested city name with randomly generated condition values.
Now we can run the service again with the same steps as before (right click ->’Debug As’ -> ’Maven build’ with the jetty:run goal) and when we repeat the steps to write to the proxy input queue and read from the output queue we should see the data is returned with the new response:
![]()
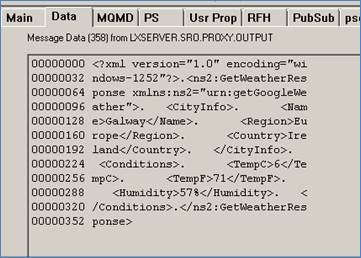
The default sample requests the weather for Galway, which is unspecified in our Implementation, and so returns generated condition values. If we change this request to Limerick, we see the set data for Limerick from the Implementation is returned. To do this, open the GetWeatherRequest.xml sample file in a text editor such as notepad++, change the city to Limerick and save the file before closing.
![]()
Now when we repeat the steps to write to the proxy input and read from the proxy output, we see the expected data for Limerick:
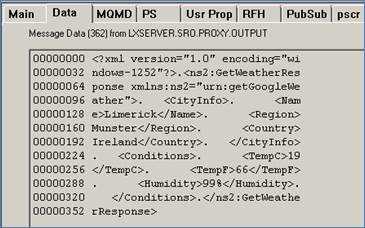
This can be verified by checking against values set in the VirtualServiceImpl.java (ServiceImp.java in newer projects) in our Eclipse environment:
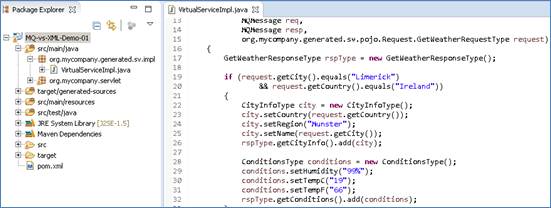
We now have a service which better reflects a real world action which can be improved upon by modifying the VirtualServiceImpl.java (ServiceImp.java in newer projects) to add custom functionality.
11.10 Tutorial to create a MQ XML COBOL virtual service
This tutorial will guide you through the steps required to build a XML-COBOL based virtual service.
11.10.1 Prerequisites
In order to complete this tutorial, you will need:
· The sample files provided in the ./Portus/Samples/MQ-XML-COBOL-VS/ directory in the product installation.
Important note: You will need to use existing queues and configuration as per your environment. Check the queue manager for details or create new queues to use and specify during project creation
· Access to a MQ Queue Manager with queues defined as follows:
o For the purpose of the tutorial, we will be using a remote queue manager called ‘MQ.PORTUS
o For the purpose of the tutorial, we will be using the following names:
§ Proxy Input Queue: MQ_XML_COBOL_VS.proxy.input.
§ Proxy Output Queue: MQ_XML_COBOL_VS.proxy.output.
§ Service Input Queue: MQ_XML_COBOL_VS.service. input.
§ Service Output Queue: MQ_XML_COBOL_VS.service.output.
Notes:
In this tutorial, a remote manager is used, however, a local queue manager may also be used once the appropriate configuration settings are provided.
The two service queue names are not used in this tutorial but are included here for completeness.
· Access to a utility that will enable you to place data on and take data off a queue. We will use the RFHUTIL utility available for free from IBM here.
· This tutorial uses Eclipse and so an Eclipse environment will be required to complete the tutorial as is.
· The Maven M2Eclipse plugin for Eclipse will be required to run the generated project from within Eclipse. This step can alternatively be executed via the command line for users who are more familiar with Maven.
11.10.2 Create the virtual service
From the Portus EVS landing page, click on the link to create a MQ virtual service and you will be presented with the following screen:
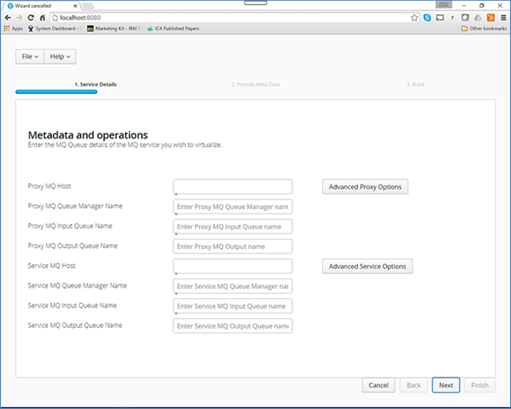
Fill in the proxy and service MQ details as required.
Important:
If using a remote queue, or modified Port/ Server Connection details, please add any required credentials in the ‘Advanced Proxy’ and ‘Advanced Service’ options which can be accessed by selecting the buttons to the right of the input fields. These details will differ depending on your environment configuration.
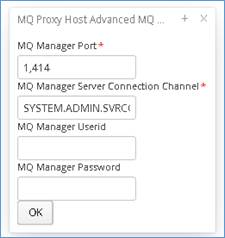
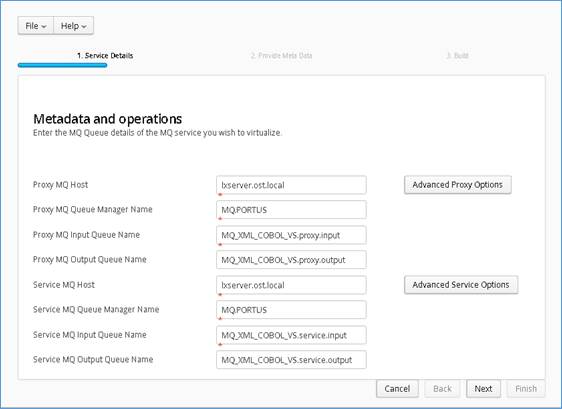
Once your Queue details have been filled in, hit the ‘Next’ button to move on to the metadata selection page, here you can choose your Payload format and required metadata. For this tutorial we will be selecting XML for the request format with weather_request.xsd for metadata, and COBOL for the response format with CPL004.cpy for the metadata.
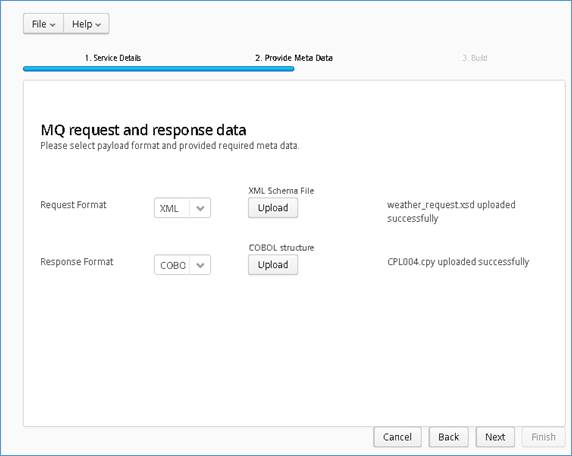
Once you have selected your format and provided the appropriate metadata, you can move on to the build page by hitting ‘Next’. On the build shown below, you can enter the details for your project.
Review GroupId (convention is that this is the WWW domain name of the company reversed. We use a company called mycompany so we have used org.mycompany for the tutorial).
Note:
If you are following the tutorial exactly, you will need to leave the GroupId
as the default provided or modify your VirtualServiceImpl.java (ServiceImp.java
in newer projects) references to the group id to match your changes.
Review the target location: the directory to which the project will be written.
Review the project name. This will contain a long unique string of characters by default, you can change this to ensure your project has a more meaningful name. For this tutorial we include the format type, purpose and build number.
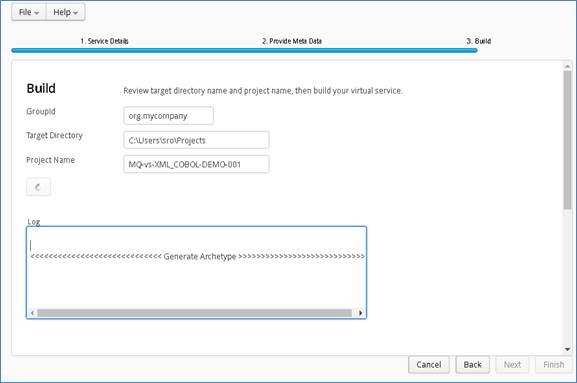
Hit the ‘Build’ button; a log is displayed as the virtual service project is built. Please note that this may take some time depending on the speed of your machine.
Once the project build has been completed, you will be notified via a popup on screen:
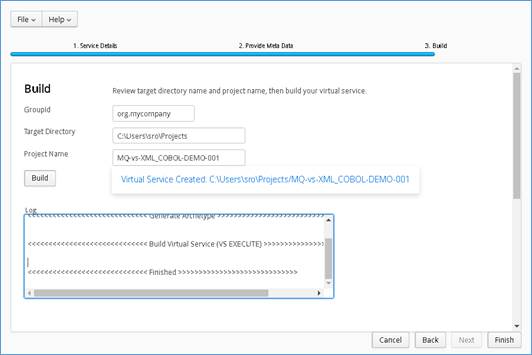
Now that the project has been created, we can import it into our development environment.
11.10.3 Importing and running the virtual service project
Within your Eclipse environment, click on file->import…. And you will see the following screen.

Select ‘Existing Maven Project and then hit ‘Next’.
Select the project we have just generated in the next screen:
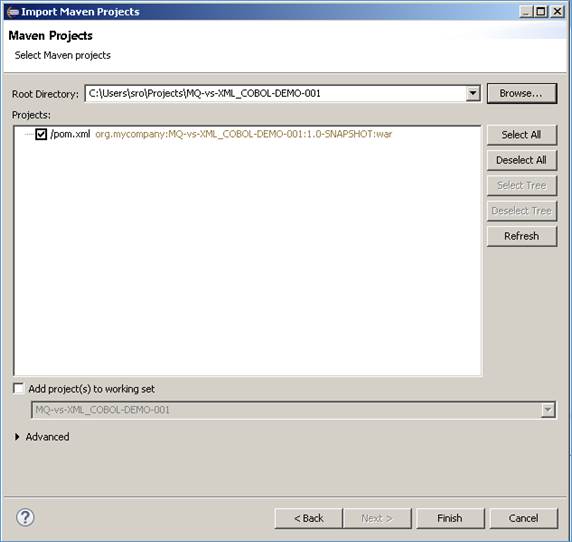
Click ‘Finish’ and the project will be imported to your Eclipse environment. Note, Eclipse can be very picky so please just ignore any errors or warnings from Eclipse. Once completed, your project should look like the following:
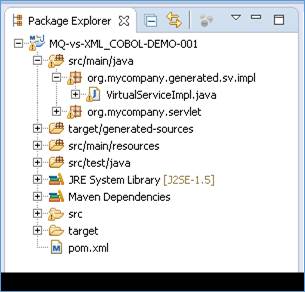
11.10.4 Modifying the virtual service
For this tutorial, we
will modify the virtual service before testing, as this service does not return
anything by default.
Within your project structure you will find the VirtualServiceImpl.java
(ServiceImp.java in newer projects):
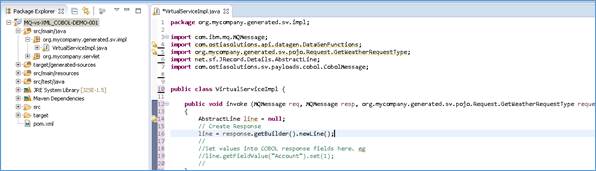
We will use the VirtualServiceImpl.java (ServiceImp.java in newer projects) sample provided in the MQ-XML-VS samples directory to enhance the virtual services behaviour.
Open the VirtualServiceImpl.java (ServiceImp.java in newer projects) file in the samples directory, copy the contents and replace the contents of the VirtualServiceImpl.java (ServiceImp.java in newer projects) in our project with the sample contents:
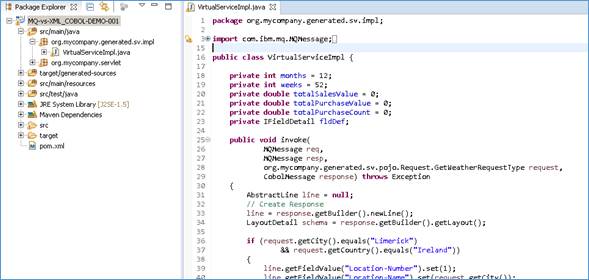
This expanded service will return some realistic data we can use to test the service.
11.10.5 Running your project
Within Eclipse, right click on your project root folder and select ‘Debug As’ -> ‘Maven build’… from the context menu. This opens the Edit Configuration screen.
Add jetty:run as the goal and select debug to run the project:
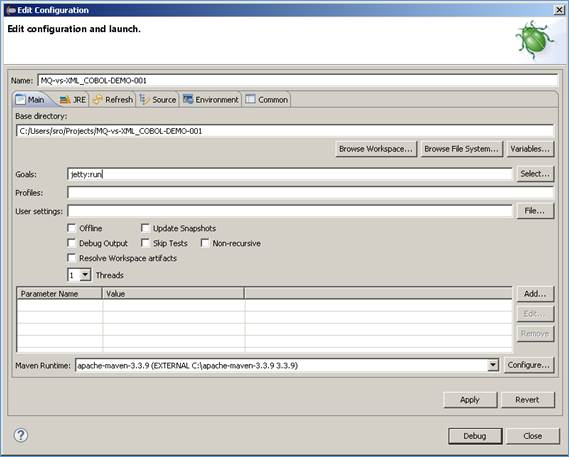
The startup output will be shown in the console window in Eclipse, once the following lines appear, the base project is running and ready to be used:
[INFO] Started Jetty Server
[INFO] Starting scanner at interval of 10 seconds.
11.10.6 Invoking the service
Start the RFHUtil application and you will be presented with a screen as follows:
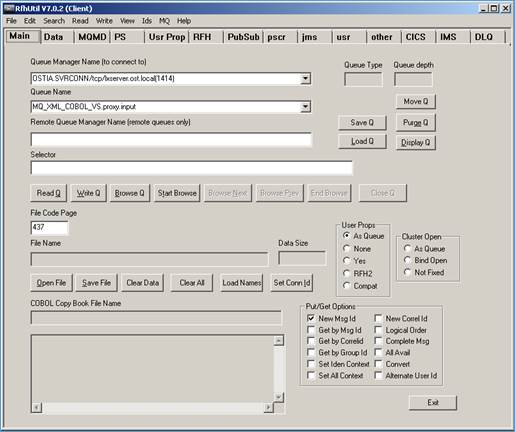
Fill in the following:
· The queue manager name.
· The proxy input queue defined to your virtual service.
· Open the weather_request_limerick.xml file in RFHUtil from the delivered samples.
The RFHUtil screen should look something like this:
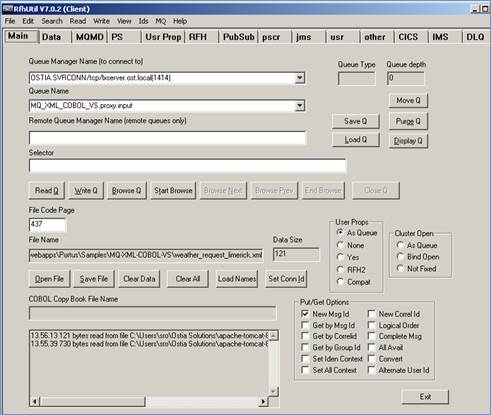
The request data can be seen by clicking the ‘Data’ tabs as follows:
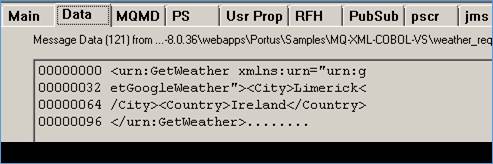
Ensure you have selected the proxy input queue and then hit the ‘Write Q’ button on the Main screen. You should see a message sent notification in the output window:
![]()
Now change the queue name to your proxy output queue. Then hit the ‘Read Q’ button and you will see the following:
![]()
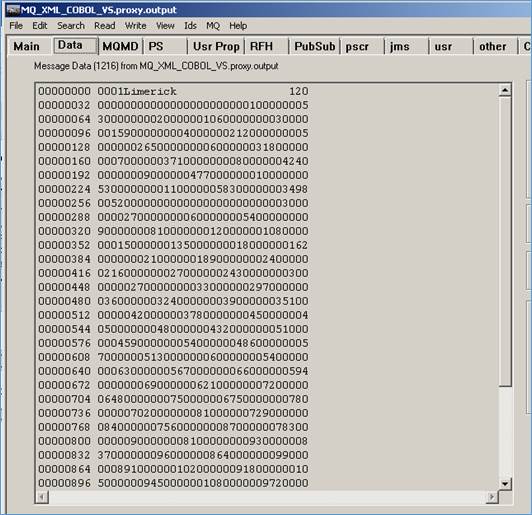
The service now returns the expected data as specified in the implementation.
We now have a service which reflects a real world action which can be improved upon by modifying the VirtualServiceImpl.java (ServiceImp.java in newer projects) to add custom functionality.
11.11 Tutorial to create a REST XML virtual service
This tutorial will guide you through the steps required to build a Portus EVS virtual REST service using XML payloads.
Prerequisites
In order to complete this tutorial, you will need:
· The sample files provided in the Portus\Samples\REST-XML-VS\ directory provided with this installation
· A client such as SoapUI to call the service
· This tutorial uses Eclipse and so an Eclipse environment will be required to complete the tutorial as is.
· The Maven M2Eclipse plugin for Eclipse will be required to run the generated project from within Eclipse. This step can alternatively be executed via the command line for users who are more familiar with Maven.
Create the virtual service
From the Portus EVS landing page, click on the link to create a REST virtual service and you will be presented with the following screen:
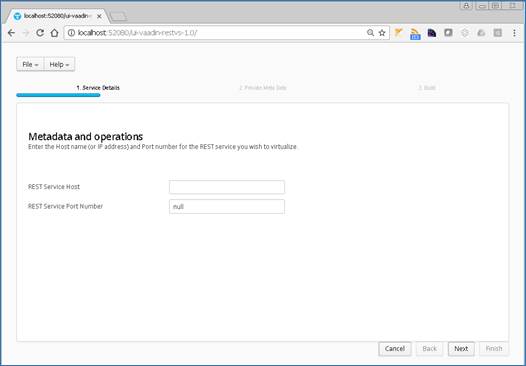
Enter the Hostname or IP address and the Service Port Number. In this example we will be using the local machine (localhost) and port number 8575. Once the details have been entered, click ‘Next’ to proceed to the metadata page.
Here you can select the format and corresponding metadata for your virtual service. In this example we will be creating a REST XML service and using the samples provided in the Portus\Samples\REST-XML-VS directory. Set the Format to XML and upload the corresponding xsd for each Operation.
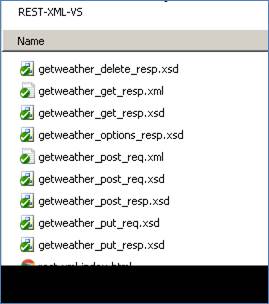
When complete, your screen should look similar to the following:
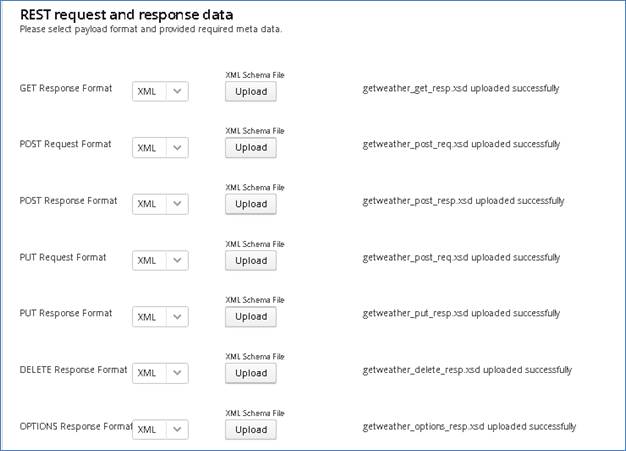
Once you have selected your format and provided the appropriate metadata, you can move on to the build page by hitting ‘Next’. Here you can enter the details for your project.
Review GroupId (convention is that this is the WWW domain name of the company reversed. We use a company called mycompany so we have used org.mycompany for the tutorial).
Note:
If you are following the tutorial exactly, you will need to leave the GroupId
as the default provided or modify your VirtualServiceImpl.java (ServiceImp.java
in newer projects) references to the group id to match your changes.
Review the target location: the directory to which the project will be written.
Review the project name. This will contain a long unique string of characters by default, you can change this to ensure your project has a more meaningful name. For this tutorial, we include the format type and build number.
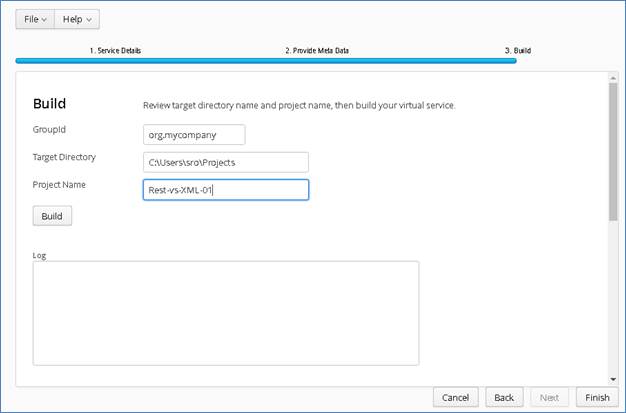
Hit the ‘Build’ button; a log is displayed as the virtual service project is built. Please note that this may take some time depending on the speed of your machine.
Once the project build has been completed, you will be notified via a popup screen:
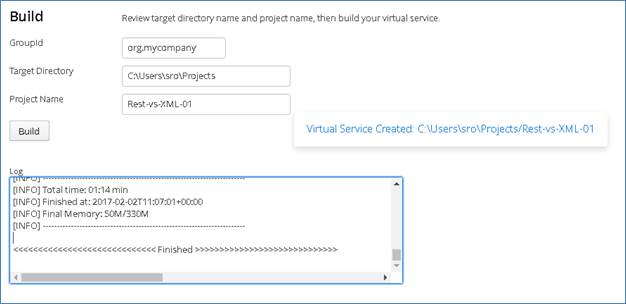
Now that the project has been created, you can import it into your Eclipse environment in order to run and modify the service.
Importing and running the virtual service project
Within your Eclipse environment, click on ‘File’ -> ’Import’…. And you will see the following screen:

Select ‘Existing Maven Project and then hit ‘Next’.
Browse to and select your project root directory. Select ‘Finish’ to import the project:
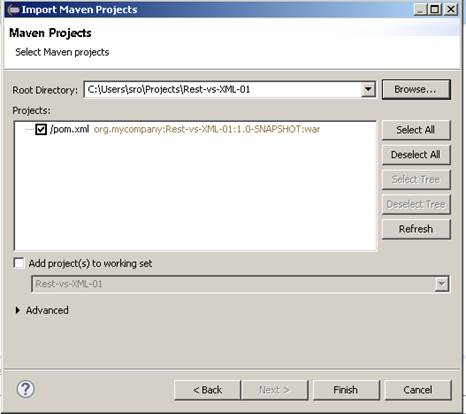
If you encounter the following warning, select ‘Finish’ to import the build:
Once the build has been imported, open the pom.xml file and on the details for the error message. Select the fix provided titled: ‘Permanently mark goal execute in pom.xml as ignored in Eclipse build’. This should resolve the issue if present. Eclipse can be very picky so please ignore any other errors or warnings from Eclipse. Once completed, your project should look like the following:
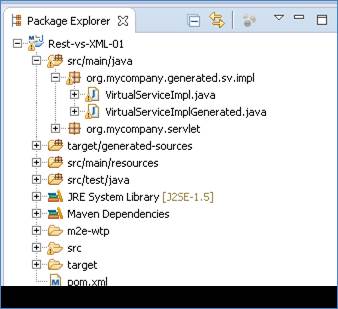
Running your project
Within Eclipse, right click on your project root folder and select ‘Debug As’ -> ‘Maven build’… from the context menu. This opens the ‘Edit Configuration’ screen.
Add jetty:run as the goal and select debug to run the project:
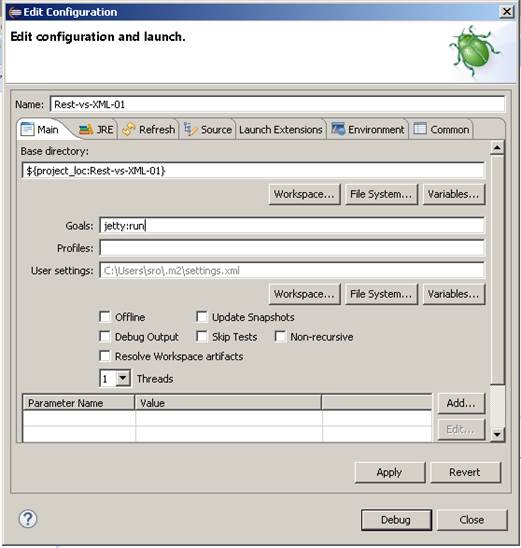
The startup output will be shown in the console window in Eclipse, once the following lines appear, the base project is running and ready to be used.
[INFO] Started Jetty Server
[INFO] Starting scanner at interval of 10 seconds.
Invoking the service
We are running the service in Jetty which runs on port 8080 by default, to test the service is active, we will create a new REST project in SoapUI and enter http://localhost:8080 for the service URI:
In SoapUI, right click on ‘Projects’ and select ‘New REST Project’ from the context menu:
In the ‘New REST Project’ window, enter ‘http://localhost:8080’ as the URI for the project and press ‘OK’

You should now have a new REST project open in SoapUI which looks similar to the following:
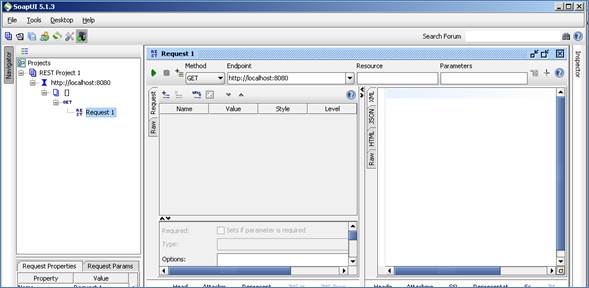
Call the service to ensure that it is accessible. Press the play button in the request window.

An empty GetWeatherResponse is returned. This is expected as we have not yet modified the service.
Modifying the virtual service
While we now have a virtual service delivering data, it needs to be modified to better reflect the real world. Within your project structure you will find the VirtualServiceImpl.java (ServiceImp.java in newer projects) which creates the default response. Return to Eclipse and stop the service using the ‘terminate’ button above the console output window:
![]()
Once the service has been terminated, navigate to and open the VirtualServiceImpl.java (ServiceImp.java in newer projects) file under Package Explorer:
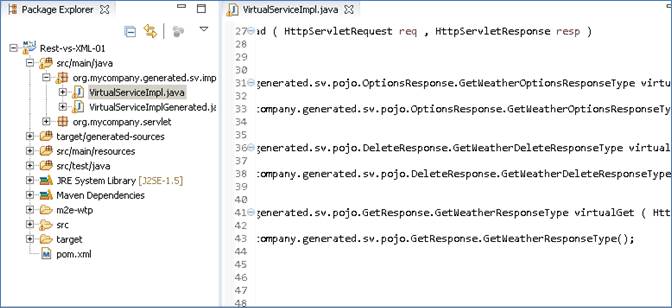
We will use the VirtualServiceImpl.java (ServiceImp.java in newer projects) sample provided in the REST-XML-VS samples directory to enhance the virtual services behaviour.
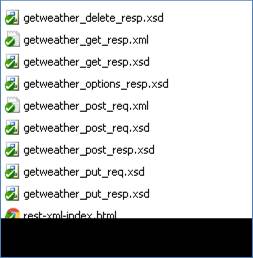
Open the VirtualServiceImpl.java (ServiceImp.java in newer projects) file in the samples directory, copy the contents and replace the contents of the VirtualServiceImpl.java (ServiceImp.java in newer projects) in our project with the sample contents:
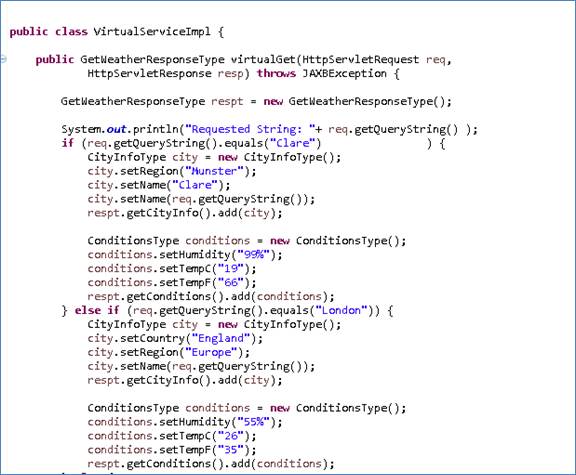
The new implementation will allow us to request weather conditions for certain cities. Where a requested city has been specified in the new implementation, the service will return set responses. Where an unknown city is requested, the values for the ‘Temp’ fields will be generated dynamically using DataGen functions. Once the Implementation has been updated, save the project.
Running the improved service
Now we can run the service again with the same steps as before (right click> ‘Debug As’ -> ‘Maven Build’ with the ‘jetty:run’ goal). With the service is running we can return to the SoapUI Client and issue a new request to the modified service.
Calling the Modified Service
There are a few steps to take in order to send the appropriate request to our service via SoapUI. These are outlined as follows:
In the SoapUI Client, Change the Method from GET to POST.
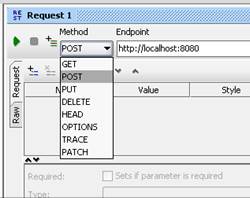
Set the Media Type for application/xml.
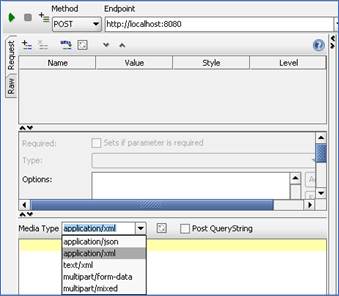
Add a header with the ‘Header’ field set to: Content-Type, and the ‘Value’ field set to: application/-x-wwwform-urlencoded;charset=UTF-8
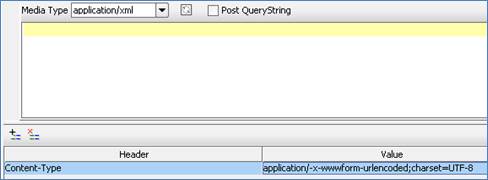
Finally, navigate to the samples folder and copy the contents of getweather_post_req.xml and post it into the request window:
Note: there is a schema xsd and an xml file both with the getweather_post_req name. Ensure you copy the contents of the xml file for the request content.
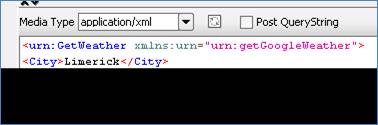
The request is now ready. To call the service, press the green play button at the top of the request window. The results returned should be similar to the following:
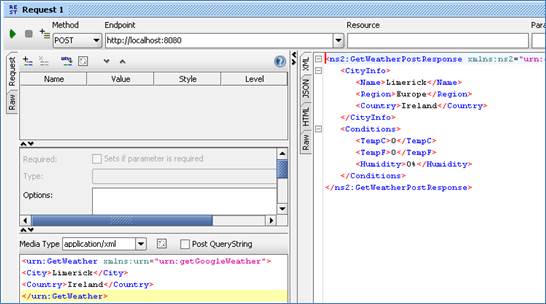
By comparing this result to the modified implementation, we can see that this is the expected response for the Limerick request:
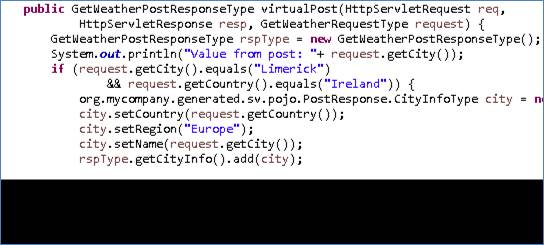
If we modify our original request to contain an unspecified city, such as Madrid, the temperature values returned will be different in each response
Modified request:
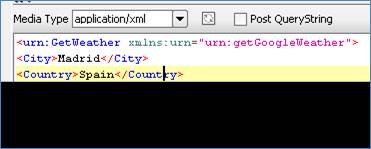
Response 1
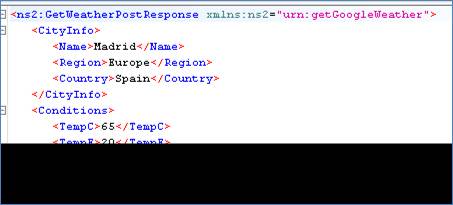
Response 2
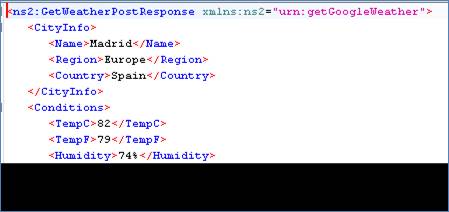
We now have a service which better reflects a real-world action which can be improved upon by modifying the VirtualServiceImpl.java (ServiceImp.java in newer projects) to add custom functionality.
12 Appendix 1 – Open source code
Open Source code used as part of Portus EVS
|
License name |
License type |
Ostia usage |
Link |
|
Apache HTTP Server |
Apache license |
HTTP server |
|
|
Xerces-C++ XML parser |
Apache license |
Parsing, validating, serializing and manipulating XML |
|
|
Xalan XSLT processor |
Apache license |
Transforming XML documents other XML document types |
|
|
ICU Unicode components |
Open source |
C/C++ and Java libraries providing Unicode and Globalization support |
|
|
OpenSSL |
Apache license |
Toolkit for the TLS and SSL protocols |
|
|
Eclipse |
Eclipse public license |
Software development platform and framework |
|
|
Vaadin |
Permissive free software |
Web application framework for rich Internet applications |
|
|
SoapUI API |
EU public license |
Web service development framework |
|
|
Java |
Java license |
Software development framework |
|
|
Maven |
Apache license |
Software build, reporting and documentation tool |
|
|
unixODBC |
GPL/LGPL |
Implements ODBC on UNIX platforms |
|
|
Jrecord |
GPL/LGPL |
Provides Java Record based I/O routines for COBOL |
|
|
Java types from JSON |
Apache license |
Supporting JSON payloads |
https://github.com/joelittlejohn/jsonschema2pojo/wiki/Getting-Started#the-maven-plugin |
|
org.fluttercode.datafactory |
GPL/LGPL |
Creating synthetic data |
http://www.andygibson.net/blog/article/generate-test-data-with-datafactory/ |
|
Apache HTTPClient |
Apache license |
Invoke REST services |
https://hc.apache.org/httpcomponents-client-4.5.x/index.html |
|
Hibernate ORM |
GPL/LGPL |
Object relational mapping |
|
13 Appendix 2 – 3rd party code
3rd party code used as part of Portus EVS
|
License name |
Ostia usage |
Link |
|
License4J |
Java Software Product Licensing |