Installation & Configuration Guides
For related video walkthroughs see the videos page
1. Portus Server - Installation
Overview
The Portus software consists of two components:
- The Portus Server component runs locally to your "resource". In this instance a resource is defined as an Adabas, MySQL, PostgreSQL or SQL Server database. It can also be defined as a Natural program, an LE program, a shared library or a DLL.
- The Portus Control Centre component is a central GUI used to configure and monitor one or more Portus Servers. This component runs within the Eclipse IDE, and must be run on Linux or Windows.
- Windows 2003/2008 Server (standard edition and enterprise edition)
- Windows 2000 Professional, Server and Advanced Server
- Windows 7/8/10
- Minimum Adabas v5 on OpenSystems platforms (Windows / Linux / Unix); Adabas 6.1.3 + Adabas Client (ACL) 6.2.1.8 required for LOBs (large objects) access
- Any supported UES-enabled Adabas version on the mainframe (v7.4 and higher); Adabas 8.1 or higher required for LOB access
- iTrac ADAOS-3371 must be applied
- Only unixODBC 2.2.13 or above is supported.
- To use any relational database driver (MySQL/Oracle/Postgres/etc) ODBC must be installed, and the appropriate driver interface for your database (e.g. MyODBC/Oracle ODBC/psqlodbc/etc) must also be installed. On Windows this must be a 32-bit driver, and should be configured via %WINDIR%\SysWOW64\odbcad32.exe
- If accessing MSSQL Server resources, it must be version 2008 or later
- As Portus is a server-based application, Windows-based ODBC DSNs must be created using the "System" tab
Portus Control Centre Prerequisites
A Java Runtime Environment (minimum: JRE 1.6)
FujitsuNetCOBOLSVR.exe - this can be provided upon request or downloaded from here
Portus Server Operating System Prerequisites
Portus is currently supported on the following platforms:
Note: All Windows 64-bit platforms are supported by running the Portus server in 32-bit compatibility mode.
Additional software prerequisites
Portus requires the following software versions when using Portus with theses applications
This is a 'Windows System' focused extract from the Portus Documentation. To view the full installation pre reqs for all systems see: cloud.ostiasolutions.com
See the video: Portus Control Centre & Server Installation Guide for a visual walkthrough.
Prerequisites
Java is required to run the Eclipse SDK
If you already have Java Runtime Environment (JRE, v1.6 or higher) installed, you may skip this step.
To find out what level of java you have installed, run the command java -version from either a shell ( Unix/Linux) or command box (Windows) depending on your system.
If Java is not installed already in your environment, follow these steps
- Install the latest version
- Find the "Java Runtime Environment (JRE)" and download it.
- Accept the license agreement, and choose the correct package for your platform.
- Start the Java installer (for example double-click) and follow the instructions.
- The Java download site provides detailed install instructions.
- Once the installer has finished, Java is installed in your environment.
Download and install Eclipse
It is recommended you download the optimized Portus Eclipse package from here
The Eclipse OpenSource framework forms the base for the Portus administration and monitoring tool, the 'Control Centre'.
Eclipse 3.7 (or higher) is required to run the Portus Control Centre.
Steps required to install the Eclipse framework:
- Download Eclipse version 3.7 for your environment:
- Unzip the downloaded packages, this will create a directory structure under a top-level directory named 'eclipse', at the selected file system location. for example C:\eclipse on Windows when unzipping into C:\
- Start Eclipse - 'eclipse.exe' on Windows, './eclipse' on Unix/Linux, from the top-level eclipse directory.
Install the Portus Control Centre from an Update Site
Start the Update Manager, which can be found on the Eclipse main menu under Help -> Install new software.
Note: As the Eclipse Update Manager may need to get to an external site, you may have to specify a HTTP proxy in order to access it from an intranet.
In the 'Work with' text box, enter the URL
http://cloud.ostiasolutions.com/Portus/brazilUpdateSite
OR
If you have previously downloaded the archived update site, select the Add button, then Archive, and choose the zip file portus-brazil-updateSite.zip
- The Update Manager will now contact the update site and display the list of available downloads.
- An empty box next to the features name indicates that the feature is not selected
- Choose a feature by clicking the checkbox beside it. A tick appears in the box beside the features
- You should always select the Portus Control Centre' category
- You should also select the install kit(s) which correspond to the system that will run the Portus Server
- In some cases, you may also drill down by expanding the feature menu.
- Once finished, click Next and the required features will be downloaded.
- Depending on the amount of features selected, and the speed of your connection, this may take some time.
- Once the download has finished, you will be presented withe Legal Notices dialog. Read and Accept the license agreement before continuing.
- Check I accept the terms in the license agreement and click Next
- Review the features to be installed, and click Finish
- The selected features will now be installed.
- If the features have not been signed, you will be asked if you wish to continue with the installation.
- If the features have been signed, you will be asked if you want to install a digitally signed feature.
- Either way, click OK
- Restart Eclipse when prompted.
Once the control centre is installed, you can move to the next stage to install the Portus Windows Server.
See the video: Portus Control Centre & Server Installation Guide for a visual walkthrough.
Introduction
This section outlines how to install the Portus Server on Windows
Important: If the version you are installing is not Portus v4.3.1, then your installation may display a version number different from the screenshots below. There is no functional installation difference between versions, so this can be safely ignored.
Important: When installing the Portus Server, ensure that the server is installed on a local drive along with the Control Centre and that adequate execution permissions are granted. If an error similar to the following is encountered, it indicates that the user does not have the required permissions to execute the installer:
Error reading file from …\features\com.SOAGateway.feature.install.x86.windows_4.3.1.009902\target\win32Build.msi verify that file is exists and you can access it.
Installation using the Deployment Wizard
On Windows, the Portus install is done via the Deployment Wizard. This is a wizard which runs within Eclipse, and guides you through the steps required to install and configure your Portus server.
- A dialog will be presented the first time the Portus Control Center is started after its installation. Specify a project name and click Continue
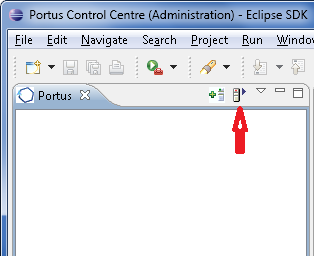
- If you have not deployed via the prompt after installation, you may start the deployment wizard at any time, to do this, click the following button:
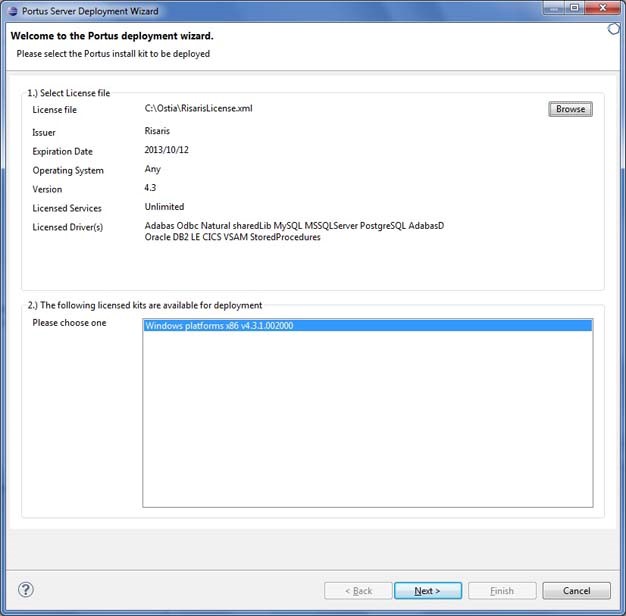
- The Deployment Wizard will appear
- Click "Browse" to select your license, choose your (Windows) installation kit from the list of available and licensed kits.
- Important: This license should reside on a local HDD (Hard Disk Drive), and not on a network drive or SSD (Solid State Drive).
- Important: Please make sure you are not selecting a license file from C:\ProgramData... If your license file is located in the programData folder please make a temporary copy of it to another location and select the file from there.
- Click Next
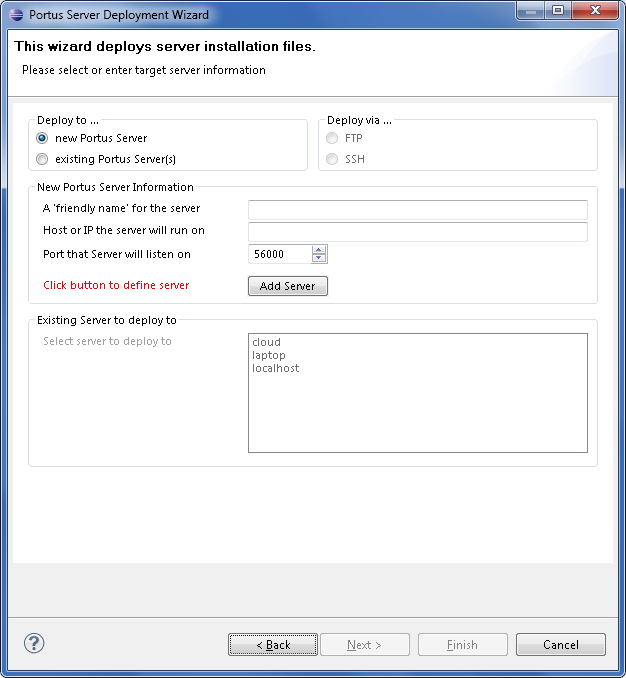
- The following screen allows you to either select an existing Portus server to deploy to, or to define a new Portus server to the Control Centre. This server definition will be used for server administration later on.
For Windows, you should
- Enter a 'friendly name'. This name will be used to refer to a Portus Server without needing to enter the hostname (or IP) later on.
- Enter the hostname or IP of the machine on which the Portus server will run. This host/IP will be the machine you are currently working on.
- Enter the port which you would like Portus to listen for requests on. A new Apache web server will be installed, you must ensure that the port choosen here is available for use and not blocked by a firewall. The port entered here will utimately be the port that Portus uses to service requests.
- Important: Once you have filled in all of the above, click 'Add Server'
- The server will now be added to your Portus Control Center 'Servers View' for later use.
- Click Next
- Now the Deployment Wizard must launch the Windows installer program.
- Press the Launch Setup button
- A dialog will pop up alerting that the process needs to check for an existing installation.
- The deployment wizard now starts an MSI installer to install the Portus Server component on the system. When the first page appears, click Next
- If you require Portus to be installed in a non-default directory, click Browse and select your directory. Otherwise click Next
- Click Install to continue
- Please wait while Portus is installed
- When the installation is complete, click Finish
- Return to the Deployment Wizard, the message log will indicate either success or failure of the setup process.
- Click Next
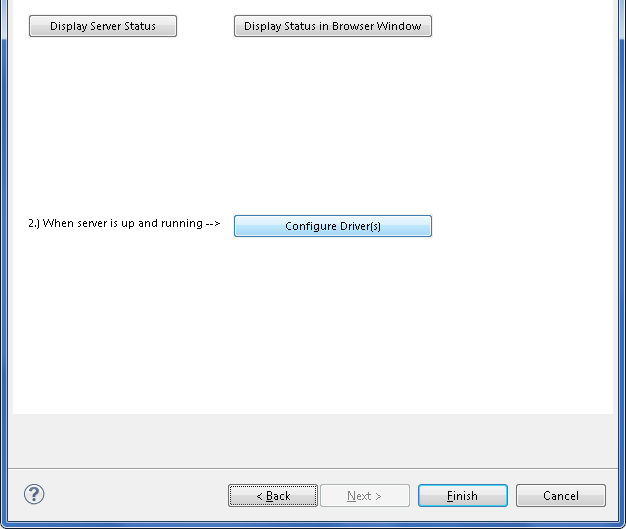
The next screen is used to verify that your Portus is up and running, and then to configure it based on your license.
- Display Server Status: This displays this a short summary of the server status in the deployment wizard
- Display Status in Browser Window: This displays more information about the servers status in a browser.
- Configure Driver(s): Allows you to automatically create drivers based on your license.
- You should now click Configure Driver(s) to create Portus drivers that are enabled in your license. If you choose to not add drivers now, they can also be created at a later stage, more information about defining drivers can be found 'defining drivers' section of this documentation.
- The "Driver Wizard" will present a list of licensed drivers, and come up with all drivers selected and ready to be defined. You may now just click the Configure button to define all of them, or deselect those you do not need or want to set up at that stage.
- Click "Configure".
- In case the driver does not require any additional parameters to be set, it will be defined now, otherwise the Driver Definition Dialog will ask for the additional parameter(s) to be set e.g. set the "ListMaxRecords" parameter to a value of "0" (zero) for an Adabas Driver. Click the Save button.
- The Driver Wizard Dialog indicates the success of the operation
- When Show (post-setup) Driver Information is selected, and information is available for the driver(s) just installed, it will be displayed (cumulatively) after the driver(s) have been configured
- Click Done to close the Deployment Wizard
2. Portus Server - Service Discovery and Creation
Portus uses database specific drivers to discover database tables. Users can select available tables from the discovered lists and create a number of Portus services to enable access to those tables.
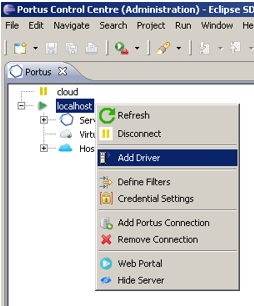
To add a driver for the Portus Server, first right click on the Server
- Select 'Add Driver'
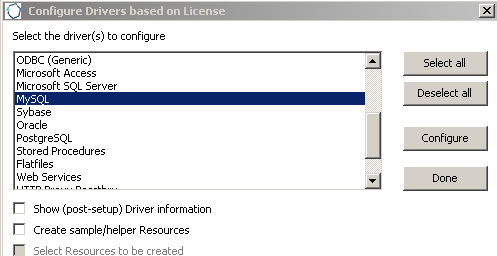
- Select required drivers from the driver configuration wizard
- Shift+Click to select multiple drivers
- Select the 'Configure' button, followed by the 'Save' button to setup the driver
- Click done when finished.
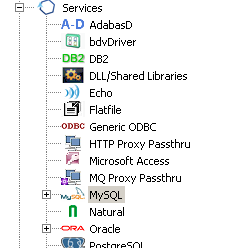
- The new driver will appear below the Services node in the Portus Server view
Users can now use the defined driver to discover tables using a pre defined ODBC connection through the discovery wizard
Initiating Service creation
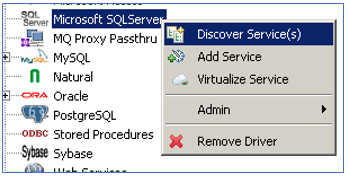
The Service creation process can be started by selecting the appropriate driver, right-clicking and selecting either 'Discover Service(s)' or 'Add Service':
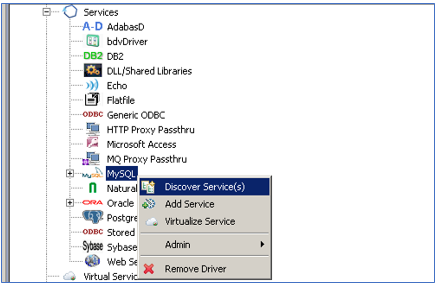
'Discover Service(s)' will start the discovery wizard and request the specific parameters required for the selected driver type.
'Add Service' will ask you to name the service and you can then manually set the various parameters as per your particular system.

Status and error information can be retrieved later on from the Portus Action Log
To create Portus services from MS SQL server tables, first ensure a working 32bit ODBC connection has been defined
Open the 32bit ODBC Data Source Administrator and Switch to the system tab
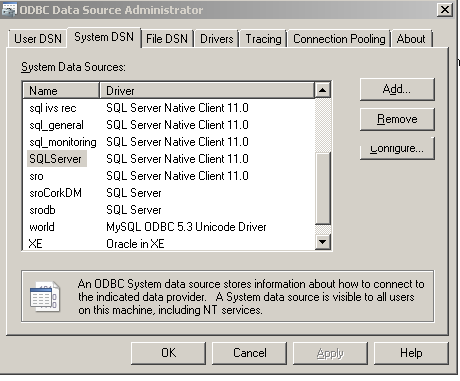
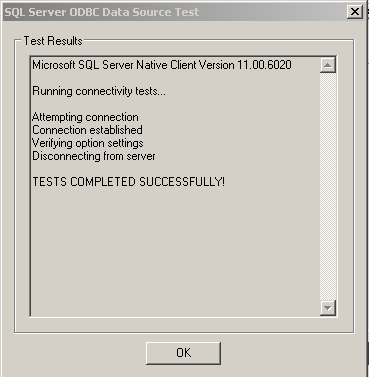
Configure the SQL Server connection with the details for your database and test the connection to ensure it is working as expected:
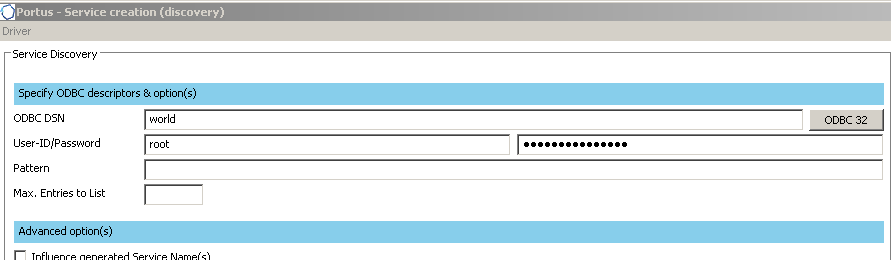
In the Portus Control Centre, define a Microsoft SQL Server driver, right click and select ‘Discover Services’
In the discovery wizard, enter the ODBC connection details and any required credentials
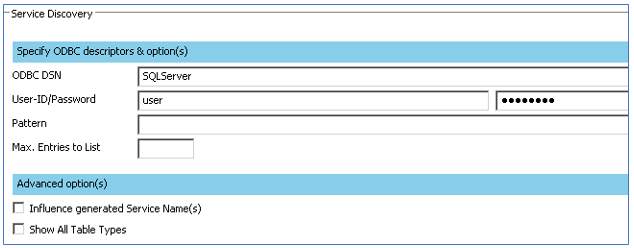
Once the details are filled in, Select the Discover button to return a list of avaible tables

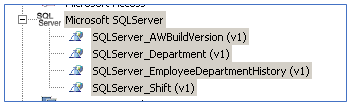
Once you have selected the required tables, hit the ‘Generate’ button to create Portus services from these tables.
New services will appear below the MS SQLServer driver in the portus server window
When a backend database such as MS SQL server requires credentials, you will have to provide these through Apache directives in order to call portus created services in certian clients such as a browser (whereas these details may be added directly in the header when calling via a client such as SoapUI). If this is the case, a service call will return an error with login authentication failed.
To add a new Apache directive, navigate to and open the portusHttpd.conf configuration file located in: ProgramData\Portus 4.3.1\configuration\. This can also be accessed through the start menu by selecting 'Edit Portus Httpd Config' option in the Portus 4.3.1 directory.
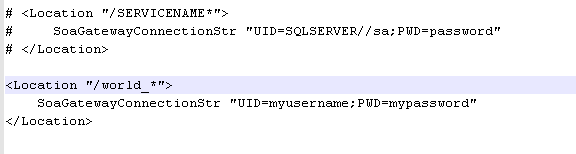
In the configuration file, a commented out directive example is shown

Copy this example, paste it below the existing example, modify it to include your service name and credentials, uncomment it and save the file.
Restart the Portus server to pickup the changes.
Now when you call the service, the expected data should be returned
3. Portus Server - Service Caching
See the video playlist: Ostia Solutions Caching of Services in Portus to see caching in action.
To begin caching, select a service, and move to the Data Monitoring section in the properties window
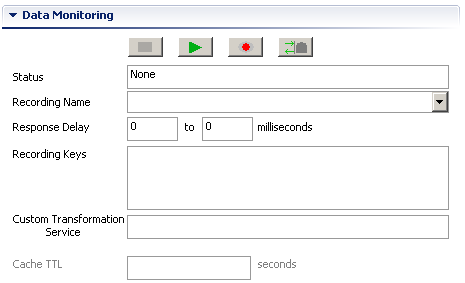
Select the Caching button and next set time to live (TTL) as circled in green below:
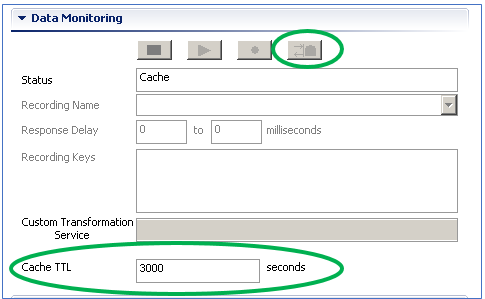
Caching is now enabled and is ready to use.
Once caching has been enabled on a service, the initial call to a service will capture the response, each time a user calls the service in the same way within the TTL set for caching, Portus will return the initial captured response to the user. Once the TTL has expired or the caching is manually stopped, the service will resume in real time.