| |
||
| PDF BOOKS | HOME UP PREV NEXT | ||
These tasks would typically be carried out by an experiened Portus user.
Typically when you install Portus on Windows, the Control Centre and the Portus server are on the same machine. If you wish to install Portus on a remote Windows here are the steps involved.
Transfer win32Build.msi to the target machine.
The msi can be located at ../eclipse/features/com.SOAGateway.feature.install.x86.windows_v.r.m.pppppp.
where ../eclipse is the folder from which your Control Centre is launched and v.r.m.pppppp indicates the version of Portus for Windows.
Logon to the target machine and run:
msiexec /I c:\temp\win32Build.msi /L*v c:\temp\installLog.txt SERVERPORT=56000 LICENSESRC=c:\temp\LIC.xml
Assuming that:
The msi and your license are in c:\temp\
This section outlines the steps required to run multiple instances of Portus, either of the same, or different versions, on a single operating system image.
The simplest way for setting up multiple Portus servers on z/OS is to execute the Deployment Wizard once for every server, specifying distinct HLQs (High Level Qualifiers) for the datasets, TCP/IP port numbers etc., then execute the setup jobs.
This will also create multiple copies of the Portus load library, which is not required, so the start job / procedure for the various instances of the server can be modified to all use the same loadlib in its STEPLIB.
This step-by-step guide assumes good knowledge of the Apache webserver on a Linux platform.
The following steps outline how to copy the existing Portus installation, and then bring up both the existing and new installations using the same Apache webserver.
Make a duplicate of the current installations files and directories. For example, if installed in /home/bre/soaGateway, then
mkdir /home/bre/soaGatewayNew
cp -R /home/bre/soaGateway/* /home/bre/PortusNew
In the current installation (not the one you have just created) copy the apachectl control script. For example
cp /home/bre/Portus/apache2/bin/apachectl /home/bre/Portus/apache2/bin/apachectl_new
Modify the new file to pick up the new httpd.conf and new envvars file.
IPv6 (Internet Protocol version 6) is the latest revision of the Internet Protocol (IP), the primary communications protocol upon which the entire Internet is built. It is intended to replace the older IPv4, which is still employed for the vast majority of Internet traffic as of 2012. IPv6 was developed by the Internet Engineering Task Force (IETF) to deal with the long-anticipated problem of IPv4 running out of addresses.
IPv6 Portus is supported on all non-Windows platforms. The underlying hosting infrastructure of Portus is provided by an Apache web server, therefore IPv6 configuration changes take place in the Apache configuration.
Further information can be found here
To make Portus listen on the IPv6 interface, provide the IPv6 address of the host machine on the Listen directive in the Apache configuration file. This file is [INSTALL_DIR]/apache2/conf/httpd.conf or [INSTALL_DS].CONF(HT$CONF) depending on your system.
E.g.
More than one Listen directive can be applied, but the ports must be unique
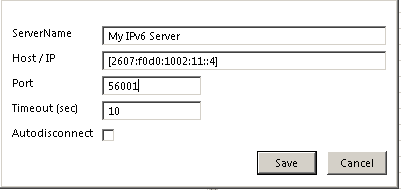
To connect to this server from the Portus Control Centre, add a new server connection with the IPv6 address surrounded by [ and ] and the port number of your server
When Portus handles a request it builds XML structures internally to hold the response payload. This data can become very large, and on systems where memory is limited, unexpected results can occur.
To resolve this, Portus has the ability to stream back data as it is retrieved from the database.
Portus streaming uses HTTP chunked transfer encoding as a transfer mechanism. This is only available in HTTP clients that understand HTTP 1.1 or above.
When data is streamed back to the client, Portus does not have to build large internal strutures to handle the payload, therefore the memory footprint is considerably less.
When streaming is enabled, it only applies when the client issues a LIST request, with all keys wildcarded. E.g. a REST request with LIST&ID=*
Streaming can be enabled by adding the following line in the Apache configuration
SoaGatewayStreaming on
And stopping and starting the server
This directive can also be applied to specific services using the <Location /SERVICENAME > directive